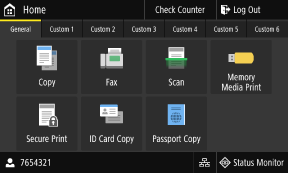
[Home] Screen
This screen is displayed when you press [ ] on the control panel.
The status of the machine and the login information are constantly displayed at the top and bottom of the screen for quick viewing and operations, as needed.
The function and setting buttons are displayed on separate tabs in the middle of the screen. Select a tab or flick the screen left or right to change the displayed function and setting buttons. Press these buttons to perform functions and change settings.
You can rearrange the buttons and change the tab names. Rearranging the Buttons and Renaming the Tabs (Remote UI)
* By default, the [General] to [Custom 6] tabs are displayed.
 ] on the control panel.
 The status of the machine and the login information are constantly displayed at the top and bottom of the screen for quick viewing and operations, as needed.
The function and setting buttons are displayed on separate tabs in the middle of the screen. Select a tab or flick the screen left or right to change the displayed function and setting buttons. Press these buttons to perform functions and change settings.
You can rearrange the buttons and change the tab names. Rearranging the Buttons and Renaming the Tabs (Remote UI)
* By default, the [General] to [Custom 6] tabs are displayed.

Status of the Machine and Login Information
[Check Counter]
You can check the total number of printed pages. Checking the Number of Printed Pages (Check Counter)
You can check the total number of printed pages. Checking the Number of Printed Pages (Check Counter)
[Log Out]
This is displayed when the user is logged in. Press this to log out after completing operations on the machine. Logging In to the Machine
This is displayed when the user is logged in. Press this to log out after completing operations on the machine. Logging In to the Machine
[ ]
]
Displays the logged in user name or Department ID.
 ]
]Displays the logged in user name or Department ID.
[ ] / [
] / [ ]
]
When connected to a wired LAN, [ ] is displayed. When connected to a wireless LAN, [
 ] is displayed.
Press this icon to switch between using a wired LAN or wireless LAN to connect the machine to the network. Selecting Wired or Wireless LAN
 ] / [
] / [ ]
]When connected to a wired LAN, [
 ] is displayed. When connected to a wireless LAN, [
 ] is displayed.
Press this icon to switch between using a wired LAN or wireless LAN to connect the machine to the network. Selecting Wired or Wireless LAN
[Status Monitor]
You can check the information of the machine, usage and logs, network settings, and error information. [Status Monitor] Screen
You can check the information of the machine, usage and logs, network settings, and error information. [Status Monitor] Screen
Function and Setting Buttons
 | ||
 | ||
 | ||
 | [Memory Media Print] Prints files from a USB memory device. Printing from a USB Memory Device (Memory Media Print) | |
 | [Secure Print] Prints data temporarily saved in the memory of the machine. Printing a Document Secured with a PIN (Secure Print) | |
 | [ID Card Copy] Copies the front and back sides of ID cards. Copying Both Sides of ID Cards onto One Sheet | |
 | [Passport Copy] Copies multiple passports onto one sheet of paper. Copying Multiple Passports onto One Sheet | |
 | ||
 | [Address Book] Register destinations when sending and saving scanned data and faxes. You can specify destinations from the Address Book, and call up the send function. Registering Destinations (Address Book) Specifying Destinations (Address Book) | |
 | [Paper Settings] Set the paper size and type to use, and register frequently used paper. Specifying the Paper Size and Type | |
 | ||
 | [Home Screen Settings] Add shortcut buttons to the [Home] screen and rearrange the buttons. Customizing the [Home] Screen | |
 | ||
 | [Operation Guide] View the basic operation guide and troubleshooting methods. | |
 | [Wireless LAN Settings] Connects a computer to the machine via a wireless LAN router (access point). Connecting to a Wireless LAN by Searching for a Router (Access Point Setup Method) | |
 | [uniFLOW Online Setup] Installs applications for uniFLOW Online and uniFLOW Online Express. For details about uniFLOW Online and uniFLOW Online Express, see the Canon website. https://global.canon/ | |
 | [Monitoring Service] Perform operations related to the Monitoring Service. To use this service, the machine must be connected to a server providing the service. | |
 | Shortcut Button (Scan) Call up scan settings registered as Favorite Settings. The name of the button varies depending on the setting. Adding Shortcut Buttons | |
 | Shortcut Button (Fax) Call up fax settings registered as Favorite Settings. The name of the button varies depending on the setting. Adding Shortcut Buttons | |
 | Shortcut Button (Copy) Call up copy settings registered as Favorite Settings. The name of the button varies depending on the setting. Adding Shortcut Buttons |
Application Library buttons 
Application Library enables you to perform operations with one touch.
To use this function, you must click [Application Library] on the Portal Page of Remote UI, and configure the application. Portal Page of Remote UI
For more information, see the User's Guide of the Application Library.
Application Library
To use this function, you must click [Application Library] on the Portal Page of Remote UI, and configure the application. Portal Page of Remote UI
For more information, see the User's Guide of the Application Library.
Application Library