Registering Non-standard Size Paper (Custom Paper)
Custom paper is non-standard size paper whose side lengths can be freely defined within the range supported by the machine.
You can register sizes when frequently using specific non-standard size paper. You can call up the paper on the size input screen, saving you the trouble of entering the size.
You can register up to three custom sizes.
You can register sizes when frequently using specific non-standard size paper. You can call up the paper on the size input screen, saving you the trouble of entering the size.
You can register up to three custom sizes.
This section describes how to register the settings using the control panel.
You can also register the settings using Remote UI from a computer. Managing the Machine from a Computer (Remote UI)
You can also register the settings using Remote UI from a computer. Managing the Machine from a Computer (Remote UI)
Touch Panel Model
1
On the control panel, press [Paper Settings] in the [Home] screen. [Home] Screen
2
Press [Register Custom Paper].
The [Register Custom Paper] screen is displayed.
3
Select from [S1] to [S3].
The size is registered to the selected number.
4
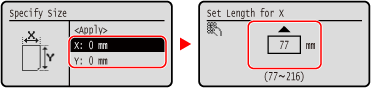
Enter the lengths for [X] and [Y].

Press [Name] to change the display name of [S1] to [S3].
5
Press [Apply].
The custom paper is registered.
Black and White LCD Model
1
On the control panel, select [Paper Settings] in the [Home] screen, and press  . [Home] Screen
. [Home] Screen2
Select [Register Custom Paper], and press .
.The [Register Custom Paper] screen is displayed.
3
Select the registration number, and press .
.If you have selected the registered number, continue on to select [Edit], and press .
.4
Press [X]  enter the values in [X] .
.
5
Enter the values in [Y] in the same way as [X].
6
Select [<Apply>], and press .
.7
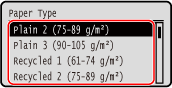
Select the type of the paper, and press .
.
If you frequently need to change the paper to be loaded, set to [Free]; this will reduce the number of steps required to change the setting each time. However, note that this setting lets the machine perform printing even if there is mismatch between the paper type setting in the printer driver and the paper type actually loaded in the machine.
When the paper type setting in the printer driver is [Auto], the machine operates the same way as when the paper type is [Plain 1].
When the paper type setting in the printer driver is [Auto], the machine operates the same way as when the paper type is [Plain 1].
The custom paper is registered.