Configuring SQL Server
This section describes the settings required to use SQL Server as the database of this software.
When SQL Server is running on the same computer as the Manager of this software
Perform the following operations before installing this software.
When SQL Server is running on a different computer from the Manager of this software
Perform the following operations before installing this software.
Installing SQL Server
Install a version of SQL Server supported by this software. Set the instance name and authentication mode of SQL Server during installation.
The procedure for SQL Server 2017 Express is described here.
NOTE |
For details on the versions of SQL Server supported by this software, see the following. This manual describes the procedure for configuring SQL Server using SQL Server Management Studio. Also install SQL Server Management Studio as required. |
1.
Log on to the computer as a user with Administrator privileges.
2.
Execute the installer for SQL Server Express.
3.
Select [Custom] from [Select an installation type].
4.
Specify the destination folder, and click [Install].
[SQL Server Installation Center] is displayed when the download of the installation package is complete.
5.
Click [New SQL Server stand-alone installation or add features to an existing installation].
6.
Follow the wizard to proceed with the installation.
A warning is displayed if Windows Firewall is enabled, but you can proceed with the installation.
7.
Select the functions to install on the [Feature Selection] screen.
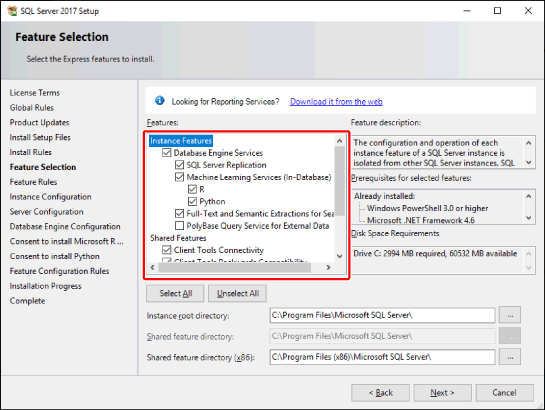
Confirm that the following items are selected.
[Database Engine Services]
[Machine Learning Services (In-Database)] and the functions below it are not required for this software to operate. Deselect them if you do not want to install them.
Other items do not need to be changed from their default values.
Click [Next].
8.
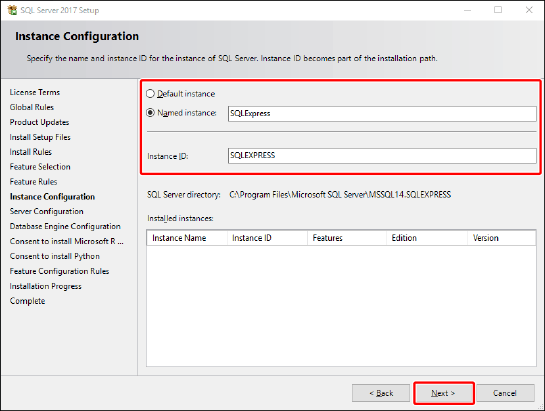
On the [Instance Configuration] screen, configure the instance and click [Next].
NOTE |
When installing this software, enter the instance name configured here. |
9.
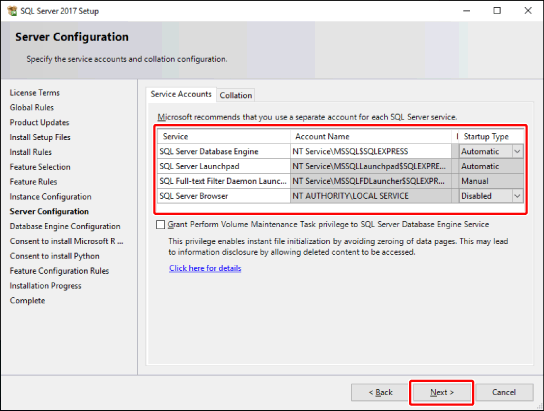
Confirm that the [Service Accounts] tab is displayed on the [Server Configuration] screen as indicated below, and click [Next].
10.
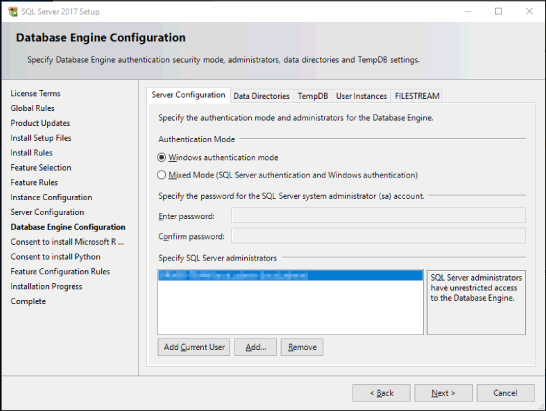
Configure the authentication mode and SQL Server administrator on the [Server Configuration] tab of the [Database Engine Configuration] screen.
IMPORTANT |
When installing SQL Server to a different computer from the Manager of this software, enable SQL Server authentication. |
When using Windows authentication
Select [Windows authentication mode] from [Authentication Mode].
Click [Add] in [Specify SQL Server administrators].
The [Select Users or Groups] dialog box is displayed.
Enter "SYSTEM" in [Enter the object names to select], and click [OK].
The [Database Engine Configuration] screen is displayed again.
Confirm that "NT AUTHORITY\SYSTEM(SYSTEM)" is displayed in [Specify SQL Server administrators].
Click [Next].
When using SQL Server authentication
Select [Mixed Mode (SQL Server authentication and Windows authentication)] from [Authentication Mode].
Enter a password of your choice for the "sa" system manager of SQL Server in [Enter password] and [Confirm password].
Click [Next].
11.
Continue to follow the wizard to proceed with the installation.
12.
When the [Complete] screen is displayed, click [Close].
13.
Restart the computer.
Enabling SQL Server Authentication and Remote Connection
1.
Log on to the computer as a user with administrator privileges for SQL Server.
2.
Start SQL Server Management Studio and connect to the database engine (SQLEXPRESS).
NOTE |
If you cannot connect to the database engine because a TLS certificate error has occurred, one of the following measures is required. Change the server certificate (key) of the computer where SQL Server is installed to a trusted certificate (key) Install the certificate (public key) of the server to the client computer connected to SQL Server Trust the existing server certificate of the computer where SQL Server is installed |
3.
Right-click the database engine, and select [Properties].
4.
Select [Security].
5.
Select [SQL Server and Windows Authentication mode].
6.
Select [Connections].
7.
In [Remote server connections], select [Allow remote connections to this server].
8.
Click [OK].
9.
Right-click the database engine, and select [Restart].
Enabling Connection via TCP
1.
Start the SQL Server configuration manager.
2.
In [SQL Server Network Configuration], select the protocol for SQLEXPRESS.
3.
Enable connection via TCP.
Double-click [TCP/IP].
On the [Protocol] tab, set [Enabled] to [Yes].
On the [IP Addresses] tab, enter "1433" for [TCP Port] in [IPAll].
Click [OK].
4.
Select [SQL Server Services], and restart the SQL Server service.
Starting SQL Server Browser
1.
Start the SQL Server configuration manager.
2.
Select [SQL Server Services].
3.
Right-click [SQL Server Browser], and select [Properties].
4.
On the [Service] tab, set [Start Mode] to [Automatic].
5.
Click [OK].
6.
Start the SQL Server Browser service.
Configuring the Firewall Reception Settings
When the Manager of this software connects to an instance of SQL Server running on another computer, the port configured in "Enabling Connection via TCP" is used (port 1433). This port must be registered to the firewall.
For details, see the instruction manual for your firewall.
Creating the Database and User for This Software
Create a user for logging in to SQL Server and set that user as the owner of the database for this software.
Creating a Login User
1.
Log on to the computer as a user with administrator privileges for SQL Server.
2.
Start SQL Server Management Studio and connect to the database engine (SQLEXPRESS).
NOTE |
If you cannot connect to the database engine because a TLS certificate error has occurred, one of the following measures is required. Change the server certificate (key) of the computer where SQL Server is installed to a trusted certificate (key) Install the certificate (public key) of the server to the client computer connected to SQL Server Trust the existing server certificate of the computer where SQL Server is installed |
3.
Right-click [Security] > [Logins], and select [New Login].
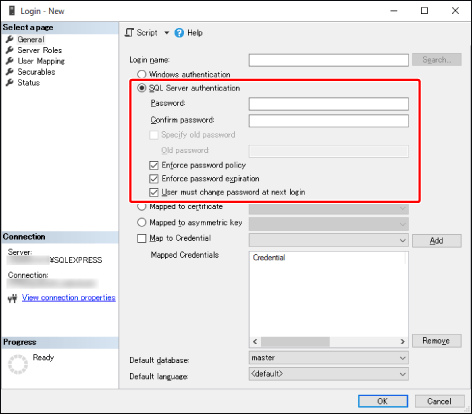
Select [SQL Server authentication].
Set [Password].
Deselect [Enforce password expiration].
Deselect [User must change password at next login].
4.
Click [OK].
Creating the Database for This Software
1.
Start SQL Server Management Studio, and connect to the database engine (SQLEXPRESS).
2.
Right-click [Databases], and select [New Database].
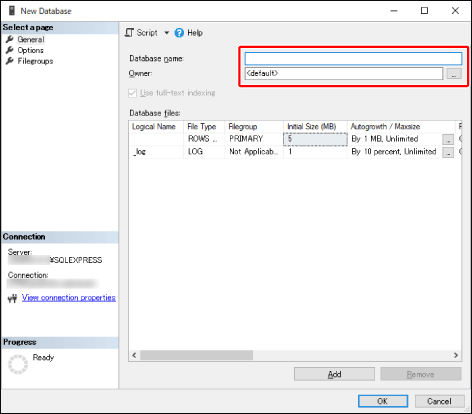
Enter "ManagementConsole" in [Database name].
IMPORTANT |
The name of the database used by this software must be "ManagementConsole." Other names cannot be used. |
In [Owner], specify the login user created in "Creating a Login User."
3.
Click [OK].
Preventing the Computer from Entering the Sleep Mode
When installing this software to a different computer from SQL Server, confirm that the computer where SQL Server is installed is not configured to enter the sleep mode.
1.
Select [Settings] > [SYSTEM] > [Power & sleep] from the Start menu.
2.
Confirm that the computer is not configured to enter the sleep mode.