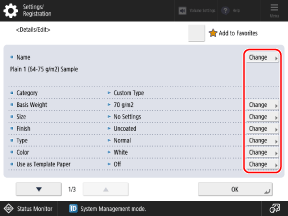
You can press [Change] for each item to change the paper type information.
For C7100 Series, when [Add to Favorites] is selected, the registered custom paper is added to the list of paper types sorted by Favorites on the Paper Type Management Settings screen. Registering Frequently Used Paper Types
[Details/Edit] Screen
The [Details/Edit] screen is displayed when you press [ Settings/Registration]
  [Preferences]
  [Paper Settings]
  [Paper Type Management Settings], select the paper type, and press [Details/Edit].
You can check and change the paper type information on this screen.
 Settings/Registration]
  [Preferences]
  [Paper Settings]
  [Paper Type Management Settings], select the paper type, and press [Details/Edit].
 You can check and change the paper type information on this screen.
* You cannot change the paper type information registered by default.
* You can also check and change the paper type information on the same screen displayed in Remote UI. Managing the Machine from a Computer (Remote UI)
* You can also check and change the paper type information on the same screen displayed in Remote UI. Managing the Machine from a Computer (Remote UI)
For C5100 Series, Administrator or DeviceAdmin privileges are required.

IMPORTANT
If the following information differs from the information of the paper to be actually used, a paper jam or print problem may be caused.
[Basis Weight]
[Finish]
[Type]
[Color]
[Name]
You can change the name of the paper type.
[Basis Weight]
You can change the paper weight.
[Size] (C7100 Series only)
You can set the paper size.
[Finish]
You can change the surface quality of the paper (such as fine paper and recycled paper).
[Type]
You can change the characteristics of the paper (such as tab paper and envelops).
[Color]
You can change the paper color.
[Use as Template Paper]
Set this to [On] when you use paper with a logo or other graphic design.
* The loaded paper with this setting set to [On] will not be selected automatically in the following cases:
When the settings are configured so that the paper type to be used is selected automatically for printing
When [Paper Source Auto Selection] is set to [On], and [Consider Paper Type] is set to [Off], for copying [Paper Source Auto Selection]
* When loading paper with this setting set to On, pay attention to the orientation and which side is face up. Orientation for Loading Paper with a Logo
[2nd Side of 2-Sided Page]
Set this to [On] when you register paper with the back side already printed.
[Adjust Image Position]
You can adjust the print position when the printed images are shifted. Adjusting the Print Position
[Adjust Creep Correction]
You can adjust the amount of creep (shift) correction for each sheet of paper so that the inner pages do not creep out when the layered paper is folded in half.
When you make a saddle stitched booklet using custom paper with [Adjust Creep (Displacement) Correction] performed automatically, the correction is performed according to the correction amount set for this setting.
When you make a saddle stitched booklet using custom paper with [Adjust Creep (Displacement) Correction] performed automatically, the correction is performed according to the correction amount set for this setting.
* For details about [Adjust Creep (Displacement) Correction], see the following:
[Use Paper Separation Fan] (C7100 Series Only)
If you do not want to use the paper separation fan, set this to [Off].
[Adjust Paper Separation Fan Level] (C7100 Series Only)
You can change the air volume of the paper separation fan according to the symptoms of problems that occur. For details on the adjustment method, contact your dealer or service representative.
[-5] to [-1]: When high-density images are not printed evenly or a large amount of curling occurs on the printed paper
[0]: When normal
[1] to [5]: When paper jams occur frequently or when the machine is used in a hot and humid environment
[Adjust Paper Separation Fan Time] (C7100 Series Only)
You can adjust the paper separation fan operation time in seconds.
Press [-] to decrease the fan operation time, and press [+] to increase it.
[Adj. Paper Separation Fan Interval] (C7100 Series Only)
You can adjust the number of sheets for the interval at which the paper separation fan operates.
[Adjust Paper Realignment Speed]
Adjust the paper realignment speed if more roughness occurs in the image compared to when printed on regular paper, or if the color at the trailing edge of the paper is different than when printed on regular paper. For details on the adjustment method, contact your dealer or service representative.
Press [-] if roughness occurs in the printed image.
Press [-] if the color at the trailing edge of the paper is different. If the symptoms do not improve, press [+].
[Adjust Gloss]
Adjust the glossiness of the printed image when using plain paper, coated paper, or other paper.
Press [-] to decrease the glossiness, or press [+] to increase the glossiness.
Adjust the value gradually to avoid problems that may occur when you change the adjustment value significantly.
Depending on the paper, setting a [-] value may cause a fixing or printing error, and setting a [+] value may cause a paper jam.
[Adjust Lead/Tail Margins]
You can adjust the length of the margins at the leading edge and trailing edge according to the feed direction. Printing errors such as uneven glossiness, as well as corner folding and misfeeds, may occur when the margins are small. In such cases, increase the margin length.
[Adjust Secondary Transfer Voltage]
If the overall printed image is lighter in color or distorted compared to when printed on regular paper, you can adjust the secondary transfer voltage (voltage when the image is transferred onto the paper). Adjusting the Transfer Condition of the Printed Image
[Adj. Lead Edge Sec. Transfer Volt.]
If the printed image is lighter in color or distorted only in the leading edge area of the paper according to the feed direction compared to when printed on regular paper, you can adjust the lead edge secondary transfer voltage (voltage when the image is transferred onto the paper).
When you set [Adjustment Level] to a [+] value, the effect on the print problem will be increased. If the set value is too large, white spots may occur in high density areas.
When you set [Adjustment Range] to a [+] value, the adjusted distance from the leading edge of the paper becomes longer (by 1 mm for every "+1").
Making this adjustment may affect the [Correct Tail End Toner Application] and [Adjust Image Position] settings. Readjust those settings, as needed.
[Correct Tail End Toner Application]
If you use curled paper or paper prone to curl during 2-sided printing, white spots or faint colors may occur in the image at the trailing edge area of the paper according to the feed direction. Low density images may also become lighter or deeper in color. If this happens, perform Correct Tail End Toner Application.
When you set [Correction Level] to a [+] value, the effect on the print problem will be increased. If the set value is too large, white spots may occur in high density areas.
When you set [Correction Amount] to a [+] value, the adjusted distance from the trailing edge toward the leading edge of the paper becomes longer (by 1 mm for every "+1").
If the symptoms do not improve even after performing Correct Tail End Toner Application, perform adjustment using [Adjust Secondary Transfer Voltage] or [Adj. Lead Edge Sec. Transfer Volt.]. A certain effect can be expected by making the secondary transfer voltage smaller than the current value, but it may affect images.
[Toner Amount Reduction Mode] (For C7100 Series and C5100 Series)
Set this to [On] if printing errors such as uneven glossiness occur, or if misfeeds or fixing errors occur. This reduces the amount of toner used for printing, which may solve the problem.
The density, color tone, or glossiness may change when this is set to [On], depending on the paper.
Even when this is set to [On], the adjustment values applied to the color levels set for the color balance and other settings are retained while the toner amount is reduced.
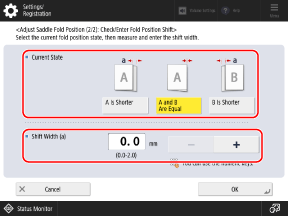
[Adjust Saddle Fold Position]
Adjust the saddle fold position so that it is at the center of the paper.
You can either enter the values directly, or you can print a test page to check the shift amount of the fold position on the test page, and then perform adjustment.
* This item is displayed only on machines with the option installed.
You can either enter the values directly, or you can print a test page to check the shift amount of the fold position on the test page, and then perform adjustment.
* This item is displayed only on machines with the option installed.
When Entering Values Directly

Press [+] to move the fold position to the left, and press [-] to move the fold position to the right.
When Using a Test Page to Check and Adjust the Shift Width of the Fold Position

1
Press [Start]  [Next].
 [Next].
2
Select the paper source with the loaded usable paper, and press [Start Printing].
A test page is printed.
3
Select the current state of the fold position, and adjust the shift width.

Check the current state of the fold position and the shift width on the test page, then select the current state and set the shift width.
4
Press [OK].
5
Press [Start Printing] to print the test page again, and check the adjustment results.
To end the adjustment without printing the test page, press [Done].
6
Press [Done].
If further adjustment is needed, press [Re-Adjust] and repeat Steps 3 to 5.
[Adjust Saddle Stitch Fold Position] and [Change Fold/Stitch Position]
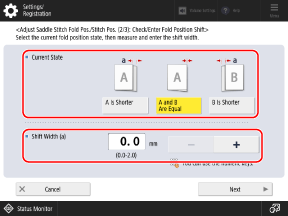
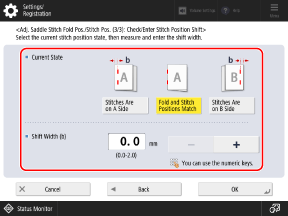
Adjust the saddle stitch fold position or saddle stitch position so that it is at the center of the paper. Use [Adjust Saddle Stitch Fold Position] to adjust the fold position of the paper without changing the staple position, or use [Change Fold/Stitch Position] to adjust both the staple position and the fold position of the paper.
You can either enter the values directly, or you can print a test page to check the shift width of the fold position and stitch position on the test page, and then perform adjustment.
You can either enter the values directly, or you can print a test page to check the shift width of the fold position and stitch position on the test page, and then perform adjustment.
* This item is displayed only on machines with the option installed.
When Entering Values Directly

For [Adjust Saddle Stitch Fold Position], press [+] to move the fold position toward the right of the print side, and press [-] to move the fold position toward the left of the print side.
For [Change Fold/Stitch Position], press [+] to move the saddle stitch position toward the right of the print side, and press [-] to move the saddle stitch position toward the left of the print side.
When Using a Test Page to Check and Adjust the Shift Width of the Fold Position and Stitch Position

1
Press [Start]  [Next].
 [Next].
2
Select the paper source with the loaded usable paper, and press [Start Printing].
A test page is printed.
3
Select the current state of the fold position, and adjust the shift width.

Check the current state of the fold position and the shift width on the test page, then select the current state and set the shift width.
4
Press [Next].
5
Select the current state of the stitch position, and adjust the shift width.

Check the current state of the stitch position and the shift width on the test page, then select the current state and set the shift width.
6
Press [OK].
7
Press [Start Printing] to print the test page again, and check the adjustment results.
To end the adjustment without printing the test page, press [Done].
8
Press [Done].
If further adjustment is needed, press [Re-Adjust] and repeat Steps 3 to 7.
[Adjust Fixing Speed] (For C7100 Series and C5100 Series)
When you use heavy paper, adjust the fixing speed if streaks (lines) appear or if the image is blurred at the trailing edge of the paper according to the feed direction. For details on the adjustment method, contact your dealer or service representative.
* If the conditions do not improve even after pressing [+], press [-].
[Auto Adjust L/R Edge Alignment] (C7100 Series Only)
You can perform adjustment to prevent the printed image from being shifted perpendicular (sideways) to the feed direction. You can set this to [Off] to improve the results when the left edge alignment has shifted or the image position varies greatly on printed paper, bordered paper, or color paper. For details on the adjustment method, contact your dealer or service representative.