Adjusting the Transfer Condition of the Printed Image

If the overall printed image is lighter in color or distorted compared to when printed on regular paper, you can register that paper as a custom paper type and adjust the secondary transfer voltage (voltage when the image is transferred onto the paper). The adjustment results are applied when you specify the paper type and perform printing.
NOTE
When you adjust the transfer condition of the printed image, the print position settings may be affected. Adjusts the print position, as needed. Adjusting the Print Position
Step 1: Registering the Paper Type
Register the paper for which you want to adjust the secondary transfer voltage as a custom paper type. Registering Frequently Used Paper Types
Step 2: Adjusting the Secondary Transfer Voltage
To adjust the secondary transfer voltage, you can either visually check a printed chart to perform the adjustment manually, or you can perform the adjustment automatically by scanning the chart.
Adjusting by Visually Checking the Chart
Print the chart, visually check it, and manually adjust the most appropriate patch.
Use the control panel to adjust the secondary transfer voltage. You can set the adjustment values using Remote UI from a computer, but you cannot print the chart.
For C5100 Series, Administrator or DeviceAdmin privileges are required.
For C5100 Series, Administrator or DeviceAdmin privileges are required.
1
Log in to the machine as an administrator (for C5100 Series). Logging In to the Machine
2
On the control panel, press [ Settings/Registration] in the [Home] screen or other screen.
 Settings/Registration] in the [Home] screen or other screen.
The [Settings/Registration] screen is displayed.
3
Press [Preferences]  [Paper Settings]
  [Paper Type Management Settings].
 [Paper Settings]
  [Paper Type Management Settings].
The [Paper Type Management Settings] screen is displayed.
4
Select the registered custom paper type, and press [Details/Edit].
The [Details/Edit] screen is displayed.
5
Press [Change] of [Adjust Secondary Transfer Voltage].
The screen for selecting the adjustment method is displayed.
Press [Do Not Use Scanner].
The [Adjust Secondary Transfer Voltage] screen is displayed.
7
Press [Chart Print Settings].
The [Chart Print Settings] screen is displayed.
8
Set the voltage range and print side for the chart to be printed, and press [Next].
To make fine adjustments to the secondary transfer voltage, set [Chart Print Type] to [For Fine Adjustment]. A chart with the adjustment values in ± 1 increments is printed.
To make large adjustments, set this to [For Coarse Adjustment]. A chart with the adjustment values in the increments according to the condition of the machine is printed.
To make large adjustments, set this to [For Coarse Adjustment]. A chart with the adjustment values in the increments according to the condition of the machine is printed.
To perform adjustment for both sides of the paper, set [Print Side] to [Both Sides]. Usable Paper for 2-Sided Printing
Set [Print Side] to [Front Side Only] in either of the following cases:
When [2nd Side of 2-Sided Page] is set to [On] for custom paper [Details/Edit] Screen
When paper is loaded in the multi-purpose tray, and [2nd Side of 2-Sided Page] is set on the screen for setting the paper type Setting the Paper Size and Type for the Multi-purpose Tray
9
Select the paper source loaded with the custom paper to be adjusted and press [OK].
The [Adjust Secondary Transfer Voltage] screen is displayed again.
10
Press [Chart Print].
The chart is printed.
11
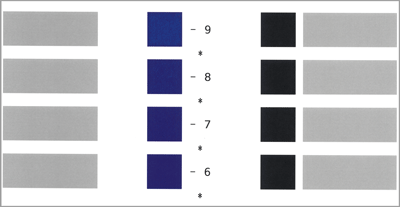
Check the chart, and select the most appropriate patch.

The numeric value printed in magenta is the current set value.
Check the numeric values ascending order from the minus values to plus values, and compare the position where the density seems to be even against the next two values and select the value you consider the most appropriate.
If no difference can be seen among the selected values, select the one in the middle of the three.
If no difference can be seen among the selected values, select the one in the middle of the three.
When the chart is printed on both sides of the paper, select the most appropriate patch separately for the front side and back side. The front side has "*" printed on it, and the back side has "**" printed on it.
Example: When the position where density seems to be even is "-8"
Compare "-8," "-7," and "-6," and select the value you consider the most appropriate.
If you cannot see the difference between these three values, select "-7."
Compare "-8," "-7," and "-6," and select the value you consider the most appropriate.
If you cannot see the difference between these three values, select "-7."
12
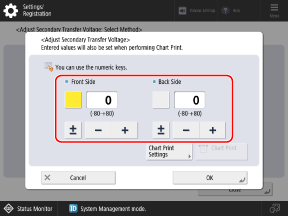
Enter the value checked on the chart.

Press the [Front Side] or [Back Side] button to select it, and then enter the value.
You can press [±] to switch the entered value between positive and negative.
Enter a value for [Back Side] in either of the following cases:
When [2nd Side of 2-Sided Page] is set to [On] for custom paper [Details/Edit] Screen
When paper is loaded in the multi-purpose tray, and [2nd Side of 2-Sided Page] is set on the screen for setting the paper type Setting the Paper Size and Type for the Multi-purpose Tray
13
Press [OK]  [Close].
 [Close].
The adjustments are applied.
Adjusting Automatically by Scanning the Chart
Print the chart, and then scan the chart to automatically adjust the most appropriate patch.
Use the control panel to perform automatic adjustment. You cannot perform automatic adjustment using Remote UI from a computer.
For C5100 Series, Administrator or DeviceAdmin privileges are required.
For C5100 Series, Administrator or DeviceAdmin privileges are required.
1
Log in to the machine as an administrator (for C5100 Series). Logging In to the Machine
2
On the control panel, press [ Settings/Registration] in the [Home] screen or other screen. [Home] Screen
 Settings/Registration] in the [Home] screen or other screen. [Home] Screen
The [Settings/Registration] screen is displayed.
3
Press [Preferences]  [Paper Settings]
  [Paper Type Management Settings].
 [Paper Settings]
  [Paper Type Management Settings].
The [Paper Type Management Settings] screen is displayed.
4
Select the registered custom paper type, and press [Details/Edit].
The [Details/Edit] screen is displayed.
5
Press [Change] for [Adjust Secondary Transfer Voltage].
The screen for selecting the adjustment method is displayed.
6
Press [Use Scanner].
The [Adjust Secondary Transfer Voltage] screen is displayed.
7
Press [Chart Print Settings].
The [Chart Print Settings] screen is displayed.
8
Set the chart type and print side for the chart to be printed, and press [Next].
To make fine adjustments to the secondary transfer voltage, set [Chart Print Type] to [For Fine Adjustment]. A chart with the adjustment values in ± 1 increments is printed.
To make large adjustments, set this to [For Coarse Adjustment]. A chart with the adjustment values in the increments according to the condition of the machine is printed.
To make large adjustments, set this to [For Coarse Adjustment]. A chart with the adjustment values in the increments according to the condition of the machine is printed.
To perform adjustment for both sides of the paper, set [Print Side] to [Both Sides]. Usable Paper for 2-Sided Printing
Set [Print Side] to [Front Side Only] in either of the following cases:
When [2nd Side of 2-Sided Page] is set to [On] for custom paper [Details/Edit] Screen
When paper is loaded in the multi-purpose tray, and [2nd Side of 2-Sided Page] is set on the screen for setting the paper type Setting the Paper Size and Type for the Multi-purpose Tray
9
Select the paper source loaded with the custom paper to be adjusted, and press [OK].
The [Adjust Secondary Transfer Voltage] screen is displayed again.
10
Press [Chart Print/Scan].
The [Chart Print/Scan] screen is displayed.
11
Press [Start Printing].
The chart is printed.
12
Scan the chart to perform adjustment.
Depending on the paper type, the location where to place the chart may be restricted to the platen glass.
When Using the Feeder to Scan

1
Follow the instructions on the screen to load the chart in the feeder.
2
Press [Start Scanning].
The chart is scanned, and adjustment is performed.
When adjustment is complete, [Adjustment is complete.] is displayed.
When adjustment is complete, [Adjustment is complete.] is displayed.
When Using the Platen Glass to Scan

1
Open the feeder.
2
Follow the instructions on the screen to place the chart on the platen glass.
3
Gently close the feeder.
4
Press [Start Scanning].
The chart is scanned.
When adjustment is complete, [Adjustment is complete.] is displayed.
When adjustment is complete, [Adjustment is complete.] is displayed.
* When the chart is printed on both sides of the paper, follow the instructions on the screen to place the chart on the platen glass again, and press [Start Scanning].
5
Remove the chart from the platen glass.
13
Press [OK]  [Close].
 [Close].
The adjusted settings are applied.
NOTE
You may not be able to perform scanning (automatic adjustment) when using special paper such as Pre-Punched, Transparency, Labels, or Color paper. In this case, adjust manually. Step 1: Registering the Paper Type
* Print the chart again according to the manual adjustment procedure.
* Print the chart again according to the manual adjustment procedure.