Printing on Envelopes from the Multi-Purpose Tray
Use the procedure below to print on envelopes. Envelopes can be printed only on the front side (non-glued side).
Step 1: Loading Envelopes in the Multi-purpose Tray
Load envelopes in the multi-purpose tray while paying attention to the orientation and side of the envelopes. Orientation for Loading Envelopes (Multi-purpose Tray)
Step 2: Setting the Paper Size and Type
Set the paper size and type according to the loaded envelopes. Setting the Paper Size and Type for the Multi-purpose Tray
Step 3: Printing from a Computer
Use the printer driver of the computer to correctly set the paper size of the paper source and document and the paper size to print, and then perform printing.
When Using Windows
1
On your computer, open the document you want to print.
2
From the menu in the application used to open the document, select the print command.
3
Select the printer driver of the machine, and click [More settings] or [Properties].
The [Printing preferences] screen of the printer driver is displayed.
4
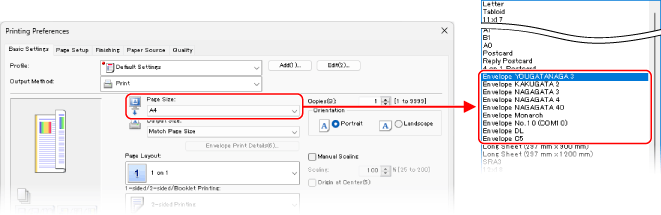
In [Page Size] on the [Basic Settings] tab, select the size of the envelope.
The [Information] screen is displayed.
5
Click [Yes].
The [Print Envelope] screen is displayed.
6
Check the paper settings and the orientation of the print data, and click [Next].
7
Click [Finish].
8
In [Paper Source] and [Paper Type] on the [Paper Source] tab, select the multi-purpose tray and envelope.
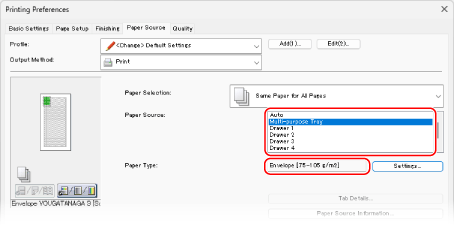
In [Paper Source], select [Multi-purpose Tray].
In [Paper Type], select [Envelope].
9
Click [OK], and click [Print] or [OK].
Printing starts.
When Using macOS
1
On your computer, open the document you want to print.
2
From the menu in the application, select the print command.
The printing dialog box is displayed.
3
In [Printer], select the printer driver of the machine.
4
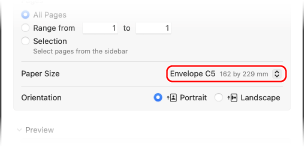
In [Paper Size], select the size of the loaded envelopes.
5
Click [Printer Options]  [Paper Source].
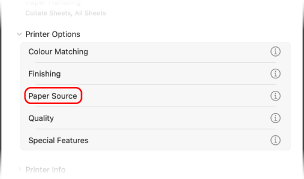
6
In [Paper Source], select [Multi-purpose Tray].
7
In [Paper Type], click [Settings], select the envelope, and click [OK].
8
Click [OK], and click [Print].
Printing starts.