
Basic Paper Loading Method
This section describes the general method for loading paper such as plain or recycled paper. Load frequently used paper types or sizes in the paper drawer. When temporarily using paper that is not loaded in the paper drawer, load it in the multi-purpose tray.
 |
For the optional Paper Feeder PF-L, follow the procedure in Loading Paper in the Paper Drawer. The available paper sizes may differ for the paper drawer of the main unit and the optional Paper Feeder PF-L. For more information, see Available Paper. If there are instructions on the paper package about which side of the paper to load, follow those instructions. Paper may overlap when it is fed or a paper jam may occur, depending on the cut surface of the paper. Changing the paper orientation and loading it again may reduce the effect of the cut surface. If paper runs out and printing is stopped, load a new paper stack. Printing restarts after the new paper stack is loaded. |
Loading Paper in the Paper Drawer
Paper Orientation and Adjustment of Paper Drawer Length
The sizes of paper that can be loaded and their correct orientation are indicated below. For the main unit paper drawer, it is necessary to adjust the paper drawer length according to the paper to load.
Orientation | Paper | Length of Main Unit Paper Drawer |
 (Portrait orientation) | A4 (portrait), B5 (portrait), A5 (portrait), A6, B6 | Needs to be extended.*1 |
Ledger, Legal, Letter (portrait), Statement, Executive (portrait) | ||
Oficio, Ecuador-Oficio, Brazil-Oficio, Mexico-Oficio, Argentina-Oficio, Argentina-Letter (portrait), Government-Letter (portrait), Government-Legal, Australia-Foolscap, Foolscap/Folio, F4A, Indian-Legal | ||
8K, 16K (portrait), Custom (portrait)*2, Free (portrait)*2 | ||
 (Landscape orientation) | A4 (landscape), B5 (landscape), A5 (landscape) | Needs to be shortened. |
Letter (landscape), Executive (landscape) | ||
Argentina-Letter (landscape), Government-Letter (landscape) | ||
16K(landscape), Custom (landscape)*3, Free (landscape)*3 |
*1 The paper drawer of the main unit needs to be extended when loading A3, B4, 8K, Ledger, or Legal size paper. *2 When the length exceeds 297 mm *3 When the length is 297 mm or less |
 |
Follow the procedure below also when loading paper in the optional Paper Feeder PF-L. |
Loading Standard Size Paper
To load paper whose size is found in the paper size markings on the paper drawer, use the following procedure. For paper whose size is not found in the paper size markings, see Loading Custom Size Paper.
1
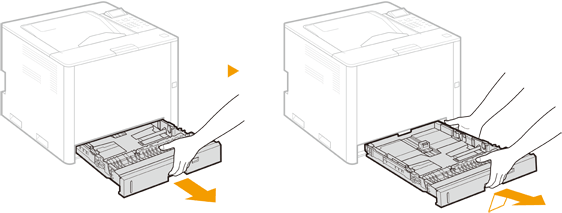
Pull out the paper drawer, and lift up the front side to remove it.
2
When loading paper in the main unit paper drawer, adjust the length of the paper drawer as required.
 Adjusting the Length of the Paper Drawer
1 | Align the slide switch with  . .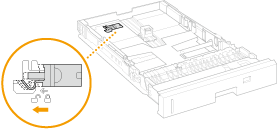 |
2 | Hold the back end of the paper drawer and slide the paper drawer. Slide the paper drawer until the slide switch returns to the  position. position.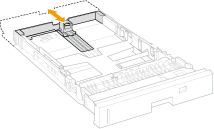 |
3
Align the paper guides with the paper size to load.
Align the protrusion ( ) with the mark of the paper size to load, while squeezing the unlock lever (
 ).
).
 ) with the mark of the paper size to load, while squeezing the unlock lever (
 ).
).
 Using A5/A6 Size Paper with the Paper Feeder PF-L
1 | Remove the attachment stored at the back of the paper drawer.  |
2 | Attach the attachment to the specified location of the Paper Feeder PF-L. 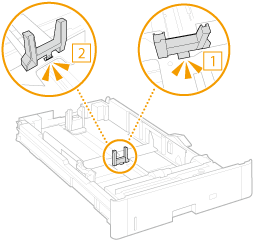 |
4
Load the paper against the paper guide on the far side.
Load the paper with the print side face up.
Fan the paper stack well, and align the edges on a flat surface before loading the paper.
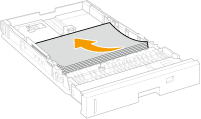

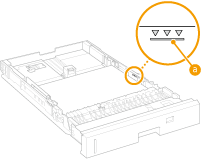
Load the paper so that it does not exceed the loading limit marks.
Ensure that the line of the loading limit marks ( ) are not exceeded when loading the paper. Doing so may cause paper feed problems.
Ensure that the line of the loading limit marks (
 ) are not exceeded when loading the paper. Doing so may cause paper feed problems.

For instructions on loading paper with a logo, see Loading Preprinted Paper.
5
Set the paper selection lever according to the loaded paper.
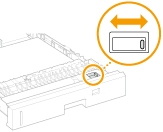
Paper Size | Position of the Paper Selection Lever | |
Paper Drawer of Main Unit | Paper Feeder PF-L | |
A3, A4, A5, B4, B5 |  |  |
Ledger, Legal, Letter, Foolscap/Folio, 16K, Custom |  |  |

To set a paper size other than the above, set the paper selection lever to the same direction as Custom, turn the dial to Custom, then specify the actual paper size on the control panel. Available Paper
6
Rotate the paper size dial to match the size of the loaded paper.
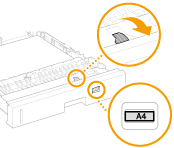

For the A4/B5/A5/Letter/Executive/16K Size
A4, B5, A5, Letter, Executive, and 16K size paper can be loaded both horizontally and vertically. See the table below to set the dial to match the proper paper size according to the orientation of the paper.
A4, B5, A5, Letter, Executive, and 16K size paper can be loaded both horizontally and vertically. See the table below to set the dial to match the proper paper size according to the orientation of the paper.
Paper Size | Orientation | Setting |
A4, B5, A5, 16K |  * *(Portrait orientation) | A4 |
 (Landscape orientation) | A4, B5, A5, 16K | |
Letter, Executive |  * *(Portrait orientation) | LTR |
 (Landscape orientation) | LTR, EXEC |
* Perform printing after selecting [Feed Custom Paper Vertically] on the [Paper Source] tab of the printer driver. |
7
Insert the paper drawer into the main unit.
Insert the paper drawer at an angle, then push it in horizontally.
»

When changing the paper size or type
If you load a different size or type of paper into the machine, make sure to change the setting. If you do not change the paper size or type setting, the machine cannot print properly.
 Printing on the back side of printed paper (2nd Side of 2-Sided Page)You can print on the back side of printed paper. Flatten any curls on the printed paper and insert it into the multi-purpose tray, with the side to print face up (previously printed side face down). Then select the paper type and select <Yes> for <Enable settings for 2nd side of 2-sided page?>. Use only the paper printed with this machine. You cannot print on the side that has previously been printed on. |
Loading Custom Size Paper
To load custom size paper or other paper for which size is not found in the paper size markings on the paper drawer, use the following procedure.
1
Pull out the paper drawer, and lift up the front side to remove it.

2
When loading paper in the main unit paper drawer, adjust the length of the paper drawer as required.
 Adjusting the length of the paper drawer
1 | Align the slide switch with  . . |
2 | Hold the back end of the paper drawer and slide the paper drawer. Slide the paper drawer until the slide switch returns to the  position. position. |
3
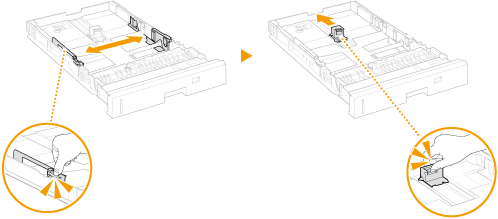
Slide the paper guides apart.
Move the paper guides outwards while squeezing the unlock levers.
4
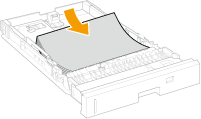
Load the paper against the front of the paper drawer.
Load the paper with the print side face up.
Fan the paper stack well, and align the edges on a flat surface before loading the paper.

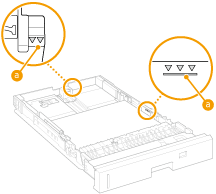
Load the paper so that it does not exceed the lines of the loading limit marks.
Ensure that the lines of the loading limit marks ( ) are not exceeded when loading the paper. Doing so may cause paper feed problems.
 ) are not exceeded when loading the paper. Doing so may cause paper feed problems.

For instructions on loading paper with a logo, see Loading Preprinted Paper.
5
Align the paper guides with the paper.
Align the paper guides exactly with the paper while squeezing the unlock levers.
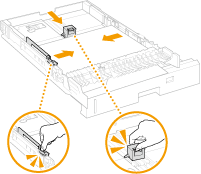

Align the paper guides exactly with the paper.
If the guides are too loose or too tight, the paper may not be sent correctly or paper jams may occur.
6
Switch the paper selection lever and align the paper size dial to "Custom".

7
Insert the paper drawer into the main unit.
Insert the paper drawer at an angle, then push it in horizontally.
»

When changing the paper size or type
If you load a different size or type of paper into the machine, make sure to change the settings. If you do not change the paper size or type setting, the machine cannot print properly.
 Printing on the back side of printed paper (2nd Side of 2-Sided Page)You can print on the back side of printed paper. Flatten any curls on the printed paper and insert it into the multi-purpose tray, with the side to print face up (previously printed side face down). Then select the paper type and select <Yes> for <Enable settings for 2nd side of 2-sided page?>. Use only the paper printed with this machine. You cannot print on the side that has previously been printed on. |
Loading Paper in the Multi-Purpose Tray
 |
To print on paper loaded in the multi-purpose tray, change the paper source setting as required. |
Paper Orientation
See the table below to load available paper in correct orientation.
Orientation | Paper |
 (Portrait orientation) | A3, B4, A4 (portrait), B5 (portrait), A5 (portrait), A6, B6 |
Ledger, Legal, Letter (portrait), Statement (portrait), Executive (portrait) | |
Oficio, Ecuador-Oficio, Brazil-Oficio, Mexico-Oficio, Argentina-Oficio, Argentina-Letter (portrait), Government-Letter (portrait), Government-Legal, Australia-Foolscap, Foolscap/Folio, F4A, Indian-Legal, 3x5 inch | |
8K, 16K (portrait), Custom Size (portrait), Long Sheet, Free Size (portrait), Postcard, Reply Postcard, Envelope | |
 (Landscape orientation) | A4 (landscape), B5 (landscape), A5 (landscape) |
Letter (landscape), Statement (landscape), Executive (landscape), Argentina-Letter (landscape), Government-Letter (landscape) | |
16K (landscape), Custom Size (landscape), Free Size (landscape), 4 on 1 Postcard |
1
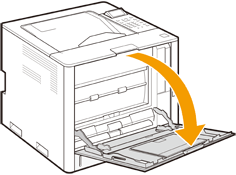
Open the multi-purpose tray.
2
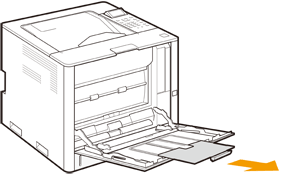
Pull out the tray extension.
Pull out the tray extension when loading large size paper.
3
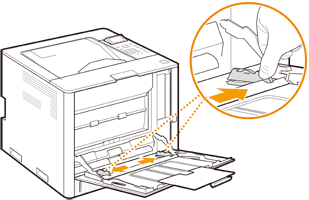
Slide the paper guides apart.
Slide the paper guide outwards.
4
Insert the paper in until it stops.
Insert the paper with the print side face down.
Fan the paper stack well, and align the edges on a flat surface before loading the paper.


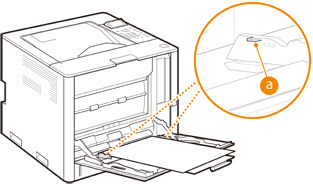
Load the paper so that it does not exceed the loading limit guides.
Ensure that the loading limit guides ( ) are not exceeded when loading the paper. Doing so may cause paper feed problems.
 ) are not exceeded when loading the paper. Doing so may cause paper feed problems.

When loading envelopes, postcards, or paper with a logo mark, take care with the orientation of the envelopes, postcards, or paper.
5
Align the paper guides with the paper.
Move the paper guides inwards to align them exactly with the width of the paper.
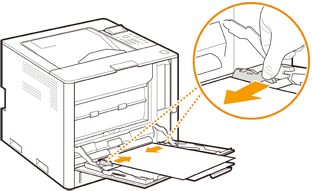

Align the paper guides exactly with the width of the paper.
If the guides are too loose or too tight, the paper may not be sent correctly or paper jams may occur.
»

When changing the paper size or type
If you load a different size or type of paper into the machine, make sure to change the setting. If you do not change the paper size or type setting, the machine cannot print properly.
 |
Printing on the back side of printed paper (2nd Side of 2-Sided Page)You can print on the back side of printed paper. Flatten any curls on the printed paper and insert it into the multi-purpose tray, with the side to print face down (previously printed side face up). Then select the paper type and select <Yes> for <Enable settings for 2nd side of 2-sided page?>. Use only the paper printed with this machine. You cannot print on the side that has previously been printed on. |