
Changing Login Services
The application to implement user authentication is called the "Login Service." The machine is set to use "User Authentication (personal authentication management)" for the login service by default. To use a login service other than User Authentication, change the login service in SMS.
Changing the Login Service
1
Log in to the Remote UI. Starting the Remote UI
2
Click [Service Management Service] on the portal page.
3
Click [Start] for [SMS Installer Service (Password Authentication)] in [System Application Management], as required.
The status becomes [Started].
4
Click [Enhanced System Application Management]  [Switch] for the login service to use.
The status becomes [Start after Restart].
5
Restart the machine. Restarting the Machine
The machine restarts and the changed settings are reflected.
Settings when Using a Login Service Other Than User Authentication
When using Department ID Management with a login service other than User Authentication, make sure that the administrator (System Manager) manages the Department IDs and PINs. To enhance security, make sure to log in with the System Manager ID immediately after starting to use the login service other than User Authentication and change the System Manager ID and PIN.
Which users become administrator or general users depends on whether Department ID Management and System Manager Settings are set, as indicated in the table below.
Which users become administrator or general users depends on whether Department ID Management and System Manager Settings are set, as indicated in the table below.
Department ID Management | System Manager Settings | Administrator | General Users |
On | Set | System Manager | Users authenticated with a Department ID and PIN not for the System Manager |
Not Set | Users authenticated with a Department ID and PIN | None | |
Off | Set | System Manager | Users other than the System Manager |
Not Set | All users | None |
Changing the System Manager ID and PIN
1 | Select <Set> on the <Home> screen. <Home> Screen |
2 | Enter the ID and PIN in <System Manager ID> and <System Manager PIN>, and press  . .Immediately after the login service has started, both the System Manager ID and PIN are set as "7654321." You cannot register a Department ID or PIN consisting only of 0s, such as "00" or "0000000". Even if you enter fewer than seven digits, zeros are added to the start of the number, and a seven digit number is set. However, the zeros at the start of the number can be omitted when logging in. For example, even if you enter <2>, <02>, or <002>, the PIN is set as <0000002>. However, you can log in by entering <2>, <02>, or <002>. |
3 | Select <Management Settings> |
4 | Enter the necessary information and press  . .Enter the same PIN again for confirmation, and press . |
Enabling Department ID Management
To enable Department ID Management, you need to register the Department ID and PIN.
1 | Start the Remote UI. Starting the Remote UI |
2 | Select [Settings/Registration] |
3 | Select [Enable Department ID Management], and click [OK]. If you want to manage only with the System Manager ID and PIN without implementing Department ID Management, deselect [Enable Department ID Management].  If you want to return the login service to User Authentication and use Department IDs, follow the procedure below to enable Department ID Management. 1 Deselect [Enable Department ID Management] for the login service other than User Authentication. 2 Start User Authentication. 3 Assign Department IDs to users. 4 Select [Enable Department ID Management] for User Authentication. |
4 | Click [Register New Department]. |
5 | Enter the ID and PIN in [Department ID] and [PIN], and click [OK]. Enter the same PIN again in [Confirm] for confirmation. You cannot register a Department ID or PIN consisting only of 0s, such as "00" or "0000000". Even if you enter fewer than seven digits, zeros are added to the start of the number, and a seven digit number is set. However, the zeros at the start of the number can be omitted when logging in. For example, even if you enter <2>, <02>, or <002>, the PIN is set as <0000002>. However, you can log in by entering <2>, <02>, or <002>. If you do not set a PIN, you can use the machine by entering only the Department ID. |
Login Operation When Department ID Management is Enabled
When Department ID Management is enabled, you need to log in to use the machine.
Logging in from the control panel
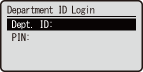
Enter the ID and PIN in <Department ID> and <PIN> press .
.

Logging in from the Remote UI
The login method may differ from that for Department ID Management, depending on the login service you are using. For details, see the instruction manual for the login service.
Implementing Function Restrictions and User Management
Configure the settings as necessary.
Checking page totals
Start the Remote UI select [Settings/Registration] [User Management] [Department ID Management] check the counter information.
Setting the maximum number of pages for print
Start the Remote UI select [Settings/Registration] [User Management] [Department ID Management] select the Department ID select [Total Prints] for [Page Limit] enter the total page count click [OK].
Deleting Department IDs
Start the Remote UI select [Settings/Registration] [User Management] [Department ID Management] click [Delete] for the Department ID to delete.
Blocking printer jobs when Department ID is unknown
Start the Remote UI select [Settings/Registration] [User Management] [Department ID Management] [Edit] deselect [Allow Printer Jobs with Unknown IDs] click [OK].