Paper Type Management Settings
You can register and edit detailed information of frequently used paper types as the [Custom Type].
To register a new paper type, first duplicate the paper type that resembles the new type in order to copy all of the internal operational parameters. This procedure copies the suitable settings to the new paper type from the registered custom paper easily.
You can also improve printing quality and paper feeding trouble by editing the custom paper, depending on the characteristics.
 |
It is necessary to log in as an administrator to register custom paper types or change the settings of registered custom paper types. Logging into the Machine When you register the custom paper type, you cannot specify the paper source. For more information on registering the paper source, see Specifying Paper Size and Type in the Paper Drawer. You can import/export the registered custom paper type information, and share it with another Canon machine. Importing/Exporting All Settings |
Registering frequently used paper types
1
Start the Remote UI. Starting the Remote UI
2
Click [Settings/Registration] on the Portal page. Remote UI Screen
3
Click [Paper Settings]  [Paper Type Management Settings].
 [Paper Type Management Settings].
4
Select the paper type to edit.

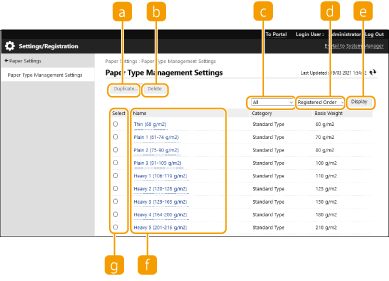
 [Duplicate]
Duplicates the paper type selected in [Select] as a custom paper type.
 [Delete]
Deletes the paper type selected in [Select].

Only paper types with [Custom Type] displayed for [Category] can be deleted.
 Paper type drop-down list
Enables you to select the paper type to display.
 Sort List By
Enables you to change the display order of the list.
 [Display]
Switches the list display to the items selected in  and
and  .
.
 and
and  .
. [Name]
Displays [Paper Details] when you click the paper type displayed in [Name]. If you select a custom paper type, you can edit it.
 [Select]
Select a paper type to duplicate or delete.
5
Select [Edit] and configure the various settings.

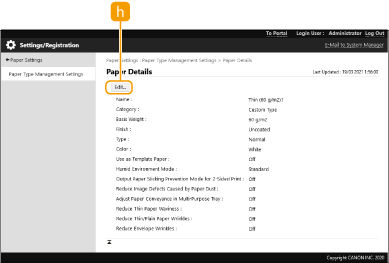
 [Edit]
Appears on the [Paper Details] screen for the custom paper type and enables you to change the settings for the selected item.

Only paper types with [Custom Type] displayed for [Category] can be edited.
6
Click [OK] .
Items that can be specified
The following items can be specified.
[Name]
You can change the name of the custom paper type.
 |
When you register the settings for the custom paper type, make sure to change its name. You cannot change the settings of the default paper types registered in the machine. |
[Basis Weight]
You can change the basis weight of the custom paper type.
 |
If you enter a value that is different from the actual weight of the set paper, paper jams may occur, and the quality of the image may be adversely affected. |
[Finish]
You can change the Finish setting of Custom Type you have registered.
 |
If you select a finishing type which is different from that of the loaded paper, paper jams may occur, and the quality of the image may be adversely affected. |
[Type]
You can change the Type setting of Custom Type you have registered.
 |
If you select a paper type which is different from that of the loaded paper, paper jams may occur, and the quality of the image may be adversely affected. |
[Color]
You can change the color of the custom paper type.
 |
If you select a color which is different from that of the loaded paper, paper jams may occur, and the quality of the image may be adversely affected. |
[Use as Template Paper]
You can select [Use as Template Paper] to use preprinted paper (paper which has logos already printed on it), such as a letterhead.
 |
Methods for loading paper if [Use as Template Paper] is selected: Paper source other than the multi-purpose tray: the side with a logo facing down Multi-purpose tray: the side with a logo facing up |
[Reduce Ghosting]
Select this check box if afterimages appear on areas that are not printed. This setting may solve the problem.
 |
If this setting is enabled, printing may become faint because insufficient toner is fixed. |
[Reduce Toner Flaking]
You can reduce image quality problems that occur due to an inappropriate fixing assembly temperature by adjusting the fixing temperature.
 |
Set this in the following cases. The print results may be improved. [Mode 1]: Set this when the toner of the printed images peels off or afterimages appear on areas that are not printed. [Mode 2]: Set this when the improvements of [Mode 1] are insufficient. This may improve the print results. Set [Off] to not use either setting. Toner peeling and afterimage problems may be able to be solved without changing this setting, if you change the paper type and usage environment. |
[Humid Environment Mode]
Print problems may occur due to humidity in the environment of the machine or the properties of the paper. This setting may solve the problem.
 |
Set this in the following cases. The print results may be improved. [High Humidity]: Set this if printing is faint or some parts of images are left white when using the machine in a high humidity environment. [Low Humidity 1]: Set this if some parts of images are left white when using the machine in a low humidity environment. [Low Humidity 2]: Set this if printing is faint or some parts of images are left white when using the machine in a low humidity environment. Set [Standard] to not use either setting. |
[Adjust Paper Separation in Fixing Area]
If paper jams occur around the fixing assembly, this setting may solve the problem.
 |
If selecting [Mode 1] does not improve the problem, select [Mode 2]. |
[Adjust Paper Conveyance in Multi-Purpose Tray]
If feeding problems occur when feeding from the multi-purpose tray, this setting may solve the problem.
 |
When selected, the print speed may be slower. |
[Correct Paper Wrinkle]
If wrinkles appear in B5 or smaller paper, this setting may solve the problem.
 |
When selected, printing may be faint. If wrinkles appear in paper larger than B5, set <Mode 2> to <On> in <Curl Prevention Mode>. |
[Correct Rough Paper Void]
Printing may be faint when paper with a rough surface is used. This setting may solve the problem.
 |
When selected, the image quality may vary. |
[Correct Fixing (Envelope)]
Select this check box if toner peels when printing on envelopes. This setting may solve the problem.