Preparations Required Before Use
Follow the procedure below to set up the machine.
Step 1: Configuring the Basic Settings
When the power of the machine is turned ON for the first time, the Setup Guide starts on the control panel. Follow the instructions on the screen to configure the initial settings of the machine.
1
Specify the display language.
2
Set the time zone.
3
Specify the date and time.
Step 2: Configuring the Security Settings
Set an administrator password to increase the security of the machine.
 |
Make sure that you do not forget your password. If you forget your password, contact your dealer or service representative. |
1
Check the message, and press  .
.
 .
.2
Select <Yes>.
If you do not want to set a password, select <No> and proceed to Step 3: Configuring the Network Settings.
3
Enter the password, and select <Apply>.
Enter the same password again, and select <Apply>.
4
Check the message, and press  .
.
 .
.Step 3: Configuring the Network Settings
Configure the settings for connecting the machine to a network. Confirm that the computer and router are connected to the network correctly.
For a Wired LAN
1
Select <Wired LAN>.
2
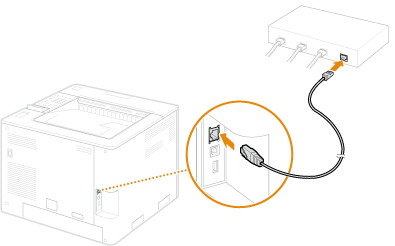
Connect the LAN cable.

It is necessary to specify an IP address to connect the machine to the network. For more information, see Setting an IP Address.
For a Wireless LAN
This section describes the method for configuring SSID settings as an example. For information on other methods, see Connecting to a Wireless LAN.
1
Check the "SSID" and "network key" of the router. Checking the SSID and Network Key

2
Select <Wireless LAN>.
3
Check the message, and press  .
.
 .
.4
Select <SSID Settings>.
5
Select <Select Access Point>.
6
Select the wireless LAN router that matches the SSID you checked in step 1.
If the message <Apply settings of IEEE 802.1X Settings to the connection?> is displayed, select <Yes>, and proceed to step 8.
7
Enter the network key you checked in step 1, and select <Apply>.
8
Select <Yes>.
When the connection is complete, the <Home> screen is displayed.
It is necessary to specify an IP address to connect the machine to the network. For more information, see Setting an IP Address.
For information on using the machine safely, also see Preventing Unauthorized Access.
Step 4: Installing the Software/Driver
The software/driver can be downloaded from the Canon website (https://asia.canon/support).
Example search: LBP468x download
Example search: LBP468x download
For information on the compatibility between the latest drivers and operating systems, see the Canon website.
https://global.canon/en/support/
https://global.canon/en/support/
This completes the procedure for setting up the machine.
For information on using the machine, see the corresponding part of this document.
For information on using the machine, see the corresponding part of this document.
 |
Setting from the Remote UIWhen you complete setup for the network environment, you can set up the machine from Remote UI efficiently. Starting the Remote UI Saving setup time by importing data from other machinesIf you have any other Canon multifunction printer and save (export) its registered setup data to a computer beforehand, setup contents such as address book and paper type setting can be immediately used by importing them to the machine. Importing/Exporting the Setting Data |