[PCL] Settings
NOTE |
These settings are applicable only when printing in the PCL mode. |
[Paper Save]
[On], [Off]*
This setting specifies whether to output a blank page when there is no data to print on the page.
[On]
A blank page is not output, thus saving paper.
[Off]
A blank page is output.
NOTE |
Depending on the content of print data, some pages may not be determined as blank even if nothing is drawn on the print area of those pages. |
[Orientation]
[Portrait]*, [Landscape]
This setting enables you to set the paper orientation.
[Portrait]
The print image is printed in portrait orientation regardless of the orientation of the paper in the paper drawers.

[Landscape]
The print image is printed in landscape orientation regardless of the orientation of the paper in the paper drawers.

[Font Source]
[Internal]*, [Soft/External]
You can set the font source. [Soft/External] is displayed only when soft font or External font is installed.
[Font Number]
0 to 104; 0* (If the [Font Source] setting is [Internal].)
1 to 999; 1* (If the [Font Source] setting is [Soft/External].)
1 to 999; 1* (If the [Font Source] setting is [Soft/External].)
You can set the default font typeface for this printer function using the corresponding font numbers. Valid font numbers are from 0 to 104 if the [Font Source] setting is [Internal]. If the [Font Source] setting is [Soft/External], the maximum range of the value is from 1 to 999 and the available range is affected by the amount of external fonts installed.
[Point Size]
4.00 to 999.75 point (in increments of 0.25 points); 12.00* point
If the number selected in [Font Number] is that of a proportionally spaced scalable font, this option appears in the PCL menu. It enables you to specify a point size for the default font. The point size can be adjusted in increments of 0.25 points.
NOTE |
This mode is available if a value from '1' to '78' is specified for [Font Number]. |
[Pitch]
0.44 to 99.99 cpi (in increments of 0.01 cpi); 10.00* cpi
If the number selected in [Font Number] is that of a fixed pitch scalable font, [Pitch] appears in the PCL menu. It enables you to specify the pitch for the default font. The pitch can be adjusted in increments of 0.01 cpi (characters per inch).
NOTE |
This mode is available if a value of '0' or from '79' to '104' is specified for [Font Number]. |
[Form Lines]
5 to 128 lines; 64* lines
This setting enables you to specify the number of lines to be printed on a page. You can specify from 5 to 128 lines.
[Character Code] (Symbol Set)
[ARABIC8], [DESKTOP], [GREEK8], [HEBREW7], [HEBREW8], [ISO4], [ISO6], [ISO11], [ISO15], [ISO17], [ISO21], [ISO60], [ISO69], [ISOCYR], [ISOGRK], [ISOHEB], [ISOL1], [ISOL2], [ISOL5], [ISOL6], [ISOL9], [LEGAL], [MATH8], [MCTEXT], [MSPUBL], [PC8]*, [PC8DN], [PC8GRK], [PC8TK], [PC775], [PC850], [PC851], [PC852], [PC858], [PC862], [PC864], [PC866], [PC1004], [PIFONT], [PSMATH], [PSTEXT], [ROMAN8], [ROMAN9], [VNINTL], [VNMATH], [VNUS], [WIN30], [WINARB], [WINBALT], [WINCYR], [WINGRK], [WINL1], [WINL2], [WINL5]
This setting enables you to select the symbol set most suited to the needs of the host computer.
[Custom Paper]
[On], [Off]*
This setting enables you to specify a custom paper size. If you select [On], you can enter a custom size.
You can only select the custom paper size entered with settings from the printer driver.
[Unit of Measure]
[Millimeters]*, [Inches]
This setting enables you to specify the unit of measurement you would like to use to specify your custom paper size.
[X dimension]
For information on the setting values displayed, see "User's Guide."
This setting enables you to specify the X dimension of the custom paper.
This mode can be very useful when part of the printed image is cut off. Increasing this dimension may allow some of the missing text to be correctly printed. Make sure you do not increase the X dimension beyond the actual size of the paper you are using for printing.
[Y dimension]
For information on the setting values displayed, see "User's Guide."
This setting enables you to specify the Y dimension of the custom paper.
This mode can be very useful when part of the printed image is cut off. Increasing this dimension may allow some of the missing text to be correctly printed. Make sure you do not increase the Y dimension beyond the actual size of the paper you are using for printing.
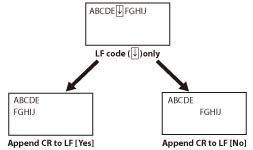
[Append CR to LF]
[Yes], [No]*
This setting enables you to specify whether to append a carriage return (CR) when line feed code (LF) is received.
[Yes]
The print head moves to the beginning of the next line when line feed code is received.
[No]
The print head moves down to the next line when line feed code is received, and the margin does not change (such as to the beginning of the next line).

[Enlarge A4 Print Width]
[On], [Off]*
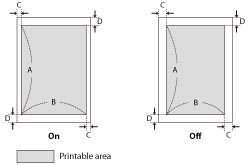
This setting determines whether to expand the printable area of A4 size paper to that of Letter size in width.
[On]
All the area on a page 4.2 mm from the top and bottom edges and 3.4 mm from the left and right edges is available for printing on A4 paper. Only the width increases.
[Off]
All the area on a page 4.2 mm from the top, bottom, left, and right edges is available for printing on A4 paper.

Settings | On | Off |
A: Length | 287.9 mm | |
B: Width | 203.2 mm | 201.5 mm |
C: Left and right edges | 3.4 mm | 4.2 mm |
D: Top and bottom edges | 4.2 mm | |
NOTE |
This setting is applicable for A4 paper only. This setting is applicable for portrait orientation only. |
[Halftones]
[Error Diffusion (600dpi Only)]: [On], [Off]*
[Text]: [Resolution]*, [Gradation]
[Graphics]: [Resolution], [Gradation]*
[Image]: [Resolution], [Gradation]*
This setting specifies how to express halftones.
Settings can be applied separately for text, graphics, and image data.
Settings can be applied separately for text, graphics, and image data.
[Error Diffusion (600dpi Only)]
If you set this to [On], [Text], [Graphics], and [Image] are all set to [Error Diffusion (600dpi Only)] and [Resolution] and [Gradation] cannot be selected.
If you set this to [Off], [Text], [Graphics], and [Image] are not set to [Error Diffusion (600dpi Only)] and [Resolution] and [Gradation] can be selected.
This mode is suitable for printing data with text and thin lines and the curved lines of CAD data, etc.
NOTE |
The stability of the texture and fixed toner may be reduced when this mode is used. |
[Resolution]
A dither pattern that gives priority to the resolution of the images is used. This helps eliminate the appearance of jagged or uneven lines along the edges of objects and is best for printing standard text and graphics.
[Gradation]
A dither pattern that gives priority to the appearance of smooth changes in tone is used. This is best for reproducing images with delicate gradations or changes of tone.
[Matching Method]
[General]*, [Perceptual], [Colorimetric], [Vivid Photo], [Download Profile]
This machine includes a color management system that provides the following color rendering styles.
The settings for this item are linked to the settings for UFR II, Imaging, and XPS.
[General]
This setting produces the best results for general documents such as photos or other documents.
[Perceptual]
This setting produces the best results for bitmapped images. It prints colors closely matching the ones displayed on your monitor.
[Colorimetric]
This setting minimizes the color difference when RGB data is converted to CMYK data.
[Vivid Photo]
This setting provides more saturated and vivid colors than [General].
[Download Profile]
Set this to use profiles downloaded to the machine. Up to 9 profiles can be saved.
NOTE |
This function may not be displayed for some products. |
[Gray Compensation]
[Text]: [On]*, [Off]
[Graphics]: [On]*, [Off]
[Image]: [On]*, [Off]
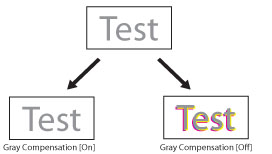
This setting determines whether only black (K) toner is used.
Settings can be applied separately for text, graphics, and image data.
[On]
Black and gray data is printed using the black (K) toner only, which lessens toner bleeding.
[Off]
Black and gray data is printed using all four (CMYK) toners. Gradation reproducibility of dark areas improves in comparison to [On].

NOTE |
This function may not be displayed for some products. |
[BarDIMM]
[Enable]*, [Disable]
This setting enables you to print bar codes supported by the Barcode Printing Kit.
IMPORTANT |
To enable BarDIMM, it is necessary to activate the Barcode Printing Kit. When you are not printing bar codes, make sure to disable BarDIMM. Otherwise, the processing speed of regular print jobs may be reduced. |
NOTE |
The default setting is [Disable]. If you activate the Barcode Printing Kit, it changes to [Enable]. [FreeScape] appears only if BarDIMM is enabled. |
[FreeScape]
[Off], ~*, ", #, $, /, \, ?, {, }, |
You can specify the AEC (Alternate Escape Code) to be used for bar code commands when the host computer does not support the standard Escape Code.
NOTE |
[FreeScape] appears only if BarDIMM is enabled. |