Registering Non-standard Size Paper to the Computer (Custom Size)
Custom size paper is non-standard size paper whose side lengths can be freely defined.
If the document or paper to print is a non-standard size, you must register the size to the printer driver in advance.
If the document or paper to print is a non-standard size, you must register the size to the printer driver in advance.
When Using Windows
1
Click [ ] (Start)
  [
[ ] (Settings)
  [Devices]
  [Printers & scanners].
 [
[ [Devices]
  [Printers & scanners].
The [Printers & scanners] screen is displayed.
2
Click the printer driver of the machine  [Manage]
  [Printing preferences].
 [Manage]
  [Printing preferences].
The [Printing preferences] screen of the printer driver is displayed.
3
On the [Page Setup] tab, click [Custom Paper Size].
4
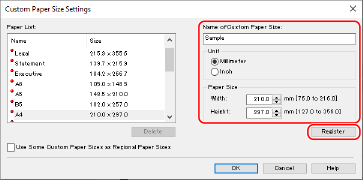
Enter the custom size paper name and paper size, and click [Register].

5
Click [OK]  [OK].
[OK].
 [OK].
[OK].The custom size paper is registered.
When Using macOS
1
On your computer, open the document you want to print.
2
From the menu in the application used to open the document, click [Print].
The printing dialog box appears.
3
In [Printer], select the printer driver of the machine.
4
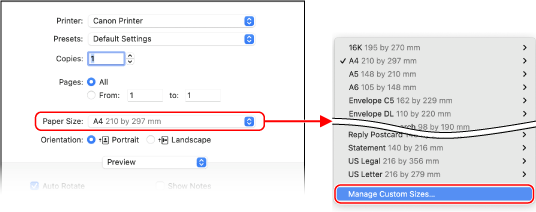
In [Paper Size] of the print options, select [Manage Custom Sizes].

If print options are not displayed, click [Show Details] in the printing dialog box.
5
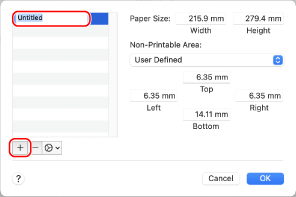
Click [+] at the bottom left, double-click [Untitled], and enter the custom size paper name.

6
Enter the paper size, and click [OK].
The custom size paper is registered.