Loading Paper in the Drawer
Load paper you usually use into the drawer, which can hold large amounts of paper.
The setting method varies depending on the size of the paper to be loaded.
The setting method varies depending on the size of the paper to be loaded.
When Loading A4, B5, Legal, or Letter Size Paper
Load paper using the standard size method.
Loading Standard Size Paper
Loading Standard Size Paper
When Loading A5 Size Paper
The setting method varies depending on the orientation of the paper to be loaded.
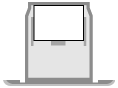
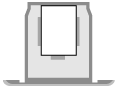
Landscape orientation (A5) | Portrait orientation (A5R) | ||
 |  | ||
When Loading Custom Size Paper
Load paper using the non-standard size method.
Loading Non-standard Size Paper
Loading Non-standard Size Paper
 |
When performing printing, open the paper stopper in advance.  |
Loading Standard Size Paper
You can load paper correctly by aligning the paper guides on the drawer with the markings.
When using paper with logos, be careful of the orientation of the loaded paper and which side is face up. Orientation for Loading Paper with a Logo
When using paper with logos, be careful of the orientation of the loaded paper and which side is face up. Orientation for Loading Paper with a Logo
1
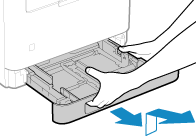
Pull out the drawer, and remove it while lifting the front side.
2
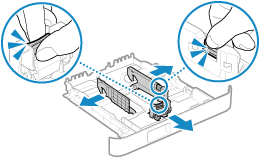
Align the paper guides with the size of the paper to be loaded.
1 | While pressing the lock release lever, move the paper guide. 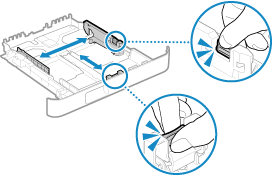 |
2 | Align the projections on the paper guides with the size markings of the paper to be loaded. 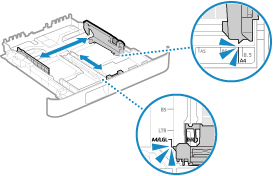 Paper guides that are aligned but too loose or too tight can cause misfeeds or a paper jam. |
 When Loading Legal Size Paper
While pressing the lock release lever, extend the drawer toward you.
3
Fan the paper and align the edges.
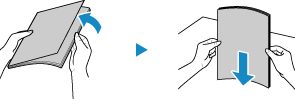
Fan the paper in small batches, and align the edges by tapping the paper on a flat surface a few times.
4
Load the paper with the print side face up.
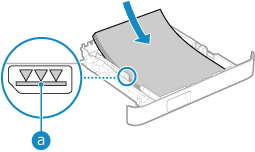
Align the paper with the paper guide on the front side of the drawer.
Make sure the loaded paper does not exceed the load limit line ( ). If it exceeds the load limit line, there may be misfeeds or a paper jam.
). If it exceeds the load limit line, there may be misfeeds or a paper jam.When Printing on the Back Side of Printed Paper (Manual 2-sided Printing)
Flatten the edge of the paper to remove any curls, and load the paper with the back (unprinted) side face up.
You can use only paper printed with this machine.
If toner smudges and splatters appear on the back side, adjust the image quality. [Manual Back Side Print (2-Sided Only)]
You cannot print on the side that has previously been printed on.
5
Load the drawer into the machine.
By default, the Paper Settings confirmation screen is displayed. [Notify to Check Paper Settings]
When you are using legal size paper, the drawer is extended from the machine and is not fully housed.
6
Set the paper size and type, as needed. Setting the Paper Size and Type for the Drawer
By default, the paper size and type of the drawer are set to A4 and Plain 2. When paper of a different size or type is loaded, change the paper settings.
Loading Non-standard Size Paper
You can load paper correctly by aligning the paper guides on the drawer with the paper.
When using envelopes or paper with logos, be careful of the orientation of the loaded paper and which side is face up.
Preparations and Orientation for Loading Envelopes
Orientation for Loading Paper with a Logo
When using envelopes or paper with logos, be careful of the orientation of the loaded paper and which side is face up.
Preparations and Orientation for Loading Envelopes
Orientation for Loading Paper with a Logo
1
Pull out the drawer, and remove it while lifting the front side.
2
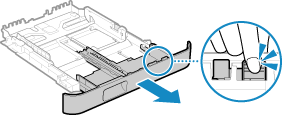
Slide the paper guides to the outside.
While pressing the lock release lever, move the paper guides.
When Loading Paper Longer than A4 Size
While pressing the lock release lever, extend the drawer toward you.
3
Fan the paper and align the edges.
Fan the paper in small batches, and align the edges by tapping the paper on a flat surface a few times.
4
Load the paper with the print side face up.
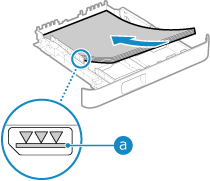
Load the paper against the rear edge of the drawer.
Make sure the loaded paper does not exceed the load limit line (). If it exceeds the load limit line, there may be misfeeds or a paper jam.
). If it exceeds the load limit line, there may be misfeeds or a paper jam.When Printing on the Back Side of Printed Paper (Manual 2-sided Printing)
Flatten the edge of the paper to remove any curls, and load the paper with the back (unprinted) side face up.
You can use only paper printed with this machine.
If toner smudges and splatters appear on the back side, adjust the image quality. [Manual Back Side Print (2-Sided Only)]
You cannot print on the side that has previously been printed on.
5
Align the paper guides with the width and length of the paper.
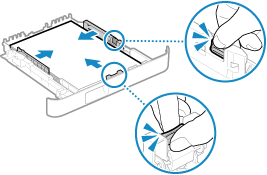
While pressing the lock release lever, align the paper guides with the width and length of the paper.
Paper guides that are aligned but too loose or too tight can cause misfeeds or a paper jam.
6
Load the drawer into the machine.
By default, the Paper Settings confirmation screen is displayed. [Notify to Check Paper Settings]
When you are using paper that is longer than A4 size, the drawer is extended from the machine and is not fully housed.
7
Set the paper size and type. Setting the Paper Size and Type for the Drawer
By default, the paper size and type of the drawer are set to A4 and Plain 2. When paper of a different size or type is loaded, change the paper settings.