Setting Up a Print Server
By setting up a print server on the network, you can speed up print operations on a computer, thereby reducing the load on the computer.
In Windows, you can install the printer driver via the print server to save you the trouble of downloading the printer driver to each computer on the network or using a CD/DVD-ROM.
In Windows, you can install the printer driver via the print server to save you the trouble of downloading the printer driver to each computer on the network or using a CD/DVD-ROM.
To set up a print server, enable the print server to print from the machine, and then configure the settings for sharing the printer.
To use a print server in a domain environment, consult your network administrator.
To use a print server in a domain environment, consult your network administrator.
Enabling the Print Server to Print from the Machine
Install the printer driver to the computer that will be the print server, and configure the settings according to your usage environment. Preparing to Print from a Computer
Configuring the Settings for Sharing the Printer
Configure the printer sharing settings on the computer that will be the print server so that other computers on the network can use the print server.
When Using Windows
Administrator privileges are required on the computer that will be the print server.
Required Preparations |
Check the operating system (32-bit or 64-bit) of the computer that will be the print server and the operating system of the computer that will use the print server (the client). Viewing the System Information of the Computer |
1
Log on to the computer that will be the print server, using an administrator account.
2
Click [ ] (Start)
  [
[ ] (Settings)
  [Devices]
  [Printers & scanners].
 [
[ [Devices]
  [Printers & scanners].
The [Printers & scanners] screen is displayed.
3
Click the printer driver of the machine  [Manage]
  [Printer properties].
 [Manage]
  [Printer properties].
The printer driver properties screen is displayed.
4
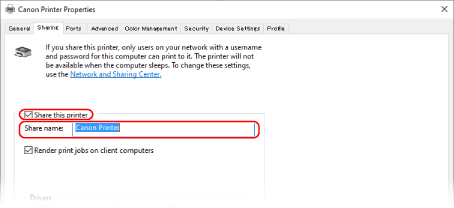
On the [Sharing] tab, select the [Share this printer] checkbox, and enter a shared name.

5
Install an additional driver, as needed. 

If the client computer has an operating system (32-bit or 64-bit) that differs from that of the print server, install an additional driver.
1 | Click [Additional Drivers]. The [Additional Drivers] screen is displayed. |
2 | Select the checkbox of the driver to be added, and click [OK]. If the print server computer has a 32-bit operating system, select the [x64] (driver for 64-bit version) checkbox. If the print server computer has a 64-bit operating system, select the [x86] (driver for 32-bit version) checkbox. |
3 | Click [Browse], specify the folder where the driver is located, and click [OK]. When Specifying the Folder of the Downloaded Driver If the print server computer has a 32-bit operating system, specify the [x64] folder with the decompressed driver  [Driver] folder. [Driver] folder.If the print server computer has a 64-bit operating system, specify the [32BIT] folder with the decompressed driver  [Driver] folder. [Driver] folder.When Specifying the Folder in the Supplied CD/DVD-ROM If the print server computer has a 32-bit operating system, specify [intdrv] in the CD/DVD-ROM  [UFRII] [UFRII]  [x64] [x64]  [Driver] folder. [Driver] folder.If the print server computer has a 64-bit operating system, specify [intdrv] in the CD/DVD-ROM  [UFRII] [UFRII]  [32BIT] [32BIT]  [Driver] folder. [Driver] folder. |
4 | Install the additional driver while following the instructions on the screen. |
6
Click [OK].
The settings are applied.
When Using macOS
1
Click [ ]
]  [System Preferences]
  [Sharing].
 [System Preferences]
  [Sharing].
The [Sharing] screen is displayed.
2
Select the [Printer Sharing] checkbox.
3
In [Printers], select the checkbox of the machine.
4
Restrict the users that can use the print server, as needed.
By default, all users can use the print server.
To enable specific users to use the print server, click [+] under [Users], and select the users who can use the print server.
To enable specific users to use the print server, click [+] under [Users], and select the users who can use the print server.
5
Close the [Sharing] screen.
The settings are applied.