Adjusting the Transfer Condition of the Printed Image
If the overall printed image is lighter in color or distorted compared to when printed on regular paper, you can adjust the secondary transfer voltage (voltage when the image is transferred onto the paper) for the registered custom paper.
Cases in Which to Increase the Current Value
When the paper is thicker than standard paper
When the density in high density areas is insufficient
When the density in high density areas of the image is uneven
When the contours in high density areas of the image appear blurry
Cases in Which to Decrease the Current Value
When the paper is thinner than standard paper
When the density in high density areas is normal, but small white spots appear in low density areas
When small white spots appear in high density areas
When the amount of toner in high density areas is reduced and small dark spots appear
When dark spots appear in low density areas
When streaks of uneven density appear in the paper feed direction in high density areas
This section describes how to make adjustments using the control panel.
To make adjustments using Remote UI from a computer, perform the operations from [Settings/Registration] [Paper Settings]
  [Paper Type Management Settings] on the Portal page. Managing the Machine from a Computer (Remote UI)
Administrator or DeviceAdmin privileges are required.
To make adjustments using Remote UI from a computer, perform the operations from [Settings/Registration]
 [Paper Settings]
  [Paper Type Management Settings] on the Portal page. Managing the Machine from a Computer (Remote UI)
Administrator or DeviceAdmin privileges are required.
Required Preparations
Register the paper type you want to adjust as custom paper types. Registering Frequently Used Paper Types
1
Log in to the machine as an administrator. Logging In to the Machine
2
On the control panel, press [ Settings/Registration] in the [Home] screen or other screen.
 Settings/Registration] in the [Home] screen or other screen.
The [Settings/Registration] screen is displayed.
3
Press [Preferences]  [Paper Settings]
  [Paper Type Management Settings].
 [Paper Settings]
  [Paper Type Management Settings].
The [Paper Type Management Settings] screen is displayed.
4
Select the registered custom paper type, and press [Details/Edit].
The [Details/Edit] screen is displayed.
5
Press [Change] of [Adjust Secondary Transfer Voltage].
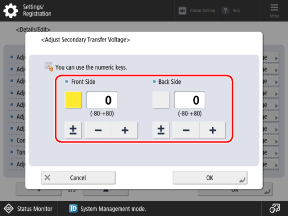
The [Adjust Secondary Transfer Voltage] screen is displayed.
6
Enter the adjustment value.

Press the [Front Side] or [Back Side] button to select it, and then enter the value.
You can press [±] to switch the entered value between positive and negative.
Enter a value for [Back Side] in either of the following cases:
When [2nd Side of 2-Sided Page] is set to [On] for custom paper [Details/Edit] Screen
When paper is loaded in the multi-purpose tray, and [2nd Side of 2-Sided Page] is set on the screen for setting the paper type Setting the Paper Size and Type for the Multi-purpose Tray
7
Press [OK].
The adjustment is applied.