Changes to Networks
Support for Using the Wireless LAN on the Main Line
You can now use the wireless LAN on the main line when the machine is connected to two different networks at the same time.
Selecting the Network Connection Method
1
Log in to the machine as an administrator.
2
On the control panel, press [ Settings/Registration] in the [Home] screen or other screen.
 Settings/Registration] in the [Home] screen or other screen.
The [Settings/Registration] screen is displayed.
3
Press [Preferences]  [Network]
  [Select Interface].
 [Network]
  [Select Interface].
The [Select Interface] screen is displayed.
4
Select the network connection method.
Connection method | [Main Line] | [Sub Line] | |
Wired LAN only | Wired LAN (main line) only | [Wired LAN] | [Off] |
Wireless LAN only | Wireless LAN (main line) only | [Wireless LAN] | [Off] |
Connecting to a wired LAN and wireless LAN at the same time*1 | Wired LAN (main line) and wireless LAN (sub line) | [Wired LAN] | [Wireless LAN] |
Wired LAN (sub line) and wireless LAN (main line)*2 | [Wireless LAN] | [Wired LAN] | |
Connecting to a wired LAN and other wired LAN at the same time | Wired LAN (main line) and wired LAN (sub line)*3 | [Wired LAN] | [Wired LAN] |
*1 If you change the settings from [Main Line] to [Sub Line] or from [Sub Line] to [Main Line], the previous wireless LAN connection settings will be cleared, so you must reconnect to the wireless LAN.
*2 The wired LAN connected to the LAN port on the machine becomes the sub line. The wired LAN connected to the machine via a USB-LAN adapter cannot connect using the sub line.
*3 The wired LAN connected to the LAN port on the machine becomes the main line, and the wired LAN connected to the machine via a USB-LAN adapter becomes the sub line.
5
Press [OK].
The settings are applied.
NOTE
When [Main Line] Is Set to [Wired LAN], and [Sub Line] Is Set to a Setting Other Than [Off]
The machine is set to consume more power in sleep mode.
Checking the Network Connection Type of the Machine
1
Log in to the machine as an administrator.
2
On the control panel, press [ Settings/Registration] in the [Home] screen or other screen.
 Settings/Registration] in the [Home] screen or other screen.
The [Settings/Registration] screen is displayed.
3
Press [Preferences]  [Network]
  [Select Interface].
 [Network]
  [Select Interface].
The [Select Interface] screen is displayed.
4
Check that [Main Line] is set to [Wired LAN], and check that [Sub Line] is set to [Off] or [Wired LAN].
If the connection type is set to wired LAN, you can establish a direct connection even if the machine is not connected to a network.
When [Main Line] or [Sub Line] Is Set to [Wireless LAN]

When Using Access Point Mode
When the machine is not connected to a wireless LAN, a direct connection cannot be established. Change [Main Line] and [Sub Line] to a setting other than [Wireless LAN], or connect the machine to a wireless LAN.
When Using Wi-Fi Direct
When the connection type is set to a wireless LAN (including a sub line), a direct connection cannot be established. Change [Main Line] and [Sub Line] to a setting other than [Wireless LAN].
5
Press [OK].
Support for Using MAC Address Filtering for Sub Line Communication
You can now use MAC address filtering on the sub line when the machine is connected to two different networks at the same time.
Setting Up MAC Address Filtering on the Sub Line
1
Log in to Remote UI as an administrator.
2
On the Portal page of Remote UI, click [Settings/Registration].
3
Click [Network Settings].
4
In the sub line settings, click [Firewall Settings]  [MAC Address Filter].
 [MAC Address Filter].
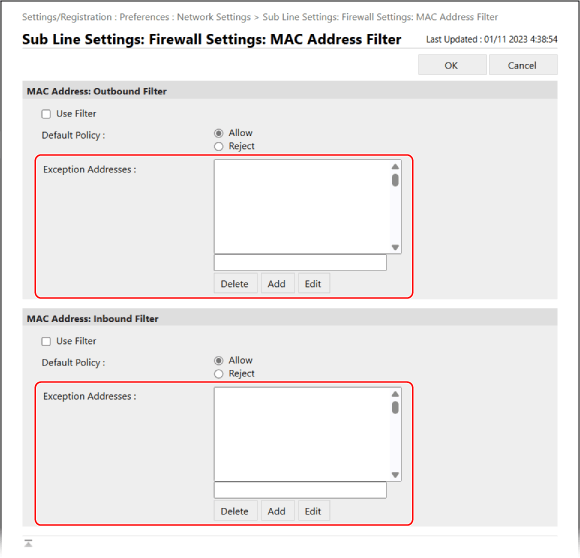
The screen for setting the MAC address filter of the sub line is displayed.
5
Select the [Use Filter] checkbox.
The MAC address filter is enabled.
To restrict sending of data from the machine to other devices, configure the outbound filter settings.
To restrict receiving of data from other devices, configure the inbound filter settings.
6
In [Default Policy], set the filtering prerequisites.
As a filtering prerequisite, select whether to allow or block communication with other devices.
7
Add exception addresses to the list of [Exception Addresses].

Add the MAC addresses of devices whose communication you want to block or allow as exceptions to the filter.
To add an exception address to the list, enter the MAC address in the input field above [Add], and then click [Add].
* Enter MAC addresses without including the hyphen (-) or colon (:) separators.
Input example:
123A456B789C
123A456B789C
You can add up to 100 exception addresses.
8
Click [OK].
9
Click [Apply Setting Changes]  [OK].
[OK].
 [OK].
[OK].The settings are applied.
10
Log out from Remote UI.
Support for Using IEEE 802.1X for Sub Line Communication
You can now use IEEE 802.1X on the sub line when the machine is connected to two different networks at the same time.
* When the machine is connected to two different networks at the same time, you can use IEEE 802.1X on either the main line or the sub line. You can change these settings, as needed. You cannot use IEEE 802.1X on the main line and sub line at the same time.
Configuring the IEEE 802.1X Settings
1
Log in to Remote UI as an administrator.
2
On the Portal page of Remote UI, click [Settings/Registration].
3
Click [Network Settings]  [IEEE 802.1X Settings].
 [IEEE 802.1X Settings].
The [IEEE 802.1X Settings] screen is displayed.
4
Select the [Use IEEE 802.1X] checkbox, and enter the login name.
For the login name, enter a name to identify the user (EAP Identity) using alphanumeric characters.
When Verifying the Certificate of an Authentication Server
Select the [Verify Authentication Server Certificate] checkbox.
To verify the Common Name of the certificate, select the [Verify Authentication Server Name] checkbox, and enter the name of the authentication server to which the user is registered.
To verify the Common Name of the certificate, select the [Verify Authentication Server Name] checkbox, and enter the name of the authentication server to which the user is registered.
5
Configure the settings according to the authentication method to be used.
When Using TLS

1
Select the [Use TLS] checkbox.
2
Click [Key and Certificate].
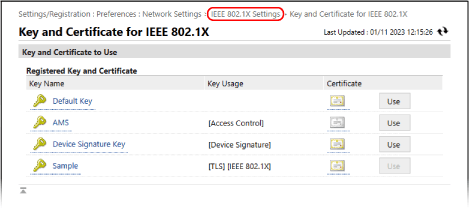
The [Key and Certificate for IEEE 802.1X] screen is displayed.
3
Click [Use] to the right of the key and certificate to use.
Click the key name (or certificate icon) to display the certificate details.
On the certificate details screen, click [Verify Certificate] to verify that the certificate is valid.
4
Click [IEEE 802.1X Settings] at the top of the Remote UI screen.

The [IEEE 802.1X Settings] screen is displayed again.
When Using TTLS or PEAP

1
Select the [Use TTLS] or [Use PEAP] checkbox.
When using TTLS, select the internal protocol to be used.
2
Use [Use Login Name as User Name] to specify whether to use the login name of IEEE 802.1X authentication for the user name.
3
Click [Change User Name/Password].
The [User Name/Password Settings] screen is displayed.
4
Set the user name and password.
Enter the user name using alphanumeric characters.
To set a password, enter the same password in both [Password] and [Confirm] using alphanumeric characters.
5
Click [OK].
The [IEEE 802.1X Settings] screen is displayed again.
6
Click [OK].
7
Click [Apply Setting Changes]  [OK].
[OK].
 [OK].
[OK].The settings are applied.
8
Log out from Remote UI.