Paper Jams in POD Deck Lite-C and Paper Deck Unit-E (Option)
Remove the paper jammed in POD Deck Lite-C or Paper Deck Unit-E. Follow the instructions on the control panel to check the location of the paper jam and remove the jammed paper.
If the paper tears, be sure to remove all parts so that no pieces remain.
If you cannot remove the paper, do not try to remove it forcibly. Check the control panel and remove the jammed paper at another location.
If the paper tears, be sure to remove all parts so that no pieces remain.
If you cannot remove the paper, do not try to remove it forcibly. Check the control panel and remove the jammed paper at another location.
Required Preparations
Close the cover and paper drawer if they are open.
1
Press the release lever and pull POD Deck Lite-C or Paper Deck Unit-E away from the main unit.
POD Deck Lite-C
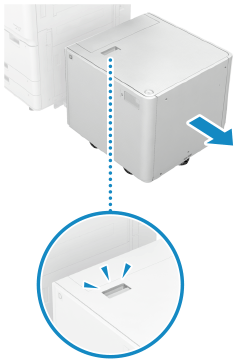
Paper Deck Unit-E

2
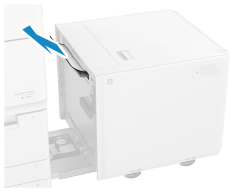
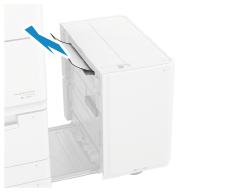
If paper is jammed on the side of POD Deck Lite-C or Paper Deck Unit-E, gently pull it out in the direction of the arrow.
POD Deck Lite-C
Paper Deck Unit-E
3
Attach POD Deck Lite-C or Paper Deck Unit-E to the main unit.
If the screen indicating a paper jam disappears, you can skip the remaining steps. Printing resumes automatically.
If the screen indicating a paper jam is still displayed, continue following the remaining steps on the screen to remove the jammed paper.
If the screen indicating a paper jam is still displayed, continue following the remaining steps on the screen to remove the jammed paper.
Check that it is attached securely to the main unit.
4
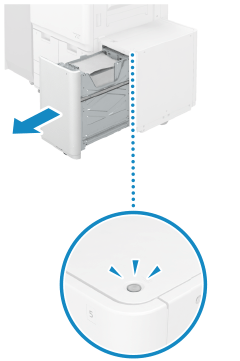
Pull the paper deck toward you until it stops.
POD Deck Lite-C

Paper Deck Unit-E
If the machine is in Sleep Mode, you may not be able to pull out the paper deck. Tap the display to exit Sleep Mode first, and then pull out the paper deck.
5
If paper is jammed inside the paper deck, gently pull it out in the direction of the arrow.
POD Deck Lite-C
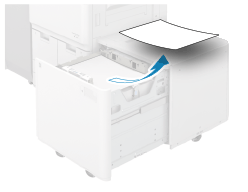
Paper Deck Unit-E

Paper may be jammed in a hard-to-see location.
6
Gently return the paper deck to its original position.
When the paper jam is cleared, the screen indicating a paper jam disappears, and printing resumes automatically.
If a screen indicating a paper jam at a different location appears, continue following the instructions on the screen to remove the jammed paper.
If a screen indicating a paper jam at a different location appears, continue following the instructions on the screen to remove the jammed paper.
NOTE
If Paper Jams Occur Repeatedly
Check the status of the machine and paper. Paper Jams That Occur Repeatedly