Installing This Software to a Computer without an Internet Connection
The Manager and Agent of this software may not be able to be installed to a computer that is not connected to the Internet. This may happen if the certificate for validating the signature of this software is not installed to the computer, or if the required settings are not configured on the computer.
In this case, configure the following settings on the computer where this software will be installed.
NOTE |
This operation is not required when installing this software to a computer that is connected to the Internet. |
Installing the Certificate
1.
Check whether the following certificate is installed in the destination computer.
DigiCert Trusted G4 Code Signing RSA4096 SHA384 2021 CA1
Log on to the computer with administrator privileges.
Right-click the Start menu, and select [Run].
Enter "certlm.msc" in [Open], and click [OK].
If the [User Account Control] screen is displayed, click [Yes].
Select [Intermediate Certification Authorities] > [Certificates].
Check whether the required certificate is installed.
2.
If the certificate indicated in step 1 is not installed in the computer, obtain the certificate and install it.
Use a computer connected to the Internet to download the file (with the "crt" extension) indicated in step 1 from the DigiCert website.
https://www.digicert.com/kb/digicert-root-certificates.htm
NOTE |
The URL of the website is subject to change. |
Copy the crt file of the certificate that you obtained to the computer where this software will be installed.
Right-click the copied file and select [Properties]. If there is a [Security] item on the bottom of the [General] tab and the [Unblock] check box is displayed, select the check box and click [OK].
Double-click the certificate file.
Click [Install Certificate].
Select [Local Machine], then click [Next].
Select [Place all certificates in the following store].
Click [Browse], select [Intermediate Certification Authorities], then click [OK].
Click [Next].
Click [Finish].
Changing the Timeout Value for Retrieving the Certificate Revocation List
Installation of this software will fail if the process for retrieving the certificate revocation list fails during authorization of the certificate. It is therefore necessary to register or change the registry to extend the timeout value. Perform the operations indicated below.
1.
Log on to the computer where the Manager and Agent will be installed as a user with administrator privileges.
2.
Create a registry registration entry file.
Start a text editor such as Notepad, and copy the following to the text editor.
Copy everything from the first line to the blank line at the end.
Set the extension to ".reg" and the character encoding to "UTF-16 LE", and save the file.
The displayed character encoding may differ according to the operating system and editor. Save the file encoded in little endian UTF-16 with BOM.
Windows Registry Editor Version 5.00
[HKEY_LOCAL_MACHINE\SYSTEM\CurrentControlSet\Control]
"ServicesPipeTimeout"=dword:0000ea60
[HKEY_LOCAL_MACHINE\SYSTEM\CurrentControlSet\Control]
"ServicesPipeTimeout"=dword:0000ea60
3.
Start the registry editor (%SystemRoot%regedit.exe) with administrator privileges.
4.
Create a backup of all the current registry settings.
Select [File] > [Export] in the registry editor.
Select [All] in [Export range], and save the file with a file name of your choice.
5.
Register the registry.
Select [File] > [Import] in the registry editor.
Specify the file created in step 2, and click [Open].
6.
Click [OK] to close the dialog.
7.
Restart the computer.
8.
To restore the registry after this software is installed, return the registry to the previous values and restart the computer. Then, add a setting to the definition file of this software that prevents retrieval of the certificate revocation list.
NOTE |
In order to upgrade correctly to the new version of this software, the settings for the definition file must be changed in advance. If you leave the registry changed, then it will be not be necessary to change the definition file. |
Log on to the computer where the Manager and Agent will be installed as a user with administrator privileges.
Start Notepad with administrator privileges.
If the [User Account Control] screen is displayed, click [Yes].
Open the following file in Notepad.
Manager
%ProgramFiles%\Canon\EMC\Manager\ManagementConsoleService.exe.config
Agent running on the same computer as the Manager
%ProgramFiles%\Canon\EMC\Manager\agent\mcagent.exe.config
Agent running on a different computer from the Manager
%ProgramFiles%\Canon\EMC\Agent\mcagent.exe.config
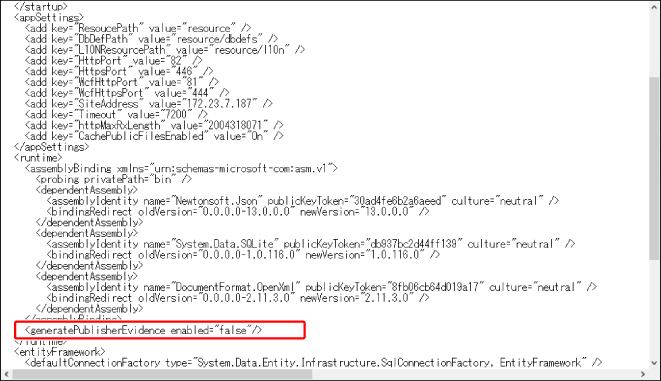
Add the following line one line before </runtime>, as a child element of <runtime>.
<generatePublisherEvidence enabled="false"/>
Example: Manager
Save the file.
9.
Restart the service for this software.
Open [Windows Administrative Tools] > [Services] from the Start menu.
Restart the following service.
Canon Management Console Manager
Canon Management Console Agent