82JS-023
Setting a Wireless LAN Manually (MF746Cdw / MF745Cdw / MF743Cdw / MF741Cdw / MF644Cdw / MF642Cdw / MF641Cw / MF543dw / MF449dw / MF448dw / MF445dw)
Two methods are available: checking the SSID, network key, etc. to select a connectable wireless LAN router to set, or entering all required security settings.
If wireless LAN has not been selected as the connection method for the machine, refer to Changing to a Wireless LAN Connection and set this in advance.
Selecting and setting a wireless LAN router
NOTE
Information required for settings
SSID
Network key
* For details on how to check the SSID and network key, see the instruction manual of the device. They might also be indicated on the wireless LAN router.
Security settings
If you select and set a wireless LAN router, the WEP authentication method is set to <Open System> and the WPA/WPA2 encryption method is set to <Auto> (AES-CCMP or TKIP). To select <Shared Key> as the WEP authentication method, or to specify <AES-CCMP> as the WPA/WPA2 encryption method, see Entering all settings.
1
Select <Menu> in the Home Screen.
2
Select <Preferences>  <Network>.
 <Network>.
If a login screen appears,

Department ID Management and System Manager IDs are set on the machine. Follow the steps below to log in.
1
Enter the Department ID.
2
Enter the PIN.
3
Select <Log In>.
3
Select <Wireless LAN Settings>.
If <Do you want to enable the wireless LAN?> appears, select <Yes>.
4
Check the message and then select <OK>.
5
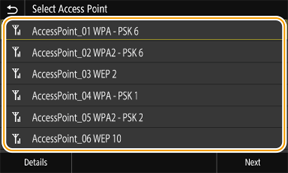
Select <SSID Settings>  <Select Access Point>.
 <Select Access Point>.
The machine searches for connectable wireless LAN routers.
If a message is displayed indicating that no access point was found, check if it is possible to connect to the wireless LAN. Connecting to a Wireless LAN
6
Select the wireless LAN router.
Select the router whose SSID matches the one that you wrote down, and then select <Next>  <OK>.
<OK>.
 <OK>.
<OK>.
If you cannot find the wireless LAN router you want to connect to,

Check if it is possible to connect to the network. Connecting to a Wireless LAN
7
Enter the network key you wrote down, and then select <Apply>.
8
Select <Yes>.
If an error message is displayed while making settings, select <Close>, check that the network key is correct, and then start again from step 5.
9
Wait until <Connected.> is displayed.
10
Select <Close>.
Wait a few minutes for the IP address, etc. to be set automatically.
NOTE
If the machine's IP address has been changed
In a DHCP environment, the IP address of the machine might be changed automatically. However, the connection is maintained as long as the machine and computer are on the same subnet.
If there are multiple wireless LAN routers that can be connected
Connect to the device with the strongest signal strength (RSSI).
Entering all settings
NOTE
Information required for settings
SSID
Network key
Security standard
Authentication/encryption method
*For details on how to check the SSID and network key, refer to the instruction manual of the device. It might also be indicated on the wireless LAN router.
1
Select <Menu> in the Home Screen.
2
Select <Preferences>  <Network>.
 <Network>.
If a login screen appears,

Department ID Management and System Manager IDs are set on the machine. Follow the steps below to log in.
1
Enter the Department ID.
2
Enter the PIN.
3
Select <Log In>.
3
Select <Wireless LAN Settings>.
If <Do you want to enable the wireless LAN?> appears, select <Yes>.
4
Check the message and then select <OK>.
5
Select <SSID Settings>  <Enter Manually>.
 <Enter Manually>.
6
Enter the SSID you wrote down and then select <Apply>.
7
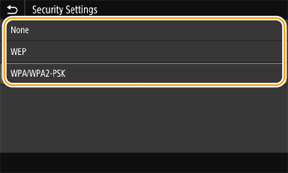
Make the security settings based on the information you wrote down.
To not set security, select <None>.

Using WEP,

1
Select <WEP>.
2
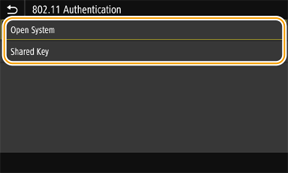
Select the authentication method.

<Open System>
This authentication method is commonly referred to as "open authentication".
<Shared Key>
This authentication method uses the WEP key as a password.
NOTE
If <Open System> is selected
If the wireless LAN router uses shared key authentication, an authentication error occurs when connecting. However, the machine automatically changes to <Shared Key> and retries connecting.
3
Select the WEP key to edit.
Select the WEP key (1 to 4), and then select <Edit>.
Up to four WEP keys can be set.
4
Enter the network key you wrote down and then select <Apply>.
5
Select the edited WEP key, and then select <Register>.
Using WPA-PSK or WPA2-PSK,

1
Select <WPA/WPA2-PSK>.
2
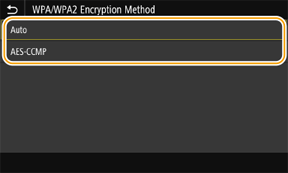
Select the encryption method.

<Auto>
Sets AES-CCMP or TKIP automatically according to the wireless LAN router to be connected.
<AES-CCMP>
Select to specify AES-CCMP as the encryption method.
3
Enter the network key you wrote down and select <Apply>.
8
Select <Yes>.
If an error message is displayed while making settings, select <Close>, check if the network key is correct, and then start again from step 5.
9
Wait until <Connected.> is displayed.
10
Select <Close>.
Wait a few minutes for the IP address, etc. to be set automatically.
NOTE
If the IP address of the machine has been changed
In a DHCP environment, the IP address of the machine might be changed automatically. However, the connection is maintained as long as the machine and computer are on the same subnet.
If there are multiple wireless LAN routers that can be connected
Connect to the device with the strongest signal strength (RSSI).