88W0-026
Setting an IP Address on the Machine Manually
How to make settings for IPv4 and IPv6 are described here.
Setting an IPv4 address
1
Select <Menu> in the Home Screen.
2
Select <Preferences>  <Network>.
 <Network>.
If a login screen appears,

Department ID Management and System Manager IDs are set on the machine. Follow the steps below to log in.
1
Enter the Department ID.
2
Enter the PIN.
3
Select <Log In>.
3
Select <TCP/IP Settings>  <IPv4 Settings>
  <IP Address Settings>.
 <IPv4 Settings>
  <IP Address Settings>.
4
Set the IP address.
1
Select <Auto Acquire>, and select <Off> in <Auto Acquire>  <Apply>
  <OK>.
<OK>.
 <Apply>
  <OK>.
<OK>.2
Select <Manually Acquire>.
3
Enter the <IP Address>, <Subnet Mask>, and <Gateway Address>, and then select <Apply>.
To assign an IP address automatically,

1
Select <Auto Acquire>.
2
Select <On> in <Auto Acquire>, and select <Select Protocol>.
3
Select <DHCP>.
Select <Off> if you do not want to use DHCP to automatically assign an IP address. If you set DHCP when it is unavailable, the machine will continue checking for this service in the network, causing unnecessary communication.
4
Check that <Auto IP> is set to <On>.
If <Off>, change it to <On>.
5
Select <Apply>.
NOTE
Even if Auto IP is enabled, IP addresses retrieved by DHCP take precedence.
5
Select <OK>.
6
Turn off the machine, and then turn on the machine after 10 seconds.
NOTE
To check that settings are correct
Enter "http://<the IP address of the machine>/" in the address field of the web browser, press the [ENTER] key on the keyboard, and check that the login screen of the Remote UI is displayed.
If the IP address has been changed after installing the printer driver
If the MFNP port* is used, the connection is maintained if the machine and the computer are on the same subnet, therefore, you do not need to add a new port. If the standard TCP/IP port* is used, you need to add a new port.
How to add a port,  1 In Windows, select [  Start] Start]  [ [ Settings]. Settings].2 Click [Devices]  [Printers & scanners]. [Printers & scanners].3 Select the machine, and click [Manage]. 4 Click [Printer properties]. 5 Click the [Ports] tab. 6 Click [Add Port]. 7 Select [Standard TCP/IP Port] in [Available port types], and click [New Port]. 8 Click [Next]. 9 Enter the IP address or DNS name of the machine, and click [Next]. [Port Name] is entered automatically. Change it if necessary. If an [Additional port Information required] screen is displayed, follow the instructions on the screen. 10 Click [Finish]. 11 Click [Close]. |
*If you are unsure which port is used, open the [Ports] tab using the steps above and check the items selected.
Setting an IPv6 address
To use an IPv6 address, an IPv4 address must be set appropriately in advance.
1
Start the web browser.
2
Enter "http://<the IP address of the machine>/" in the address box, and then press [ENTER].

3
Select [System Manager Mode], enter the [System Manager ID] and [System Manager PIN], and then click [Log In].
If Department ID Management is set,

Enter the registered [Department ID] and [PIN], and then click [Log In].

4
Click [Settings/Registration].
5
Select [Network Settings]  [IPv6 Settings].
 [IPv6 Settings].
6
Click [Edit].
7
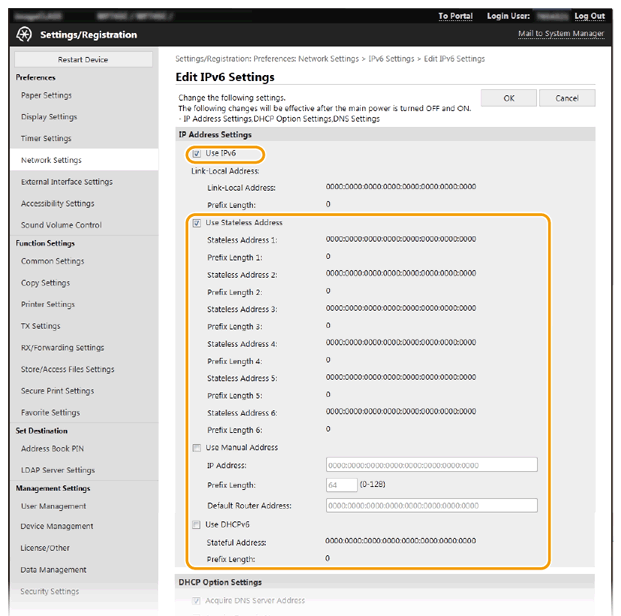
Select [Use IPv6] and set the address.

To enter the address manually,

1
Select [Use Manual Address], and enter the IPv6 address in [IP Address].
Addresses starting with "ff" (multicast addresses) cannot be entered.
2
Enter the [Prefix Length] and [Default Router Address] if necessary.
In [Prefix Length], enter the length of the network address portion.
Addresses starting with "ff" (multicast addresses) cannot be entered in [Default Router Address].
To automatically generating from a router,

Select [Use Stateless Address].
To retrieve from a DHCP server,

Select [Use DHCPv6].
8
Click [OK].
9
Turn off the machine, and then turn on the machine after 10 seconds.
NOTE
To check that settings are correct
Enter "http://<the IPv6 address of the machine>/" in the address field of the web browser, press the [ENTER] key on the keyboard, and then check that the login screen of the Remote UI is displayed.
If the IP address has been changed after installing the printer driver
You must add a new port.
If the MFNP port* is used, the connection is maintained if the machine and the computer are on the same subnet, therefore, you do not need to add a new port. If the standard TCP/IP port* is used, you need to add a new port.
How to add a port,  1 In Windows, select [  Start] Start]  [ [ Settings]. Settings].2 Click [Devices]  [Printers & scanners]. [Printers & scanners].3 Select the machine, and click [Manage]. 4 Click [Printer properties]. 5 Click the [Ports] tab. 6 Click [Add Port]. 7 Select [Standard TCP/IP Port] in [Available port types], and click [New Port]. 8 Click [Next]. 9 Enter the IP address or DNS name of the machine, and click [Next]. [Port Name] is entered automatically. Change it if necessary. If an [Additional port Information required] screen is displayed, follow the instructions on the screen. 10 Click [Finish]. 11 Click [Close]. |
*If you are unsure which port is used, open the [Ports] tab using the steps above and check the items selected.