Using the MF Toolbox
The following can be specified in the MF Toolbox:
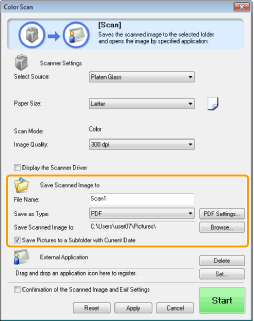
Specifying scan settings
You can specify the scan mode, resolution, original document size, and file size of the scanned images.

|
[Paper Size]
|
Specifies the original document size.
When [Custom] is selected, the [Paper Size Settings] dialog box appears for you to specify a custom size.
|
||||||||
|
[Scan Mode]
|
Select the scan mode. The modes selectable vary depending on the MF Toolbox command button clicked.
[Black and White]
Scan a document as a black-and-white image. [Black and White (OCR)]
Scan a document as a black-and-white image which can be read by OCR software. [Grayscale]
Scan a document as a grayscale image (equivalent to a monochrome printed image). This mode is best suited for scanning photos. [Color]
Scan a document as a color image. [Color (Magazine)]
Scan a document in color using the descreening function. This mode helps reduce uneven gradation and striped patterns (moiré patterns) generated when scanning printed images. Scanning takes longer than usual. |
||||||||
|
[Image Quality]
|
Select the scan resolution.
Available resolution varies depending on the [Select Source] or [Save as Type] settings.
|
||||||||
|
[Display the Scanner Driver]
|
When this check box is checked, the settings for [Scanner Settings] are unselectable.
When [Start] is clicked, the [ScanGear MF] dialog box appears for you to specify advanced scan settings.
This option is inaccessible when scanning using the [OCR] command button.
|

Saving scanned images
You can specify the file name, file format, and location where the scanned images are saved.
|
[File Name]
|
Enter the file name of the scanned image.
If there has already been a file saved under the same name, a four-digit number is automatically added to the end of the file name. The number starts with [0001].
|
|||
|
[Save as Type]
|
Specify the file type to save the scanned image in.
[BMP]
Bitmap format [JPEG/Exif]
JPEG/Exif format (This option is selectable only when [Grayscale], [Color] or [Color (Magazine)] is selected for [Scan Mode].) [TIFF]
TIFF format [PDF]
PDF format (multiple pages or single page) [PDF (Single Page)]
Create a single-page PDF file. [PDF (Multiple Pages)]
Combine multiple documents into one PDF file. [PDF (Add Page)]
Add the scanned image to the last page of a PDF file created by the MF Toolbox.
|
|||
|
[PDF Settings]
|
When [PDF], [PDF (Single Page)], [PDF (Multiple Pages)] or [PDF (Add Page)] is selected for [Save as Type], you can specify advanced file settings.
|
|||
|
[Save Scanned Image to]
|
Display the location where the scanned image is saved when a setting other than [PDF (Add Page)] is selected for [Save as Type]. To save the image in a different location, click [Browse], select a folder, and click [OK].
|
|||
|
[Add Scanned Image to]
|
This item appears instead of [Save Scanned Image to] when [PDF (Add Page)] is selected in [Save as Type]. You can select a PDF file to which the scanned image is added. However, you may only add scanned images to PDF files that have been created using MF Toolbox. You may not add scanned images to PDF files that have been created using other applications.
|
|||
|
[Save Pictures to a Subfolder with Current Date]
|
Create a folder bearing the current date in the specified location to save the scanned image in this folder.
|

Configuring an application (an e-mail client application)
You can specify a host application to view the scanned image.

Click [Set], select an e-mail program to be used and click [OK]. (You can specify an application other than e-mail programs by dragging and dropping the application icon directly onto the dialog box.)
For [Settings for E-mail Program], you can enter an e-mail address by clicking [Address Settings].
For [Settings for E-mail Program], you can enter an e-mail address by clicking [Address Settings].


|
NOTE
|
When scanning using the [Mail] command buttonThe MF Toolbox supports the following e-mail applications.
Microsoft Outlook Express
Microsoft Outlook
Microsoft Exchange
EUDORA
Netscape Messenger
Windows Mail
Becky! Ver.2
Mozilla Thunderbird
|
Previewing the scanned image and entering Exif information (Viewing the scanned image)
Follow the steps in the procedure below to display a thumbnail preview of the scanned image before specifying the file format and location where the scanned image is saved.
|
(1)
|
Select the [Confirmation of the Scanned Image and Exif Settings] ([Confirm the Scanned Image] for the [PDF] button) check box.
 |
|
(2)
|
Press [Start].
The scanned image is displayed in the [Scanned Image] dialog box. See the following instructions to specify the file format and location where the image is saved. |
|
NOTE
|
When scanning using the [OCR] command buttonThis check box is unselectable.
|
When scanning using the [PDF] command buttonYou can only preview the scanned image and specify the location where the image is saved.
|
|
[Save as Type]
|
Specify the file format to save the scanned image in.
|
|
[Exif Settings]
|
When [JPEG/EXIF] is selected for [Save as Type], display the [Exif Settings] dialog box for you to enter the Exif information. You can add such information as comments and the scanning date to the JPEG file. Choose a file from the drop-down list and add information.
[Basic Information]
Display the information acquired automatically when the image was scanned. [Advanced Information]
Display the newly added information. [Apply the Same Setting of Input Items Automatically]
When the check box is checked, the last specified scan settings are applied. |
|
[PDF Settings]
|
When [PDF], [PDF (Single Page)], [PDF (Multiple Pages)] or [PDF (Add Page)] is selected for [Save as Type], you can specify advanced file settings.
|
|
[Save Scanned Image to]
|
Specify the location where the scanned image is saved.
|
|
[Add Scanned Image to]
|
This option appears instead of [Save Scanned Image to] when [PDF (Add Page)] is selected for [Save as Type]. Select a PDF file to which the scanned image is added. Note that you may not be able to add scanned images to PDF files, if the images are scanned using different applications.
|
|
[Save Pictures to a Subfolder with Current Date]
|
Create a folder bearing the current date in the specified location to save the scanned image in this folder.
This option is unselectable when [Save as Type] is set to [PDF (Add Page)].
|
|
[Save]
|
Save the scanned image in the specified location.
|
|
[Forward]
|
This button appears instead of [Save] when an application is selected for [Mail Program] or the [External Application]. You can forward the scanned image to the application.
|
|
[Cancel]
|
Undo any changes made within the dialog box and return to the previous screen. All scanned images are deleted.
|