MF Toolbox Settings
This section explains the main dialog displayed first when MF Toolbox is started, the scan dialog for setting details when scanning, and the [Preferences] dialog for setting content that can be customized with MF Toolbox.
Main Dialog
You can select a scanning method according to your needs. You can also register settings updated in the scan dialog.
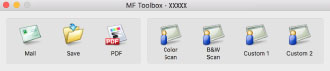
[Mail]
Attaches a scanned image to an e-mail.
[Save]
Saves a scanned image to macOS.
[PDF]
Saves a scanned image as a PDF format file.
[Color Scan]
Saves a scanned image with color settings. You can register the updated settings in the scan dialog.
[B&W Scan]
Saves a scanned image with black-and-white settings. You can register the updated settings in the scan dialog.
[Scan-1]-[Scan-4]/[Custom 1]/[Custom 2]
The initial values for scanning are set according to the settings of the device. Depending on the device, you can change the names of the icons in the [Preferences] dialog.
You can also register settings updated in the scan dialog.
Scan Dialog
You can set scan method details, execute scanning, etc.
Refer to the scanning method icon names displayed at the top of the dialog concerning what scanning method settings to update or what scanning method to actually scan with.
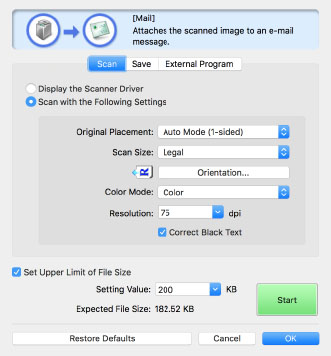
[Set Upper Limit of File Size]
Sets the maximum value for the file size of scanned images in [Setting Value]
[Expected File Size]
Displays the predicted size of the image file when scanning with the set content. If the predicted size exceeds the numerical value of [Setting Value] set in [Set Upper Limit of File Size], it is displayed in red.
[Start]
Executes scanning.
[Scan] Pane |
Sets the position where the original is set, scan size, color mode, etc.
You can also specify to scan using the settings of ScanGear MF rather than the settings of MF Toolbox.
Scan settings option button
If you select [Display the Scanner Driver] and click [Start], ScanGear MF is started and scanning is performed with the content set by ScanGear MF.
If you select [Scan with the Following Settings], you can set MF Toolbox.
[Original Placement]
When scanning, sets the position to place the original (the platen glass or feeder).
If you select [Auto Mode], the original will be scanned from the feeder if it is set in the feeder. If the original is not set in the feeder, the device will scan from the platen.
[Scan Size]
Sets the size of the original to be scanned.
[Orientation]
When scanning from the feeder, selects the orientation of the original.
When [Original Placement] > [Feeder (2-sided)]/[Auto Mode (2-sided)] is selected, you can also specify [Book Opening]
[Color Mode]
Specifies the color mode of the original to be scanned.
[Resolution]
Specifies a resolution when scanning.
[Correct Black Text]
Clarifies the contours of black text.
[Save] Pane |
Specifies the file name with which the scanned image will be saved, the save destination, etc. You can set the details when saving as a PDF in the [PDF Settings] dialog.
[File Name]
Specifies the file name with which the scanned image will be saved.
If a file with the same name exists, a number starting from "1" is attached to the end of the file name.
[Save as Type]
Specifies the file format in which the scanned image will be saved.
[PDF Settings]
Sets details when saving a scanned image in PDF format.
[PDF Settings] Dialog
[PDF Type]
Specifies whether a one-page PDF is created for each scanned image file or whether a PDF comprising multiple pages is created.
If you select [Add Page], a page of the scanned image is added and saved to the PDF file specified in [Create PDF File Based On].
[PDF Compression]
Specifies a PDF compression method.
If you select [Compact], the file size will be smaller than [Standard] but the image quality will decrease.
If [Black and White] is selected for the [Scan] pane > [Color Mode], a file equivalent to [Standard] will be saved even if you select [Compact].
[Save Scanned Image to]
Specifies the save destination for a scanned image.
[Save Pictures to a Subfolder with Current Date]
Creates a subfolder named after the scan date in the folder specified in [Save Scanned Image to], and saves the image therein.
[Open the Storage Location After Scanning Is Finished]
Opens the folder where the scanned image has been saved after scanning.
[External Program] Pane |
[Program to Start After Scanning Is Finished]
Starts the application set for the scanned image.
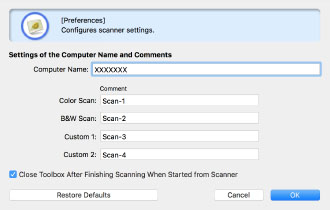
[Preferences] Dialog
Sets the computer that sends scanned images, the button names for scanning methods displayed in the main dialog, etc.
[Start Key on the Scanner]
When initiating scanning from the device, specifies which method registered in MF Toolbox to scan with or whether to display the main dialog.
[Computer Name]
Sets the computer name to be displayed as the scanned image transmission destination in the device.
[Button 1]-[Button 4]
Sets the [Display Name] and [Comment] of the buttons displayed in the main dialog. Depending on the device, the set comment may be displayed at the device when scanning.
[Color Scan]/[B&W Scan]/[Custom 1]/[Custom 2]
Sets the [Comment] of the buttons displayed in the main dialog. Depending on the device, the set comment may be displayed at the device when scanning.
[Close Toolbox After Finishing Scanning When Started from Scanner]
When scanning from the device, closes MF Toolbox when scanning is complete.