Printing Using a Template from the Desktop Browser Screen
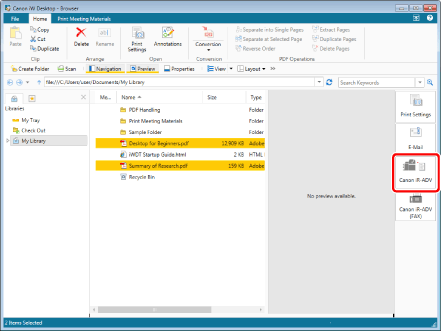
You can use a printer output button registered in the output bar in the Desktop Browser screen to print a document using a Desktop Editor template. You can also collect multiple documents into a single document.
|
NOTE
|
|
To print from the output bar on the Desktop Browser screen, it is necessary to register a printer output button in the output bar. To print using a template, the [Use print settings of template when printing] check box must be selected in the printer output button settings. For information on registering and setting buttons, see the following.
If you change the name of the printer registered in a printer output button on the Windows printer properties screen, you will not be able to print a document using the printer output button.
When printing an IWB document with print settings specified using a printer output button, it will be printed according to the template settings specified in the printer output button.
If you print an image whose width or height exceeds 482.6 mm (19 inches), it is reduced to fit the size set in [Reduced Image Paper Size] when printing.
If information for the resolution is not included in the image, the image is converted to 96 dpi when reduced.
[File] menu > [Option] > [System Settings] > [Common Settings] > [Import] > [Reduced Image Paper Size]
When you print an IWB document with Mail Merge print settings from Desktop Browser screen, the Mail Merge print settings are not applied and the document is printed normally. To perform Mail Merge printing, use Desktop Editor.
|
1.
Select a document/folder to print in the File List View Window, and click  (printer output button).
Or, follow one of the steps described below.
Drag and drop the document/folder to  (printer output button)
Right-click to select the document or folder, drag and drop it to  (printer output button), and select [Multiple Document Order Settings] from the displayed menu

A confirmation message is displayed.
|
NOTE
|
|
You can also use one of the following methods to perform the same operation.
Click
 for a printer output button displayed on the ribbon or toolbar for a printer output button displayed on the ribbon or toolbarClick
 for a printer output button displayed on the ribbon or toolbar, and select [Execution] for a printer output button displayed on the ribbon or toolbar, and select [Execution]If buttons are not displayed on the ribbon or toolbar, see the following to display them.
|
2.
Click [Yes].

When you select a single document, printing starts.
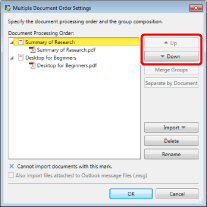
When you select multiple documents or folders, the [Multiple Document Order Settings] dialog box is displayed. In this case, proceed to step 3.
If you selected [Multiple Document Order Settings] in step 1, proceed to step 3.
|
NOTE
|
|
If annotations are included in a document, you can select the [Print annotations] check box to also print the annotations.
Annotations added with something other than Desktop Editor may be printed regardless of whether you select the [Print annotations] check box, depending on the type of annotation.
|
3.
Select a document in [Document Processing Order] and click [Up] or [Down] to specify the order of printing the documents.

|
NOTE
|
|
For more information on the [Multiple Document Order Settings] dialog box, see the following.
|
4.
Click [OK].
Printing of the document starts.
A confirmation message appears if, in the template, there are any printer settings that cannot be used by the selected printer.
Click [Yes], and Desktop Editor starts and you can confirm the print settings.
Click [No] if you want to print without applying a template.
|
NOTE
|
|
If [Check preview with Editor before printing] is selected in the printer output button settings, Desktop Editor is started.
If, after printing, the application remains open and the [The printing process is taking some time, or a supported application related to documents may be running. Check the printer if printing has finished. Also, if a supported application related to the documents being processed is running, quit the supported application. Do you want to continue?] message is displayed, close the application or select [No].
For more information on the print job status, see the following.
|