Checking In
Checking in the document checked out from a Document Server Library/SharePoint Server Library reregisters it in the original location as the newest version of the document and makes it available to other users.
|
NOTE
|
|
You cannot check in while multiple documents are being selected.
Documents for which the mandatory property items are not entered in the document properties cannot be checked in.
For more information on how to check in and register a folder or document in a Document Server Library for which [Require Check Out] is enabled, see the following.
For more information on how to check out a document, see the following.
Also, users with Full Control (Document Server/SharePoint Server) permission can check in the documents that have been checked out by other users. For more information on permissions in Document Server/SharePoint Server, consult the server administrator of Document Server/SharePoint Server.
|
Checking In the Checked Out Document
1.
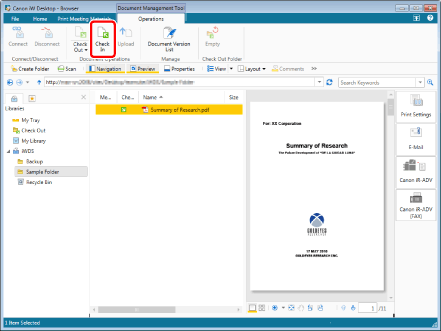
Select the documents to check in from the File List View Window.
2.
Click  (Check In) on the ribbon.
 (Check In) on the ribbon.
Or, right-click and select [Check In Document].

For the library with [Create Version] enabled, the [Enter Version Comments] dialog box is displayed. However, in the following cases, no operation is necessary because check in is performed without displaying the [Enter Version Comments] dialog box.
When the [Enter version comments when checking in documents] check box is deselected
[File] menu > [Option] > [System Settings] > [Browser] > [Shared Document Management] > [Enter version comments when checking in documents]
When the [Do not show this dialog box again when checking in documents] check box is selected in the [Enter Version Comments] dialog box
|
NOTE
|
|
When you select a document in a Document Server Library or SharePoint Server Library for which no connection has been established, the library must be connected. For more information on connecting, see the following.
This operation can also be performed with the tool buttons on the toolbar. If tool buttons are not displayed on the toolbar of Desktop Browser, see the following to display them.
|
3.
When the [Enter Version Comments] dialog box is displayed, enter a comment as necessary, and click [OK].
The document is checked in the library, and the check out icon disappears.
Checking In from the Check Out Folder
1.
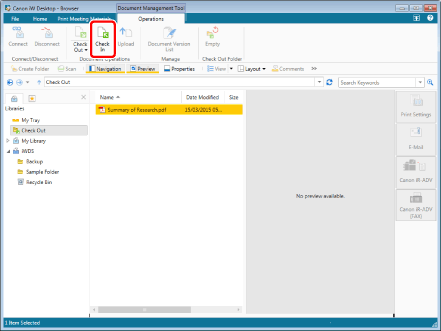
Select the check out folder from the Navigation Window.
Items in the check out folder are displayed in the File List View Window.
2.
Select the documents to check in from the File List View Window.
3.
Click  (Check In) on the ribbon.
 (Check In) on the ribbon.
Or, right-click and select [Check In Document].

For the library with [Create Version] enabled, the [Enter Version Comments] dialog box is displayed. However, in the following cases, no operation is necessary because check in is performed without displaying the [Enter Version Comments] dialog box.
When the [Enter version comments when checking in documents] check box is deselected
[File] menu > [Option] > [System Settings] > [Browser] > [Shared Document Management] > [Enter version comments when checking in documents]
If the [Do not show this dialog box again when checking in documents] check box is selected in the [Enter Version Comments] dialog box
|
NOTE
|
|
When you select a document in a Document Server Library or SharePoint Server Library for which no connection has been established, the library must be connected. For more information on connecting, see the following.
This operation can also be performed with the tool buttons on the toolbar. If tool buttons are not displayed on the toolbar of Desktop Browser, see the following to display them.
|
4.
If necessary, enter a comment, and click [OK].
The document is checked into the library, and the document is deleted from the check out folder.