Managing Watermarks
You can register, duplicate, edit, and delete watermarks that are added to a document.
|
NOTE
|
|
If multiple instances of Desktop Editor are running and you register, duplicate, edit, or delete a watermark, the change is only reflected to the watermark list of the Desktop Editor used to perform the operation. If you close all instances of Desktop Editor that are running, the settings are reflected the next time you start Desktop Editor.
If you create a watermark with the same name in multiple instances of Desktop Editor, the watermark is saved with a "(1)" added to its name in the Desktop Editor closed last. If the name of the watermark exceeds 31 characters, the last characters of the original name are deleted until the name including "(1)" becomes 31 characters.
Only watermarks in documents being edited become unique watermarks. The icon displayed for these watermarks when [Add/Delete Watermark] on the [Page Settings] tab on the Details Window is clicked becomes
The following file types can be set as watermarks.
JPEG (*.jpg/*.jpeg)
TIFF (*.tif/*.tiff) (For a multi-page TIFF image, the first page is used. TIFF images including transparent parts also can be used.)
BMP (*.bmp)
PNG (*.png)
GIF (*.gif)
The types of image files that can be set for watermarks may increase, depending on the codecs installed in your computer.
In the following preview and in the actual print preview, the position of watermarks may vary.
The [Watermark Management] dialog box displayed by clicking [Watermark Management] on the [Page Settings] tab on the Details Window
The [Add/Delete Watermark] dialog box displayed by clicking [Add/Delete Watermark] on the [Page Settings] tab on the Details Window
|
Registering Watermarks
You can register new watermarks.
1.
Click [Watermark Management] on the [Page Settings] tab on the Details Window.
Or, follow one of the steps described below.
Click  (Watermark Management) on the ribbon
 (Watermark Management) on the ribbon
Select the [File] menu > [Settings/Management] > [Watermark List]

The [Watermark Management] dialog box is displayed.
|
NOTE
|
|
If the Details Window is not displayed, see the following.
If commands are not displayed on the ribbon of Desktop Editor, see the following to display them.
This operation can also be performed with the tool buttons on the toolbar. If tool buttons are not displayed on the toolbar of Desktop Editor, see the following to display them.
|
2.
Click [Add].
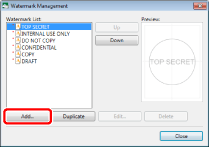
The [Add New Watermark] dialog box is displayed.
3.
Set the new watermark to add.
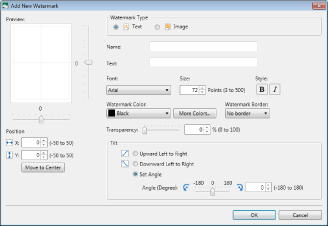
|
[Preview]
|
Displays a preview of the set watermarks.
The slider position indicates the display position of the watermark. If you want to change the position of the watermark, move the slider up and down or left and right.
|
|
[Position]
|
Sets the position of the watermark. Enter values in [X] and [Y] to set the position.
|
|
[Move to Center]
|
Moves the watermark to the center.
|
|
[Watermark Type]
|
Select [Text] or [Image].
The items that you can set differ according to the selected type.
|
|
[Name]
|
Enter the name of the watermark.
|
|
[Text]
|
Enter the string to display when the watermark is added to a document.
Displayed when you select [Text] in [Watermark Type].
|
|
[File Name]
|
Enter the path of the image file that is displayed when adding watermarks to the document.
Displayed when you select [Image] in [Watermark Type].
|
|
[Browse]
|
Click [Browse] and select the image you want to use.
Displayed when you select [Image] in [Watermark Type].
|
|
[Font]
|
Sets the font.
Displayed when you select [Text] in [Watermark Type].
|
|
[Size]
|
Sets the font size.
Displayed when you select [Text] in [Watermark Type].
|
|
[Style]
|
Sets the font style.
Displayed when you select [Text] in [Watermark Type].
|
|
[Watermark Color]
|
Sets the watermark color. When you want to use a color that is not available in the list, click [More Colors].
Displayed when you select [Text] in [Watermark Type].
|
|
[More Colors]
|
If you click this, the [Color] dialog box is displayed. On the [Color] dialog box, you can set a color that is not listed in [Watermark Color].
|
|
[Watermark Border]
|
Select one of the following watermark borders.
[No border]
[Round]
[Box]
Displayed when you select [Text] in [Watermark Type].
|
|
[Image Scaling Settings]
|
Select one of the following image scaling settings.
[Maintain original size]
[Fit to output paper]
[Specify scaling]
If you selected [Specify scaling], enter a value in [Scaling].
Displayed when you select [Image] in [Watermark Type].
|
|
[Transparency]
|
The slider position and the numeric value (%) indicate the degree of transparency of the watermark. To change the degree of transparency, move the slider to left or right, or enter a numeric value.
|
|
[Tilt]
|
Select one of the following watermark tilts.
[Upward Left to Right]
[Downward Left to Right]
[Set Angle]
If you selected [Set Angle], enter a value directly or adjust the value using the slider.
Displayed when you select [Text] in [Watermark Type].
|
|
NOTE
|
|
Enter the watermark name using up to 31 characters.
|
4.
Click [OK].
The watermark added to [Watermark List] is registered.
5.
Click [Close].
Duplicating Watermarks
You can duplicate registered watermarks.
1.
Click [Watermark Management] on the [Page Settings] tab on the Details Window.
Or, follow one of the steps described below.
Click  (Watermark Management) on the ribbon
 (Watermark Management) on the ribbon
Select the [File] menu > [Settings/Management] > [Watermark List]

The [Watermark Management] dialog box is displayed.
|
NOTE
|
|
If the Details Window is not displayed, see the following.
If commands are not displayed on the ribbon of Desktop Editor, see the following to display them.
This operation can also be performed with the tool buttons on the toolbar. If tool buttons are not displayed on the toolbar of Desktop Editor, see the following to display them.
|
2.
Select the watermark to duplicate in [Watermark List] and click [Duplicate].
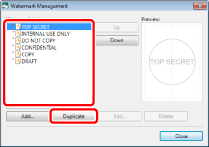
The watermark is duplicated.
|
NOTE
|
|
The name of the duplicated watermark is the original watermark name plus "(1)".
To change the name, edit the watermark after it is duplicated.
The default watermarks can also be duplicated.
|
3.
Click [Close].
Editing Watermarks
You can edit registered watermarks.
|
NOTE
|
|
The default watermarks cannot be edited.
|
1.
Click [Watermark Management] on the [Page Settings] tab on the Details Window.
Or, follow one of the steps described below.
Click  (Watermark Management) on the ribbon
 (Watermark Management) on the ribbon
Select the [File] menu > [Settings/Management] > [Watermark List]

The [Watermark Management] dialog box is displayed.
|
NOTE
|
|
If the Details Window is not displayed, see the following.
If commands are not displayed on the ribbon of Desktop Editor, see the following to display them.
This operation can also be performed with the tool buttons on the toolbar. If tool buttons are not displayed on the toolbar of Desktop Editor, see the following to display them.
|
2.
Select the watermark to edit in [Watermark List] and click [Edit].
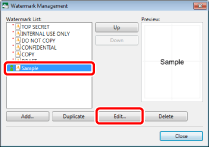
The [Edit Watermark] dialog box is displayed.
3.
Set the items to change and click [OK].
The [Watermark Management] dialog box is displayed again.
|
NOTE
|
|
[Watermark Type] cannot be changed in the [Edit Watermark] dialog box.
|
4.
Click [Close].
Deleting Watermarks
You can delete registered watermarks.
|
NOTE
|
|
The default watermarks cannot be deleted.
|
1.
Click [Watermark Management] on the [Page Settings] tab on the Details Window.
Or, follow one of the steps described below.
Click  (Watermark Management) on the ribbon
 (Watermark Management) on the ribbon
Select the [File] menu > [Settings/Management] > [Watermark List]

The [Watermark Management] dialog box is displayed.
|
NOTE
|
|
If the Details Window is not displayed, see the following.
If commands are not displayed on the ribbon of Desktop Editor, see the following to display them.
This operation can also be performed with the tool buttons on the toolbar. If tool buttons are not displayed on the toolbar of Desktop Editor, see the following to display them.
|
2.
Select the watermark to delete in [Watermark List] and click [Delete].
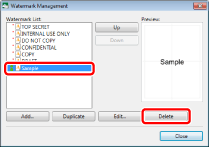
A confirmation message is displayed.
3.
Click [Yes].
The watermark is deleted.
4.
Click [Close].
Changing the Display Order of Watermarks
You can change the display order of watermarks.
1.
Click [Watermark Management] on the [Page Settings] tab on the Details Window.
Or, follow one of the steps described below.
Click  (Watermark Management) on the ribbon
 (Watermark Management) on the ribbon
Select the [File] menu > [Settings/Management] > [Watermark List]

The [Watermark Management] dialog box is displayed.
|
NOTE
|
|
If the Details Window is not displayed, see the following.
If commands are not displayed on the ribbon of Desktop Editor, see the following to display them.
This operation can also be performed with the tool buttons on the toolbar. If tool buttons are not displayed on the toolbar of Desktop Editor, see the following to display them.
|
2.
Select the watermark to change the display order of in [Watermark List], and click [Up] or [Down].
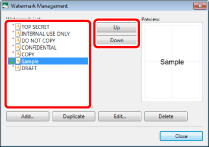
The display order is changed.
3.
Click [Close].