Configuring Cover/Back Cover/Inserted Sheets/Tab Paper for the Entire Document
This section describes how to configure the sheet insertion settings for the entire document when printing.
Additionally, you can print the chapter name on the tab area of the tab paper.
|
Type of Sheet Insertion
|
Insertion Position
|
Remarks
|
|
Front Cover
|
The sheet is inserted before the first page of the binder document.
|
|
|
Back Cover
|
The sheet is inserted after the last page of the binder document.
|
You cannot configure this when performing a booklet printing.
|
|
Tab Paper
|
The tab paper is inserted before the first page of the chapter in the binder document.
|
You can print the chapter name in the tab area.
You cannot configure this when the output paper size of the binder document is other than A4 or LTR.
You cannot configure this when performing a booklet printing.
|
|
Sheets
|
The sheet is inserted before the first page of the chapter in the binder document.
|
You cannot configure this when performing a booklet printing.
|
|
Note
|
|
The inserting sheet that you can configure when performing a booklet printing is the cover only.
When the setting is specified in combination with interleaving paper (inserted sheet) and tab paper, you can set the insertion order.
Whether or not you can set tab paper varies depending on the paper source of the printer selected in [Printer Name].
When you insert a sheet and then export a document as a PDF, all pages including the inserted sheet will be exported.
|
In addition, refer to the following as necessary.
1.
In [Sheet for Insertion] in the [Print Settings] tab of the [Print Settings] pane, select the check box corresponding to the type of paper that you want to insert in the binder document.
The Preview Pane is updated according to the selected inserting sheet.
2.
Click [Detailed Settings].
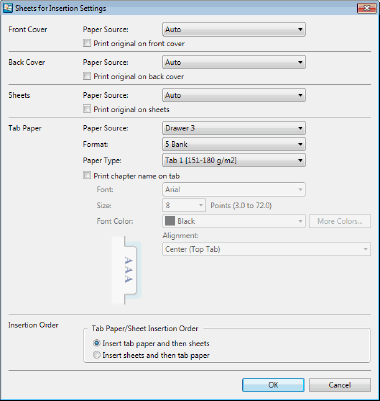
The [Sheets for Insertion Settings] dialog box is displayed.
|
[Front Cover]
|
Cover sheet settings.
|
|
[Paper Source]
|
Sets the paper source of the cover sheet.
|
|
[Print original on front cover]
|
Select this when printing on a cover sheet.
|
|
[Back Cover]
|
Back cover sheet settings.
|
|
[Paper Source]
|
Sets the paper source of the back cover sheet.
|
|
[Print original on back cover]
|
Select this when printing on a back cover sheet.
|
|
[Sheets]
|
Inserted sheet settings.
|
|
[Paper Source]
|
Sets the paper source of the inserted sheets.
|
|
[Print original on sheets]
|
Select this when printing on the inserted sheets.
|
|
[Tab Paper]
|
Tab paper settings.
|
|
[Paper Source]
|
Sets the paper source of the tab paper.
|
|
[Format]
|
Selects the number of the tab area on the tab paper.
|
|
[Paper Type]
|
Selects the type of sheet to use for the tab paper.
|
|
[Print chapter name on tab]
|
Select this check box when printing chapter names in the index tab.
|
|
[Font]
|
Select a font to use. The list displays the fonts installed in your computer.
|
|
[Size]
|
Select a font size to use. You can also enter the font size directly. Font sizes that can be configured are between 3.0 and 72.0 points. If it is entered directly, the figures below the second decimal place are omitted.
|
|
[Font Color]
|
Select a font color to use. When you want to use a color that is not available in the list, click [More Colors].
|
|
[More Colors]
|
If you click this, the [Color] dialog box is displayed. Using the [Color] dialog box, you can set a color that is not listed in [Font Color].
|
|
[Alignment]
|
Select how the text is aligned.
|
|
[Insertion Order]
|
Set the order in which the sheets will be inserted.
|
|
[Tab Paper/Sheet Insertion Order]
|
Select [Insert tab paper and then sheets] or [Insert sheets and then tab paper].
|
|
Note
|
|
The functions you can use differ according to the item selected in [Paper Source].
|
3.
From [Paper Source], select the paper sources to feed respective inserting sheets for which you have selected the corresponding check boxes.
|
Note
|
|
The options available in [Paper Source] may vary depending on the type of paper sources installed on the printer selected in [Printer Name].
|
4.
Select this check box when printing an original as a cover, back cover sheet, or sheet insertion.
5.
When you insert tab papers, select the number of tab part in [Format] and select the type of tab paper in [Paper Type].
6.
When you print the chapter name on the tab area of the tab paper, select the [Print chapter name on tab] check box and configure the print format settings.
|
Note
|
|
When the setting is made so that the chapter name is printed, the chapter name is also exported to the tab area at the time of export to a PDF document.
Even if 2-sided printing is specified, the chapter name is only printed on one side of the index tab (the same is true at the time of export to a PDF document).
|
7.
Click [OK].