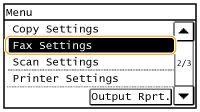
Fax Settings
 |
|
All the settings about the fax are listed with short descriptions. Default settings are marked with a dagger (
 ). ). |
 |
If a screen for entering a PIN is displayedEnter the PIN with the numeric keys and tap <Apply>. Setting the System Manager PIN
Asterisks (*)Settings marked with "*1" are only available for the MF229dw.
Settings marked with "*2" are only available for the MF229dw / MF227dw.
|
Basic Settings
Specify the basic settings for using the machine as a fax device.
Register Unit Telephone Number
Register the fax number for the machine. Registering the Fax Number and Unit Name
Select Line Type
Select the telephone line type used for fax transmission. Connecting the Telephone Line
|
Pulse
Tone |
Public Line Connection
When the fax receive mode is <Fax/Tel (Auto Switch)>, an external telephone may not ring or a call may not be dialable. In this instance, specify <Adapter 1> or <Adapter 2>.
|
Direct
Adapter 1
Adapter 2
|
<Menu>  <Fax Settings> <Basic Settings> <Public Line Connection> Select connection type
Off-Hook Alarm
Select whether the machine makes an alert sound when the handset of a telephone connected to the machine is not properly set on the cradle. You can also adjust the volume of the alert sound.
|
0
to 5 |
<Menu> <Fax Settings> <Basic Settings> <Off-Hook Alarm> Select the volume of the alert sound <Apply>
Communication Management Settings
Adjust the communication start speed in descending order from "33600 bps." This adjustment should be made when it takes a long time to start sending or receiving a fax due to a poor telephone line connection.
|
TX Start Speed
33600 bps
14400 bps
9600 bps
7200 bps
4800 bps
2400 bps
RX Start Speed
33600 bps
14400 bps
9600 bps
7200 bps
4800 bps
2400 bps
|
<Menu> <Fax Settings> <Basic Settings> <Communication Management Settings> Select a communication start speed
TX Function Settings
Specify settings for sending faxes.
Change Default Settings
Specify settings used for sending faxes. The selected settings are used as the default settings when scanning documents. Changing Default Settings
|
Resolution
200 x 100 dpi (Normal)
200 x 200 dpi (Fine)
200 x 200 dpi (Photo)
200 x 400 dpi (Superfine)
Density
Nine Levels
2-Sided Original *1
Off
Book Type
Calendar Type Sharpness
Seven Levels
|
Register Unit Name
Register the name of a company or person. Registering the Fax Number and Unit Name
The registered name is sent as sender information to the destination. TX Terminal ID
ECM TX
Enable or disable error correction mode (ECM). ECM checks for fax data errors and corrects them. To reduce errors on received faxes, see ECM RX.
|
Off
On
|
|
|
|
ECM must be enabled on both the machine and the other fax device because error checks are performed on both the sending and receiving devices.
Even when ECM is enabled, errors may occur due to telephone line conditions.
It may take a longer time than usual to process data when ECM is enabled because the error checks and corrections are performed while the data is transmitted.
|
<Menu> <Fax Settings> <TX Function Settings> <ECM TX> <On>
Set Pause Time
For example, when you make calls by dialing "0 - (pause) - (telephone number)", 0 is dialed first and then a few seconds later, the telephone number. When sending faxes overseas, you need to specify destinations by dialing "(international access code) - (country code) - (area code) - (fax number)" but consecutive numbers that are input without pauses may not be recognized correctly. In this case, try adding a pause after the international access code or the fax number. If the code or the number is still not recognized correctly, change the duration of the pause. For instructions on how to enter a pause, see step 3 on Sending Faxes.
|
1 to 2
to 15 (sec.) |
<Menu> <Fax Settings> <TX Function Settings> <Set Pause Time> Specify the duration of pause <Apply>
Auto Redial
Specify settings for Auto Redial, a function that automatically redials the fax number after several minutes if the first attempt fails because the line is busy. You can specify how many times the machine redials and the interval between redials.
|
Off
On
No. of Times to Redial
1 to 2
to 10 (times)Redial Interval
2
to 99 (min.)Redial When Err Occurs
Off
On
|
<Menu> <Fax Settings> <TX Function Settings> <Auto Redial> <On> Specify the settings <Apply>

 <No. of Times to Redial>
Specifies how many times the machine redials. Use  /
/ or the numeric keys to enter a number, and tap <Apply>.
/ or the numeric keys to enter a number, and tap <Apply>. <Redial Interval>
Specifies the interval between redials. Use / or the numeric keys to enter a number for the interval, and tap <Apply>.
/ or the numeric keys to enter a number for the interval, and tap <Apply>. <Redial When Err Occurs>
Specifies whether to redial when a transmission error occurs. Select <Off> or <On>.
TX Terminal ID
Specify settings for adding the sender information, including the fax number and the name of the machine, to the fax header. The recipient can check who sent the fax by looking at the added information.
|
Off
On
Print Position
Inside Image Area
Outside Image Area Mark No. as: TEL/FAX
FAX
TEL |
<Menu> <Fax Settings> <TX Function Settings> <TX Terminal ID> <On> Specify the settings <Apply>
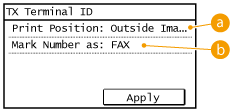
<Print Position>
Specifies the position to print the terminal ID information in the sent fax. Select <Inside Image Area> to print the information inside the image area, or <Outside Image Area> to print the information outside the image area.
<Mark No. as: TEL/FAX>
Adds the "FAX" or "TEL" mark in front of the fax number registered for the machine (Registering the Fax Number and Unit Name). Select <TEL> to indicate that the notified number is a telephone number.
Check Dial Tone Before Sending
Select whether to check the dial tone before a fax number is dialed.
|
Off
On
|
<Menu> <Fax Settings> <TX Function Settings> <Check Dial Tone Before Sending> Select <On> or <Off>
Allow Fax Driver TX
Enable or disable PC faxing (sending faxes from a computer). Prohibiting PC Faxing
|
Off
On
|
Confirm Entered Fax Number
Select whether to require users to enter the fax number twice when it is entered by using the numeric keys. Displaying the Screen for Confirming the Fax Number
|
Off
On
|
RX Function Settings
Specify settings for receiving faxes.
ECM RX
Enable or disable error correction mode (ECM). ECM checks for fax data errors and corrects them. To reduce errors on sent faxes, see ECM TX.
|
Off
On
|
|
|
|
ECM must be enabled on both the machine and the other fax device because error check is performed on both the sending and receiving devices.
Even when ECM is enabled, errors may occur due to telephone line conditions.
It may take a longer time than usual to process data when ECM is enabled because the error check and corrections are performed while the data is transmitted.
|
<Menu> <Fax Settings> <RX Function Settings> <ECM RX> <On>
Incoming Ring
Specify settings for sounding a ring to notify you of incoming faxes. This feature is only available when <Auto> or <Fax/Tel (Auto Switch)> is selected for the receive mode. Specify how many times the incoming call rings when the machine receives a fax call. You can also disable the settings to prevent the incoming call from ringing.
|
Off
On
1 to 2
to 99 (times) |
|
|
|
If you use this feature in the <Auto> mode, you need to connect your telephone to the machine beforehand.
|
<Menu> <Fax Settings> <RX Function Settings> <Incoming Ring> <On> Specify how many times the incoming call rings <Apply>
Remote RX
Specify settings for receiving a fax by operating a telephone that is connected to the machine (Remote Reception). When a fax is sent to the machine, you can receive it just by picking up the handset of the telephone and entering a specific ID number by using the telephone. This feature can save you the trouble of going all the way to the machine. For instructions on how to use Remote Reception, see Using a Telephone to Receive Faxes (Remote Reception).
|
Off
On
00 to 25
to 99 |
<Menu> <Fax Settings> <RX Function Settings> <Remote RX> <On> Specify the ID number for receiving a fax <Apply>
Switch to Auto RX
Specify settings for automatically receiving a fax after the machine has rung for a specified time period. This feature is only available when <Manual> is selected for the receive mode. By using this feature, faxes can be received even when no one is available to pick up the handset.
|
Off
On
1 to 15
to 99 (sec.) |
<Menu> <Fax Settings> <RX Function Settings> <Switch to Auto RX> <On> Specify how long the incoming call rings <Apply>
Memory Lock Settings
Select whether to store received faxes without immediately printing them. Stored fax documents can be printed at any time by changing the setting to <Off>. Storing Received Faxes into Memory (Memory Reception)
|
Off
On
Memory Lock PIN
Report Print
Off
On
Memory Lock Time
Off
On
Memory Lock Start Time
Memory Lock End Time
|
<Menu> <Fax Settings> <RX Function Settings> <Memory Lock Settings> <On> Specify settings <Apply>
RX Print Settings
Specify settings for printing received faxes.
Print on Both Sides *2
Specify settings for printing received faxes on both sides of paper.
|
Off
On
|
<Menu> <Fax Settings> <RX Print Settings> <Print on Both Sides> <On>
Reduce RX Size
Specify settings for reducing the image size of a received document. You can select an automatic reduction ratio that reduces the received document to size of the loaded paper. You can also select a ratio from a list.
|
Off
On
Reduction Ratio
Auto
97% 95% 90% 75% Reduction Direction
Vertical/Horizontal
Vertical Only |
<Menu> <Fax Settings> <RX Print Settings> <Reduce RX Size> <On> Specify the settings <Apply>
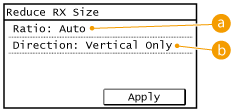
<Reduction Ratio>
<Auto> reduces the image by a ratio that is based on the size of the loaded paper. <97%>, <95%>, <90%>, or <75%> reduce the image by the corresponding ratio.
<Reduction Direction>
Select <Vertical/Horizontal> to reduce the image both vertically and horizontally. Select <Vertical Only> to reduce only vertically.
RX Page Footer
Select whether to print information, including date and time of reception and page numbers, on the bottom of received faxes.
|
Off
On |
<Menu> <Fax Settings> <RX Print Settings> <RX Page Footer> <On>
Continue Print. When Near Cart. Life End
If receiving faxes when toner is nearly empty, the machine holds them in memory instead of printing. However, if this function is enabled, the machine continues printing.
|
Off
On |
 |
|
When this function is enabled, faxes may fade or blur. Because received documents are not stored in memory, you need to ask the sender to resend the document.
|
<Menu> <Fax Settings> <RX Print Settings> <Continue Print. When Near Cart. Life End> <On>
Fax Setup Guide
Select to display on-screen instructions for specifying settings, including the fax number and the telephone line type. Configuring Initial Settings for Fax Functions