Setting the IPv4 Address
|
Before setting the IP address, see "Attention (Setting the IPv4 Address)."
|
By default, the IPv4 address is obtained automatically.
Follow the steps in the procedure below to change the IP address setting.
1
Press [ ] (Menu).
] (Menu).2
Select <Network Settings> using [ ] or [
 ], and then press [OK].
] or [], and then press [OK].
When the system manager ID and system manager PIN are specified
Use the numeric keys to enter the ID and number, and then press [ ] (Log In/Out).
] (Log In/Out).
3
Select <TCP/IP Settings> using [] or [], and then press [OK].
] or [], and then press [OK].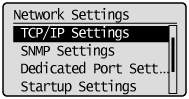
4
Select <IPv4 Settings> using [] or [], and then press [OK].
] or [], and then press [OK].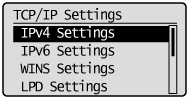
5
Select <IP Address Settings> using [] or [], and then press [OK].
] or [], and then press [OK].
6
Select the method for setting the IP address using [] or [].
] or [].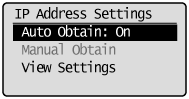
|
<Auto Obtain>
|
Set the IP address using DHCP, BOOTP, RARP, or Auto IP.
|
|
<Manual Obtain>
|
Manually assign an IP address for the machine.
This setting can be specified only when <Select Protocol> and <Auto IP> in <Auto Obtain> are set to <Off>.
|
7
Change the IP address settings.
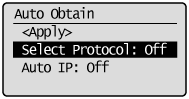
When <Auto Obtain> is selected
|
(1)
|
Change <Auto Obtain> settings.
<Select Protocol>
<Off>
Do not obtain an IP address automatically. <DHCP>
Obtain an IP address automatically using DHCP. (The DHCP server needs to be running.) <BOOTP>
Obtain an IP address automatically using BOOTP. (The BOOTP daemon needs to be running.) <RARP>
Obtain an IP address automatically using RARP. (The RARP daemon needs to be running.) <Auto IP>
<Off>
Do not obtain an IP address automatically. <On>
Obtain an IP address automatically. |
|
(2)
|
Select <Apply> using [
] or [], and then press [OK]. |
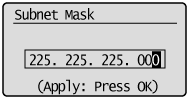
When <Manual Obtain> is selected
This setting can be specified only when <Select Protocol> and <Auto IP> in <Auto Obtain> are set to <Off>.
|
(1)
|
Enter the IP address.
After it has been entered, press [OK].
 |
|
(2)
|
Enter the subnet mask.
After it has been entered, press [OK].
 |
|
(3)
|
Enter the gateway address.
After it has been entered, press [OK].
 |
8
Press [] (Menu) to close the menu screen.
] (Menu) to close the menu screen.9
Restart the machine.
Turn OFF the machine and wait for at least 10 seconds before turning it back ON.