Sending a Fax at a Preset Time
You can automatically send a pre-scanned document at a preset time.
1
Place your fax.
2
Press [ ] (FAX/COPY) to switch to the Fax mode screen.
] (FAX/COPY) to switch to the Fax mode screen.3
Specify the scanning settings as needed.
4
Press [ ] or [
 ] to highlight <Delayed TX>, and then press [OK].
] or [] to highlight <Delayed TX>, and then press [OK].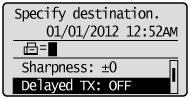
5
Press [] or [] to highlight <On>, and then press [OK].
] or [] to highlight <On>, and then press [OK].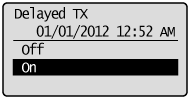
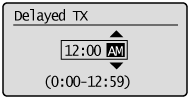
6
Enter the time at which you want to send the document, and then press [OK].
7
Specify the destination.
Specify destinations in the following ways:
by entering the fax number
by selecting a one-touch key
by selecting a coded dial code
by selecting a group address
from the Address book
under sequential broadcasting
8
Press [ ] (Start).
] (Start).When your fax is placed in the feeder:
The scan starts. Your fax is sent to the destination when the scan is complete.
When your fax is placed on the platen glass:
Perform the following procedure.
|
(1)
|
Press [
] or [] to highlight the size of the original document, and then press [OK].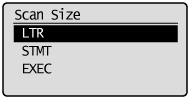 |
|
(2)
|
Place the next page on the platen glass, and then press [
] (Start).Press [
] (Start) for each page. |
|
(3)
|
When all documents are scanned completely, press [
] or [] to highlight <Start Sending>, and then press [OK].Your fax is sent to the destination.
|
|
NOTE
|
If the machine memory becomes full while scanning a document:<Memory is full.> appears in the display and you cannot send the document at a delayed time.
|
The number of operation that you can register:You can only register one preset sending operation at a time.
|
Job operation while the delayed sending is set:To print, copy, or send other documents after setting the machine for delayed sending, simply follow the procedures described in this manual.
|
To cancel a delayed sending: |
If the machine is turned off at the preset time:If the fax is stored in the memory, the fax will be sent when you turn on the machine.
|