Loading Paper in the Drawer
|
NOTE
|
When loading envelopes and custom paper sizesBecause the procedure for loading custom size paper is different from that for loading standard size paper, see "Loading Envelopes and Custom Paper Sizes."
|
Loading Standard Size Paper
 |
For details on the paper that you can load in the drawer, see "Usable Paper."
|
|
|
Load paper in Drawer 2 (optional) in the same manner as you load paper in Drawer 1.
|
|
Before loading paper, see "Attention (Drawer)."
|
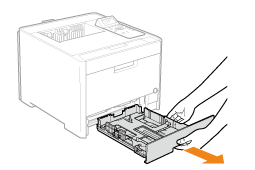
1
Pull out the drawer.
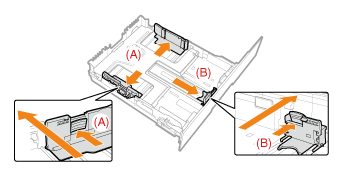
2
Slide the paper guides to the position of the size of the paper to be loaded.
While holding the lock release lever (A), adjust the guides.
|
|
Align the position of (B) with the size mark of the paper to be loaded.
|
 |
|
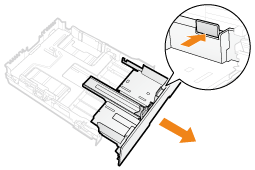
When loading Legal size paperPull out the drawer.
 |
3
Load the paper with the printing side facing up so that the paper stack is aligned with the rear paper guide.

|
IMPORTANT
|
About the paper loading orientationIf you are not using the UFR II printer driver, load paper in portrait orientation.
Also, be sure to load paper in landscape orientation if all the following conditions are fulfilled. You are using the UFR II printer driver.
[Drawer 1 Size] and [Drawer 2 Size] are set to [Mixed Sizes].
Custom size paper whose long edges are 8.50 in. (215.9 mm) or less is loaded.
|
|
NOTE
|
When loading paper with a letterhead or logoSee "Paper Loading Orientation" and load the paper in the correct orientation.
|
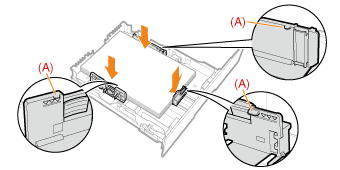
4
Hold down the paper, then set it under the hooks (A) on the paper guides.
|
IMPORTANT
|
Be sure to align the paper guides with the paper.If the paper guides are too loose or too tight, this may result in misfeeds or paper jams.
 |
5
Make sure that the paper stack does not exceed the load limit mark lines (B).
|
|
Be sure that the paper stack does not exceed the load limit mark lines. If the paper stack exceeds the load limit mark lines, this may result in misfeeds.
|

6
When loading Legal size paper, set the Legal dust cover in the paper drawer.
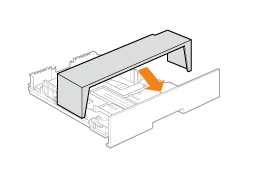
7
Set the drawer in the printer.
|
NOTE
|
When Legal size paper has been loadedWhen the drawer is inserted with it extended, the front side of the drawer is not flush with the front surface of the printer as shown in the following figure.
 |
 "
"