Configuring the Protocol Settings
This section describes the procedure for specifying the settings using the Remote UI.
 |
In the Remote UI, you can specify the settings by accessing the printer from a Web browser via a network.
|
|
Before specifying the settings, see "Attention (Protocol Settings)."
|
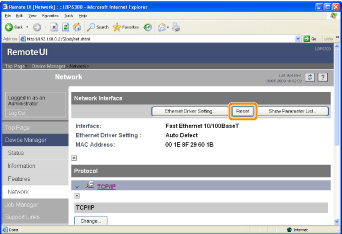
1
Start the Remote UI, and then log in as Administrator.
2
Select [Network] from the [Device Manager] menu.
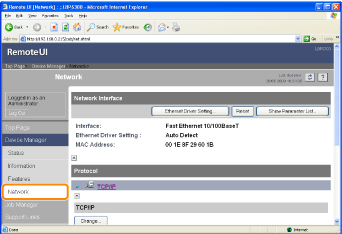
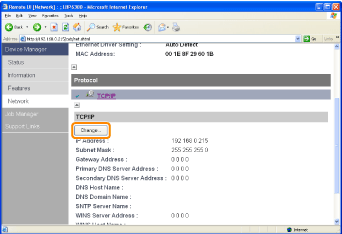
3
Click [Change] under [TCP/IP].
4
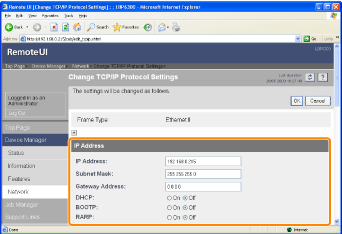
Configure the protocol settings.
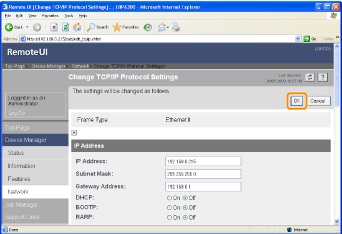
IP Address Settings
|
[IP Address]
|
Enter the IP address of the printer.
|
|
[Subnet Mask]
|
Enter the subnet mask that is being used on the TCP/IP network.
|
|
[Gateway Address]
|
Enter the gateway address that is being used on the TCP/IP network.
|
|
[DHCP]
|
Select whether to set the IP address using DHCP.
|
|
[BOOTP]
|
Select whether to set the IP address using BOOTP.
|
|
[RARP]
|
Select whether to set the IP address using RARP.
|
|
IMPORTANT
|
For details on the procedure for setting a port when using DHCP, BOOTP, or RARPSee "Values for Setting a Port" or ask your network administrator.
|
|
Proceed to Step 5 if you do not specify the settings for the other options.
|
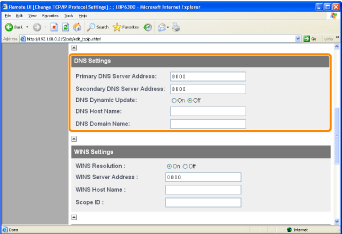
DNS Settings
|
[Primary DNS Server Address]
|
Enter the IP address of the primary DNS server.
|
|
[Secondary DNS Server Address]
|
Enter the IP address of the secondary DNS server.
|
|
[DNS Dynamic Update]
|
Select whether to use the DNS Dynamic Update function.
|
|
[DNS Host Name]
|
Enter the host name to be added to the DNS server.
|
|
[DNS Domain Name]
|
Enter the name of the domain to which the printer belongs.
Input Example: "example.com"
|
|
|
In the following case, DNS is to be used.
When performing name resolution using the SNTP server name to set the SNTP client function (When you specify the SNTP server name)
 "Configuring the SNTP Settings (Notifying the printer of the Time via an SNTP Server)" "Configuring the SNTP Settings (Notifying the printer of the Time via an SNTP Server)" |
|
Proceed to Step 5 if you do not specify the settings for the other options.
|
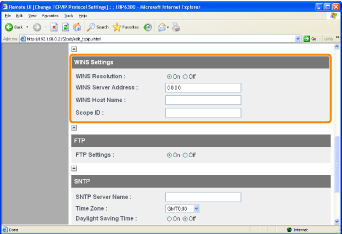
WINS Settings
If you want to use WINS Resolution
|
1.
|
Set [WINS Resolution] to [On].
|
|
2.
|
Enter the IP address of the WINS server in [WINS Server Address].
|
|
3.
|
Enter the host name to be added to the WINS server in [WINS Host Name].
|
|
4.
|
In [Scope ID], enter the Scope ID of the NetBIOS name that you want to search for from the WINS server.
You can refine the search by separating the character string with "." (period). |
If you do not want to use WINS Resolution
Set [WINS Resolution] to [Off].
|
Proceed to Step 5 if you do not specify the settings for the other options.
|
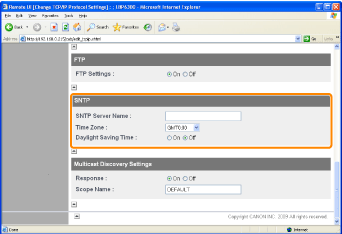
FTP Settings
Select whether to use the FTP server.

|
Proceed to Step 5 if you do not specify the settings for the other options.
|
Configuring the SNTP Settings (Notifying the printer of the Time via an SNTP Server)
If the DNS server is configured
|
1.
|
Enter the server name of the SNTP server in [SNTP Server Name].
|
|
2.
|
Select [Time Zone].
|
|
3.
|
To set daylight saving time, set [Daylight Saving Time] to [On].
|
If the DNS server is not configured
|
1.
|
Enter the IP address of the SNTP server in [SNTP Server Name].
|
|
2.
|
Select [Time Zone].
|
|
3.
|
To set daylight saving time, set [Daylight Saving Time] to [On].
|
 If an SNTP server is not available If an SNTP server is not availableYou can notify the printer of the time set on the computer using the following procedure.
|
 ] in the Windows taskbar, and then select the printer name.
|
Proceed to Step 5 if you do not specify the settings for the other options.
|
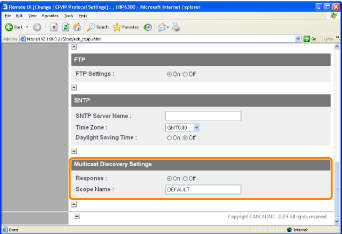
Multicast Discovery Settings
If you want to set the printer so that it responds to searches that use the multicast discovery function
|
1.
|
Set [Response] to [On].
|
|
2.
|
In [Scope Name], enter the scope name to be used when searching for certain devices from utility software, such as NetSpot Device Installer, by multicast.
|
If you want to set the printer so that it does not respond to searches that use the multicast discovery function
Set [Response] to [Off].
|
Proceed to Step 5 if you do not specify the settings for the other options.
|
Click [OK].
6
Click [Reset].
After completing the reset, the settings are effective.