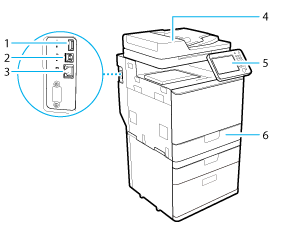
Exterior


When the Cassette Feeding Unit-AJ1 is attached.
 USB Port (1)
Connect a USB-based device such as a USB keyboard.
 USB Port (2)
You can also connect the machine to a computer using a USB cable. For connection steps, see "Getting Started". Manuals Included with the Machine
 LAN Port
Use an Ethernet cable to connect the machine to a network. Connecting to a Wired LAN
 Feeder
Originals placed in the feeder are automatically fed sheet by sheet to the scanning area. The feeder also automatically turns over two-sided originals to make one- or two-sided copies. Feeder
 Operation Panel
The Operation panel includes the keys, the display, and indicators required for operating the machine. Operation Panel Display
 Paper drawer
Holds up to 550 sheets of paper (80 g/m²). Loading Paper in the Paper Drawer
 Output Tray
Prints are output to this tray.
 USB Port (3)
You can connect a USB memory device to the machine and directly print the data from the USB memory device. Documents scanned by using the machine can also be saved directly to the USB memory device.
 Right Cover of the Main Unit
Open this cover when clearing a paper jam inside the main unit. Clearing Jams
 Multi-Purpose Tray
Use the multi-purpose tray to feed paper manually, and for loading nonstandard paper stock, such as envelopes. Loading Paper in the Multi-Purpose Tray
 Power Switch
Press to the "I" side to turn ON the machine. Turn On the Power/Shutting Down the Machine
 Hand set jack
Connect the line for an optional handset. Connecting the Telephone Line
 External telephone jack
Connect the line for a telephone.Connecting the Telephone Line
 Telephone line jack
Use this port to connect a fax line to the machine.Connecting the Telephone Line
 Right Cover of the Paper Drawer
Open this cover when clearing a paper jam. Clearing Jams
Adjusting the Angle of the Operation panel
The angle of the operation panel is adjustable as shown below.
 * Adjustable Range
|