
Installing the Paper Feeder
This section describes how to install the paper feeder in the machine. Read the precautions in Installation before installing the paper feeder. The shape and location of the packing materials described here may differ from those used for your machine, as the packing materials may have been changed, added or removed without notice.
 |
|
Do not touch the connector (
 ) of the paper feeder. Doing so may cause malfunction or paper jams. ) of the paper feeder. Doing so may cause malfunction or paper jams.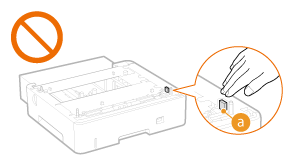 |
1
Remove the paper feeder from the box.
2
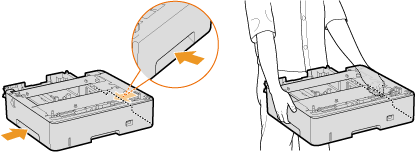
Place the paper feeder in the installation location.
When carrying the paper feeder, hold the lift handles on both left and right sides.
3
On the rear side of the paper feeder, hold the tape, and remove it with the packing materials.

4
Pull out the paper drawer until it stops, and remove it while lifting the front side.

5
Remove the packing materials.
Press the lock release lever to slide the paper guides to the rear, and remove the packing materials.

6
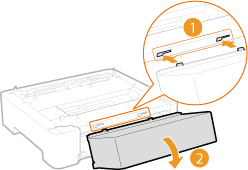
Install the drawer protective cover on the rear side of the paper feeder.
7
Set the paper drawer in the paper feeder.
Insert the paper drawer at an angle, and then push it horizontally.
8
Install other paper feeders when you want to use multiple paper feeders.

When you install only one unit of the paper feeder, proceed to step 9.
|
1
|
Stack the paper feeders one on top of another.
When you stack paper feeders, gently place one on top of another by matching the front, left, and right sides of the paper feeders, respectively.
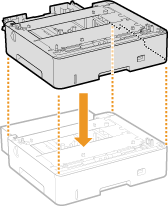 If the paper feeders are properly stacked, the securing pins (
 ) and connector ( ) and connector ( ) fit perfectly. ) fit perfectly.  If you cannot properly place one paper feeder on the other
Lift the upper paper feeder, check the positions, and place it again. Do not place the paper feeder by force. Doing so may damage the connector or securing pins. |
|
2
|
Lock the paper feeders.
When you operate the lock lever on the front side, pull out the paper drawer, and then lock the paper feeders.
Use step 3 to step 7 to remove the packing materials from the upper paper feeder.
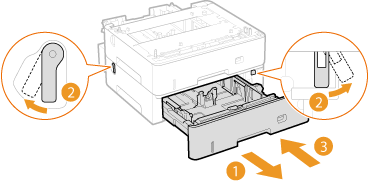 |
9
Gently mount the machine on the paper feeder by matching the front, left, and right sides of the machine to those of the paper feeder, respectively.
Use the handles on both sides of the machine, and have at least two people carry it.
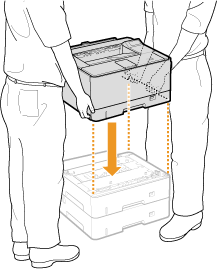
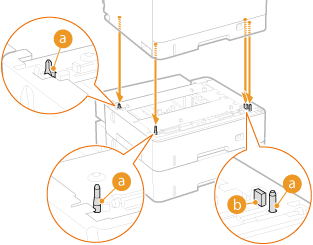
If the machine is properly placed on the paper feeder, the securing pins ( ) and connector (
 ) fit perfectly.
 ) and connector (
 ) fit perfectly.

Be sure to hold the lift handles
Do not move the machine by holding the duplex unit.
Do not move the machine by holding the duplex unit.
If you cannot properly place the machine on the paper feeder
Lift the machine, check the positions, and place it again. Do not place the machine by force. Doing so may damage the connector or securing pins of the paper feeder.
Lift the machine, check the positions, and place it again. Do not place the machine by force. Doing so may damage the connector or securing pins of the paper feeder.
10
Lock the machine and the paper feeder.
When you operate the lock lever on the front side, pull out the paper drawer, and then lock the machine and paper feeder.


 |
|
Be sure to turn ON the machine before loading paper in the paper drawer of the paper feeder.
|
 |
|
Make sure that all the packing materials have been removed from the machine.
 If a paper feeder was installed at the same time as the machine, return to the installation procedure of the machine (Removing the Packing Materials) and proceed with the installation work.
|
Configuring the Information of the Paper Feeder
If a paper feeder was added after the printer driver was installed, you need to configure the paper feeder information in the printer driver. To Use Optional Accessories