Specifying from Address Book (Fax)
 |
|
The Address Book enables you to specify a destination by selecting from a list of registered destinations or by searching by name for destinations with recipient names. You can also directly specify a destination by entering a three-digit number (coded dial number) assigned to a destination.
|
|
NOTE
|
|
You need to register destinations in the Address Book before using this feature.
|
Selecting Destinations from Address Book
1
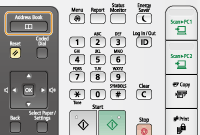
Press  .
.
.2
Press  .
.
.
You can also use  /
/ to select <Specify from Address Book> on the screen, and press
  .
.
/ to select <Specify from Address Book> on the screen, and press .3
Use  /
/ to select a tab.
/ to select a tab.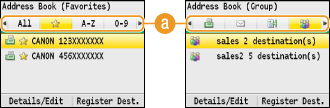
 <All>
<All>Displays all the destinations registered in the Address Book. For the marks beside the destinations, see the explanations below.
< >
>
>Displays a list of destinations registered in Favorites.
<A-Z>/<0-9>/<ABC> to <YZ>
Displays destinations with recipient names whose first characters correspond to the characters of the selected tab.
< >
>
>Displays destinations for faxes.
< >
>
>Displays destinations for e-mails. To specify destinations using this tab, see Specifying from Address Book.
< >
>
>Displays destinations for shared folders. To specify destinations using this tab, see Specifying from Address Book.
< >
>
>Displays a list of destinations registered in Group Dial.
4
Use / to select a destination, and press .
/ to select a destination, and press .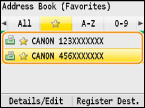
NOTE:
If you want to specify multiple destinations
If you want to specify multiple destinations
Repeat steps 2 to 4. Up to 200 destinations can be specified.
To specify any additional destinations with the numeric keys, use / to select <Specify Next Destination (New)> on the screen, and press .
/ to select <Specify Next Destination (New)> on the screen, and press .  To delete destinations
If you specified multiple destinations, you can delete destinations as necessary.
|
1
|
Select <Confirm/Edit Destination>, and press
.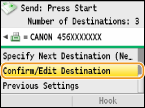 |
|
2
|
Select a destination you want to delete, and press
.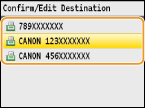 |
|
3
|
Press <Clear Dest.>, select <Yes>, and press
.If you specified destinations in Group Dial in step 2, <Number of Destinations> is displayed on the screen. Selecting this item and pressing
displays detailed destinations in Group Dial.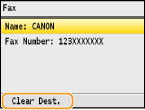 |
|
NOTE
|
If you want to easily and quickly delete destinations without displaying a list of destinationsBefore selecting <Confirm/Edit Destination> in step 1, you can press
/ to toggle the destinations you specified. Display a destination you want to delete, and press |
Selecting Destinations Directly by Entering Coded Dial Numbers
1
Press .
.2
Press  (Coded Dial).
(Coded Dial).
You can also use / to select <Specify from Coded Dial> on the screen, and press .
/ to select <Specify from Coded Dial> on the screen, and press .3
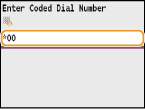
Use the numeric keys to enter a three-digit number (001 to 181).
If you enter the wrong characters, press  . (Press to delete each character one by one; press and hold to delete all the input characters at once.)
NOTE:
If a confirmation screen appears
If a confirmation screen appears
When <Coded Dial TX Confirmation> is set to <On>, a screen is displayed that shows the destination and the name for the number. (For Group Dial, the destination name and the number of destinations are shown.) Check the contents and if everything is correct, select <OK>, and press . To specify another destination, select <Cancel>, press , and enter a three-digit number again. Displaying Destinations in Address Book
. To specify another destination, select <Cancel>, press , and enter a three-digit number again. Displaying Destinations in Address BookIf you want to specify multiple destinations
Repeat steps 2 and 3. Up to 181 destinations can be specified.
To specify any additional destinations with the numeric keys, use / to select <Specify Next Destination (New)> on the screen, and press .
/ to select <Specify Next Destination (New)> on the screen, and press .To delete destinations
If you specified multiple destinations, you can delete destinations as necessary.
|
1
|
Select <Confirm/Edit Destination>, and press
. |
|
2
|
Select a destination you want to delete, and press
. |
|
3
|
Press <Clear Dest.>, select <Yes>, and press
.If you specified destinations in Group Dial in step 2, <Number of Destinations> is displayed on the screen. Selecting this item and pressing
displays detailed destinations in Group Dial.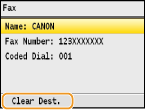 |
|
NOTE
|
If you want to easily and quickly delete destinations without displaying a list of destinationsBefore selecting <Confirm/Edit Destination> in step 1, you can press
/ to toggle the destinations you specified. Display a destination you want to delete, and press |