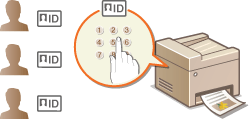
Setting the Department ID Management
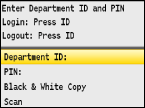
You can control access to the machine by using multiple IDs for multiple users or groups. If a user tries to operate the machine when Department ID Management is enabled, a logon screen is displayed, and the user must enter their own Department ID and PIN to use the machine. When Department ID Management is enabled, usage of functions, such as color copying and black and white scanning, is recorded for each Department ID. To configure Department ID Management, register department IDs as necessary and then enable Department ID Management function. Additional settings are required if you want to enable Department ID Management for operations from a computer, such as printing and PC faxing.
Registering/Editing Department ID and PIN
Register a Department ID and set a PIN for it. You can also disable functions, such as black and white copying and color printing, for each Department ID. Up to 300 Department IDs can be registered.
1
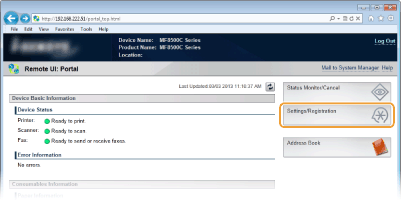
Start the Remote UI and log on in System Manager Mode. Starting Remote UI
2
Click [Settings/Registration].
3
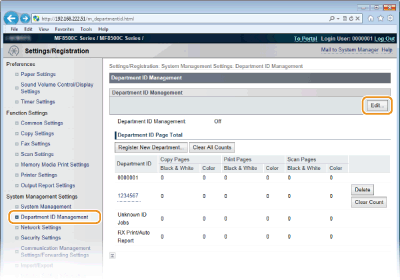
Click [Department ID Management] and register (or edit) Department IDs.

 Registering a Department ID
|
1
|
Click [Register New Department].
|
|
2
|
Specify the required settings and click [OK].
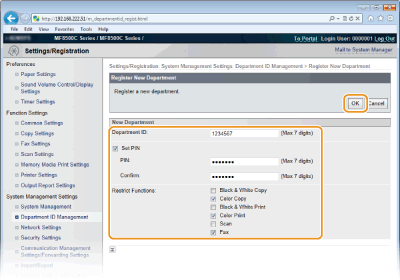 [Department ID]
Enter a number of up to seven digits for the Department ID. [Set PIN]
To set a PIN, select the check box and enter a number of up to seven digits both in the [PIN] and [Confirm] text boxes. [Restrict Functions]
Select the check box for the function that you want to disable for the Department ID. NOTE:
If the [Scan] check box is selected, scanning documents to USB memory devices, e-mails, and shared folders is disabled. You can also disable scanning documents to computers via <Computer> and <Remote Scanner>. However, you can only disable scanning documents to computers for all users (Blocking Jobs When Department ID Is Unknown).
|
Editing the settings of the registered Department ID
|
1
|
Click the corresponding text link under [Department ID] to edit.
|
|
2
|
Change the settings as necessary and click [OK].
|
NOTE:
Deleting a Department ID
Deleting a Department ID
Click [Delete] on the right of the Department ID you want to delete  click [OK].
|
NOTE
|
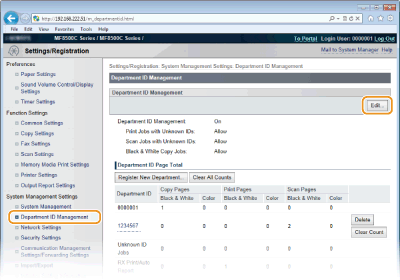
[Department ID Page Total]You can check the total numbers of pages copied, printed, scanned, or faxed for each Department ID.
If you want to return the counts to zero, click the corresponding text link under [Department ID] and click [Clear Count]
 |
Enabling the Department ID Management
After you register as many Department IDs as necessary, enable Department ID Management.
1
Start the Remote UI and log on in System Manager Mode. Starting Remote UI
2
Click [Settings/Registration].
3
Click [Department ID Management] [Edit...].
4
Select the [Department ID Management] check box and click [OK].
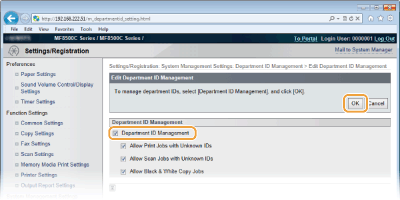
[Department ID Management]
Select the check box to enable Department ID Management. If you do not want to use Department ID Management, clear the check box.
Select the check box to enable Department ID Management. If you do not want to use Department ID Management, clear the check box.
NOTE:
For information on the [Allow Print Jobs with Unknown IDs]/[Allow Scan Jobs with Unknown IDs]/[Allow Black & White Copy Jobs] check boxes, see Blocking Jobs When Department ID Is Unknown.
|
NOTE
|
|||
Using the operation panelIf you only want to enable or disable the settings, you can use
 on the operation panel. Department ID Management On/Off on the operation panel. Department ID Management On/Off Logging on to the machine
|
Setting the Department ID Management for Printing or Faxing from the Computer
If you want to enable Department ID Management for printing and faxing from a computer, you need to specify settings by using the drivers you already installed on the computer. Specify the Department ID and PIN as necessary.
|
IMPORTANT
|
|
To perform the following procedure, log on to your computer with an administrator account.
|
1
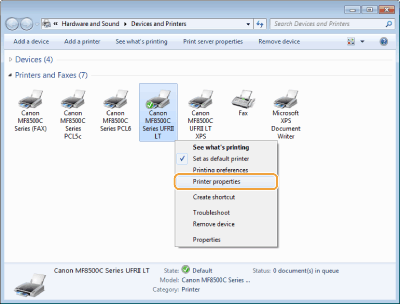
Open the printer folder. Displaying the Printer Folder
2
Right-click your printer or fax icon and click [Printer properties] (or [Properties]).
3
Click the [Device Settings] tab and specify the required settings.

|
1
|
Select the [Use Department ID Management] check box and click [Settings] on the right of it.
For the fax driver, also select the [Allow PIN Setting] check box to enable the PIN setting.
|
|
2
|
Specify the settings as necessary and click [OK].
 [Allow PIN Setting]
Select the check box to enable the PIN setting. [Department ID]
Enter a number of up to seven digits for the Department ID. [PIN]
Enter a number of up to seven digits for the PIN if it is set for the Department ID. [Verify]
Click to verify that the correct ID and PIN are entered. This function is not available if the machine and the computer are connected via a USB or WSD (Web Services on Devices) port. [Confirm Department ID/PIN When Printing]/[Confirm Department ID/PIN when Sending Fax]
Select the check box to display the [Confirm Department ID/PIN] pop-up screen each time you print or fax from a computer. [Authenticate Department ID/PIN at Device]
Select the check box if the machine and the computer are connected via a USB or WSD port. |
|
3
|
Click [OK].
|
|
NOTE
|
|||
Logging on to the machine
|

Blocking Jobs When Department ID Is Unknown
If you do not change the default settings, any user can print from a computer, scan (via <Computer> and <Remote Scanner>), or make black and white copies without entering an ID and PIN even when Department ID Management is enabled for the machine. You can change the default settings so that the machine cannot be used for these functions without a correct ID and PIN.
1
Start the Remote UI and log on in System Manager Mode. Starting Remote UI
2
Click [Settings/Registration].
3
Click [Department ID Management] [Edit...].
4
Clear the check boxes as necessary and click [OK].

[Allow Print Jobs with Unknown IDs]
In order to print from a computer when Department ID Management is enabled, you need to enter the correct ID and PIN on the printer driver (Setting the Department ID Management for Printing or Faxing from the Computer). However if the check box is selected for this setting, you can print from a computer without entering the ID and PIN. Clear the check box to require entering an ID and PIN.
In order to print from a computer when Department ID Management is enabled, you need to enter the correct ID and PIN on the printer driver (Setting the Department ID Management for Printing or Faxing from the Computer). However if the check box is selected for this setting, you can print from a computer without entering the ID and PIN. Clear the check box to require entering an ID and PIN.
[Allow Scan Jobs with Unknown IDs]
If the check box is selected, you can select <Computer> or <Remote Scanner> on the main screen and scan documents into a computer anytime using /
/ . Clear the check box to disable the selection of <Computer>, <Remote Scanner>, and / when Department ID Management is enabled.
If the check box is selected, you can select <Computer> or <Remote Scanner> on the main screen and scan documents into a computer anytime using
/. Clear the check box to disable the selection of <Computer>, <Remote Scanner>, and / when Department ID Management is enabled.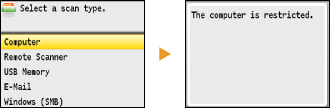
[Allow Black & White Copy Jobs]
If the check box is selected when Department ID Management is enabled, you can copy in black and white without entering the correct ID and PIN. Clear the check box to require entering an ID and PIN.
If the check box is selected when Department ID Management is enabled, you can copy in black and white without entering the correct ID and PIN. Clear the check box to require entering an ID and PIN.