Setting IPv4 Address
 |
|
The machine's IPv4 address can be either assigned automatically by a dynamic IP addressing protocol, such as DHCP, or entered manually. When connecting the machine to a wired LAN, make sure that the connectors of the LAN cable are firmly inserted into the ports (Connecting to a Wired LAN). You can test the network connection if necessary.
|
Setting IPv4 Address
1
Press  .
.
 .
.2
Use  /
/ to select <Network Settings>, and press
  .
.
 /
/ to select <Network Settings>, and press
  .
.If the logon screen appears, enter the correct ID and PIN using the numeric keys, and then press  . Logging on to the Machine
 . Logging on to the Machine
3
Select <TCP/IP Settings>  <IPv4 Settings>
  <IP Address Settings>.
 <IPv4 Settings>
  <IP Address Settings>.
4
Configure IP address settings.

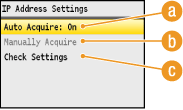
 <Auto Acquire>
Select to automatically assign an IP address via a protocol such as DHCP. When <Auto Acquire: On> is displayed, automatic addressing is enabled.
 <Manually Acquire>
Select to configure the IP address settings by manually entering an IP address. In order to select this option, <Auto Acquire> must be set to <Off>.
 <Check Settings>
Select when you want to view the current IP address settings.
 Automatically assigning an IP address
|
1
|
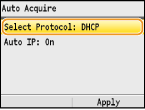
Select <Auto Acquire>
 <Select Protocol>. <Select Protocol>. |
|
2
|
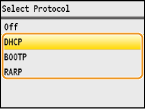
Select <DHCP>, <BOOTP>, or <RARP>, and press
 . . NOTE:
If you do not want to use DHCP/BOOTP/RARP to assign an IP address Select <Off>. If you select <DHCP>, <BOOTP>, or <RARP> when these services are unavailable, the machine will waste time and communications resources searching the network for these services. |
|
3
|
Check that <Auto IP> is set to <On>.
If <Off> is selected, change the setting to <On>.
|
|
4
|
Press <Apply>.
|
NOTE:
IP addresses assigned via DHCP/BOOTP/RARP override the address obtained via Auto IP.
 Manually entering an IP address
|
1
|
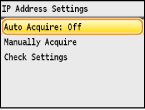
Check that <Auto Acquire> is set to <Off>.
 If <On> is displayed, select <Auto Acquire>
  , and set both <Select Protocol> and <Auto IP> to <Off>. , and set both <Select Protocol> and <Auto IP> to <Off>. |
|
2
|
Select <Manually Acquire>, and press
 . . |
|
3
|
Specify the IP address, subnet mask, and gateway address (or default gateway).
Specify the settings in the following order: <IP Address>
 <Subnet Mask> <Subnet Mask>  <Gateway Address>. <Gateway Address>.Enter the setting using the numeric keys, and press <Apply> on each screen.
 |
5
Restart the machine.
Turn OFF the machine, wait for at least 10 seconds, and turn it back ON.
|
NOTE
|
Checking whether the settings are correctMake sure that the Remote UI screen can be displayed with your computer. (Starting Remote UI) If a computer is not available, you can check the connection by using the operation panel (Testing the Network Connection).
|
Testing the Network Connection
1
Press  .
.
 .
.2
Use  /
/ to select <Network Settings>, and press
  .
.
 /
/ to select <Network Settings>, and press
  .
.If the logon screen appears, enter the correct ID and PIN using the numeric keys, and then press  . Logging on to the Machine
 . Logging on to the Machine
3
<TCP/IP Settings>  <IPv4 Settings>
  <PING Command>.
 <IPv4 Settings>
  <PING Command>.
4
Enter the IPv4 address of another device on the network, and press <Apply>.

If a proper connection has been established, the result is displayed as shown above.