Adjusting the Printing Position
If a document is printed off-center or out of the printable area, adjust the printing position. You can adjust the printing position for each paper source.
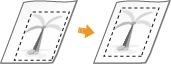
Step 1: Printing Out a Printing Position Check Sheet
You can print out a printing position check sheet ("Printing Position Adjustment Print") to check the direction and distance to adjust.
1
Select the machine by clicking  in the system tray.
in the system tray.
2
Select [Options]  [Utility] [Printing Position Adjustment Print].
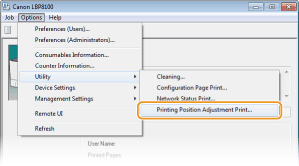
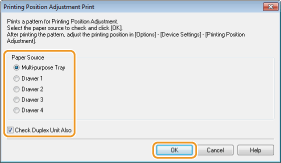
3
Select the paper source for which you want to check the printing position, and click [OK].
To check the printing position for 2-sided printing, select the [Check Duplex Unit Also] check box.
A printing position check sheet is output.

To perform 2-sided printing, you need an optional duplex unit. Duplex Unit DU-D1
Step 2: Checking the Direction and Distance to Adjust
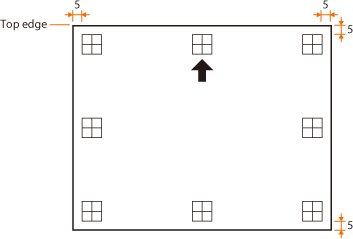
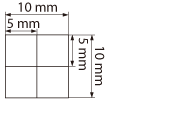
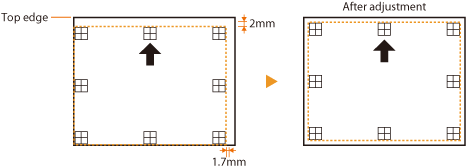
The printing position check sheet shows printing position check marks  . You can determine the direction and distance to adjust by checking the position of these marks. If all marks are 5 mm apart from the respective edge of the sheet, it means that the current printing position is proper.
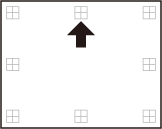
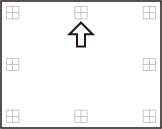
How To Use the Printing Position Check Sheet
The arrow points toward the top edge of the printing position check sheet.
|
The following figure shows the dimensions of each printing position check mark
 When you print the printing position check sheet with the [Check Duplex Unit Also] check box selected, the sheet is output with both sides printed. The side with a solid black arrow shows the printing position for first page (front side), and the side with an outline arrow shows the printing position for second page (back side).
|
When the Printing Position is Off-center
If the printing position check marks are printed off the correct position, you need to make a printing position adjustment. In adjusting the printing position, specify the direction using "+" and "-" and the distance using "mm." Use "-" to shift the printing position upward and "+" to shift it downward (vertical adjustment). Use "-" to shift the printing position leftward and "+" to shift it rightward (horizontal adjustment).
|
Vertical direction
([Vertical Adjustment]) 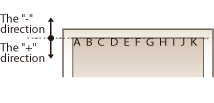 |
Horizontal direction
([Horizontal Adjustment]) 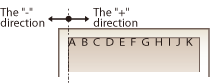 |
|
|
|
In the example shown below, it is necessary to shift the printing position 2 mm upward and 1.7 mm rightward. Specify "-2.00 mm" in [Vertical Adjustment], and specify "1.70 mm" in [Horizontal Adjustment].
Step 3: Adjusting the Printing Position for Each Paper Source
After you determine the direction and distance to adjust, specify an adjusted printing position. You can adjust the printing position in the range of -2.0 to +2.0 mm in 0.2 mm increments in the vertical direction, and in the range of -2.22 to +2.22 mm at 19 steps in the horizontal direction.
1
Select the machine by clicking in the system tray.
in the system tray.2
Select [Options] [Device Settings] [Printing Position Adjustment].

3
Specify the vertical/horizontal adjustment value for each desired paper source, and click [OK].
Select an adjustment value based on the results of examining the printing position check sheet.
[Vertical Adjustment with Duplex Unit] and [Horizontal Adjustment with Duplex Unit] allow you to adjust the printing position for first page (front side) in 2-sided printing mode, regardless of the paper source.

The printing position for second page (back side) in 2-sided printing mode follows the settings for the paper source. For example, the vertical printing position for 2-sided printing from the multi-purpose tray is adjusted as shown below.
|
First page (front side)
|
Setting value in [Vertical Adjustment with Duplex Unit]
|
|
Second page (back side)
|
Setting value in [Vertical Adjustment with Multi-purpose Tray]
|
4
Print out the printing position check sheet and check that the position adjustment is correct. Step 1: Printing Out a Printing Position Check Sheet