Printing via Secure Print
This section describes how to print a document from an application as a secured document. The first part of this section describes how to send a secured document to the machine, and the second part of this section describes how to print the secured document on the machine.
Sending a Secured Document from a Computer to the Machine
1
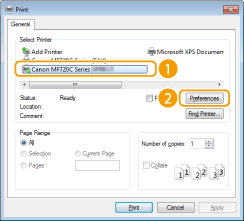
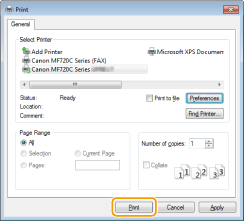
Open a document in an application and display the print dialog box.
How to display the print dialog box differs for each application. For more information, see the instruction manual for the application you are using.
2
Select the printer driver for the machine, and click [Preferences] or [Properties].
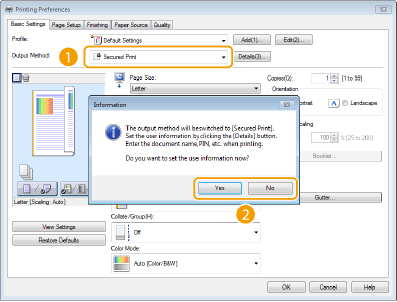
3
Select [Secured Print] in [Output Method].
Click [Yes] or [No] on the [Information] pop-up screen.
If you want to use the same user name and PIN every time, click [Yes]. To change the user name and PIN every time, click [No].
 If you selected [Yes]
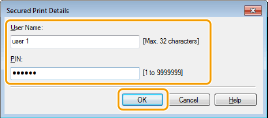
Enter the user name for [User Name] and PIN for [PIN], and click [OK].
The computer name (logon name) of your computer is displayed in [User Name]. if you want to change the user name, enter up to 32 alphanumeric characters for a new user name.
Enter the PIN of up to seven digits.
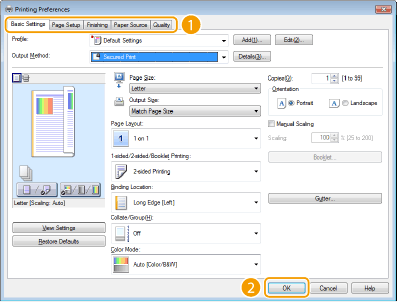
4
Specify the print settings, and click [OK].
Click the [Basic Settings], [Page Setup], [Finishing], [Paper Source], or [Quality] tabs to specify the print settings on each screen as necessary. Various Print Settings
5
Click [Print] or [OK].
After the secured document is sent to the machine, it is held in the memory of the machine waiting to be printed.
If you selected [No] at step 3
Enter the [Document Name], [User Name], and [PIN] and click [OK].
The document name is automatically set based on the information from the application. If you want to change the document name, enter up to 32 alphanumeric characters for a new document name.
The computer name or logon name is displayed. If you want to change the user name, enter up to 32 alphanumeric characters for a new user name.
Enter the PIN of up to seven digits. The entered PIN is displayed in symbols.

Printing Out Secured Documents
After you send the secured document to the machine, print it out within 30 minutes. After that, the secured document will be deleted from the memory of the machine and can no longer be printed.
 |
|
If secured documents are left unprinted, they occupy the memory and may prevent the machine from printing even ordinary (not secured) documents. Make sure that you print your secured documents as soon as you can.
You can check how much memory is being used for secured documents.
 You can change the valid time period for secured documents. Changing the Valid Time Period for Secured Documents
|
1
Press  and tap <Secure Print>.
and tap <Secure Print>.
You cannot proceed to the next step if the <Remote Scanner> screen shown below is displayed. In this case, press  to close the screen, and tap <Secure Print> again.
to close the screen, and tap <Secure Print> again.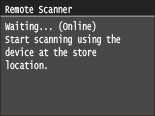
2
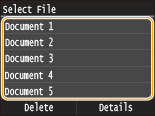
Select the secured document to print.
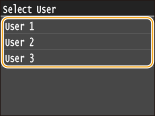
If the <Select User> screen is displayed
If secured documents from two or more users are being held in memory, the <Select User> screen is displayed prior to the <Select File> screen. Select your user name.
3
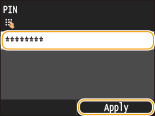
Enter the PIN using numeric keys, and then tap <Apply>.
Printing starts.
If you want to cancel printing, tap <Cancel>  <Yes>.
Changing the Valid Time Period for Secured Documents
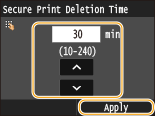
The machine at purchase is set to delete secured documents 30 minutes after receiving them unless they are printed, but you can change this setting.
1
Press and tap <Menu>.
and tap <Menu>.2
Tap <System Management Settings>.
If the logon screen appears, enter the correct ID and PIN using numeric keys, and then press  . Logging on to the Machine
. Logging on to the Machine3
Tap <Secure Print Settings>.
4
Tap <On>.
Disabling Secure Print
Tap <Off>, and restart the machine.
5
Specify how long the machine holds secured documents, and tap <Apply>.
Tap  /
/ or the numeric keys to enter the time.
/ or the numeric keys to enter the time.The secured document is erased from the memory of the machine when the time specified here elapses.
6
Restart the machine.
Turn OFF the machine, wait for at least 10 seconds, and turn it back ON.