Specifying Destinations in an LDAP Server (E-mail/I-Fax)
 |
|
If your office has an LDAP server installed, you can use the destinations registered in the server. To specify destinations, access an LDAP server via the machine, and then search for a destination.
|
 |
|
You need to specify the settings for connecting to an LDAP server beforehand.Registering LDAP Servers
|
1
Press  and tap <Scan>.
and tap <Scan>.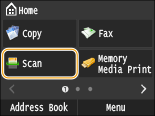
When the logon screen appears, use the numeric keys to enter the user name and password. Then select the authentication server and press  . Logging on to Authorized Send
. Logging on to Authorized Send2
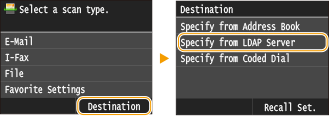
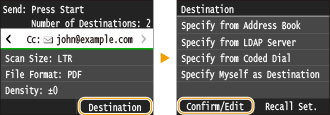
Tap <Destination>  <Specify from LDAP Server>.
3
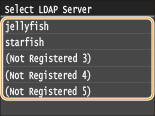
Select the LDAP server you are using.
4
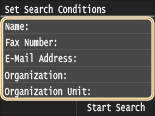
Select the search criteria.
Personal names, fax numbers, e-mail addresses, organization names, and Organization Unit names are available criteria for searching destinations. Multiple search criteria can be specified at the same time.
5
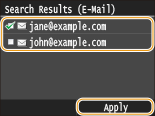
Specify the search criteria using the numeric keys, and tap <Apply>.
The following screen shows an example for when <Name> is selected in step 4 to search by personal name.
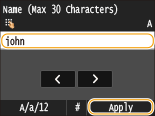
Tapping <A/a/12> toggles the input modes (except for searching by fax number).
To specify multiple search criteria, repeat steps 4 and 5.
6
Tap <Search Method>.

7
Specify the search method.
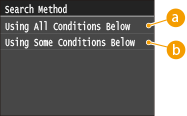
 <Using All Conditions Below>
Searches and displays the destinations that meet all the search criteria specified in steps 4 and 5.
 <Using Some Conditions Below>
All destinations meeting any of the search criteria specified in steps 4 and 5 are displayed as search results.
8
Tap <Start Search>.
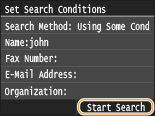
The destinations meeting your search criteria are displayed.

If the authentication screen appears when you tap <Start Search>, enter the user name of the machine and the password registered in the LDAP server, and tap <Apply>. Registering LDAP Servers
9
Select a destination, and tap <Apply>.
Up to 10 destinations can be specified.
To search for a destination using other search criteria, repeat steps 2 to 9.
If you have already specified a destination using the numeric keys, up to nine destinations can be specified using an LDAP server.
You cannot specify the selected destinations as Cc or Bcc addresses.
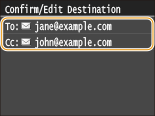
 To delete destinations
If you specified multiple destinations, you can delete destinations as necessary.
|
1
|
Tap <Destination>
 |
|
2
|
Select a destination you want to delete.
 |
|
3
|
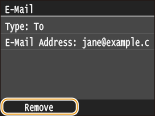
Tap <Remove>.
 |
|
4
|
Tap <Yes>.
|
|
|
If you want to easily and quickly delete destinations without displaying a list of destinationsBefore selecting <Confirm/Edit> in step 1, you can tap
 / / to toggle the destinations you specified. Display a destination you want to delete, and press to toggle the destinations you specified. Display a destination you want to delete, and press |