Common Communication Settings for E-Mail/I-Fax
If you are using the imageRUNNER ADVANCE C2020, depending on the region, the optional product is required to use this function. For information on the optional product, see "Optional Products Required for Each Function."
1.
Press  (Settings/Registration).
(Settings/Registration). 2.
Press [Function Settings] → [Send] → [E-Mail/I-Fax Settings].
3.
Press [Communication Settings].
4.
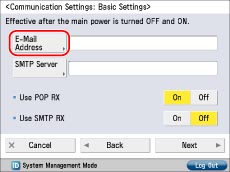
Press [E-mail Address].
5.
Enter the e-mail address → press [OK].
You can specify any user name (the part of the address located in front of the "@" symbol). Enter the host name after the "@" symbol in the e-mail address.
6.
Specify the mail server for transmitting e-mail/I-faxes.
The machine supports POP3, and can also function as an SMTP receive server.
|
IMPORTANT
|
|
The machine can only receive I-faxes and communication error notices.
|
|
NOTE
|
|
To use the SMTP receiving function, it is necessary to register the host name for the machine to the DNS server.(See "TCP/IPv4 Settings" or "TCP/IPv6 Settings.")
|
Using the machine as an SMTP receive server:
Press [Off] for <Use POP RX> → [On] for <Use SMTP RX> → [Next].
Specify <SMTP RX> → press [Next].
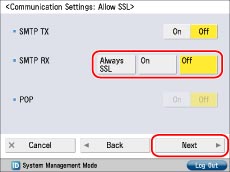
If you select [Always SSL] for <SMTP RX>, only reception of data encrypted using SSL is allowed, and communications not using SSL from the host are rejected.
If you select [On] for <SMTP RX>, receiving SSL encrypted data may only be allowed when there is a request from the host.
If you select [On] for <SMTP RX>, receiving SSL encrypted data may only be allowed when there is a request from the host.
|
IMPORTANT
|
|
Even if you select [On] for <SMTP RX>, the data will not be encrypted if the SMTP host does not support encryption.
To select [Always SSL] or [On] for <SMTP RX> to allow SSL transmission, it is necessary to generate a key pair in advance. To generate a key pair, see "Generating a Key Pair and Server Certificate" or "Registering a Key Pair File and Server Certificate File Installed from a Computer."
|
Using a POP server to receive communications:
Press [On] for <Use POP RX> → [Off] for <Use SMTP RX> → [Next].
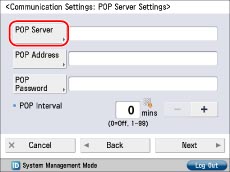
Press [POP Server].
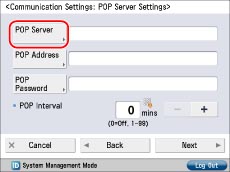
Enter the IP address or name for the POP server → press [OK].
Press [POP Address].
Enter the POP address → press [OK].
Press [POP Password].
Enter the POP password → press [OK].
Specify the time interval to automatically check the POP server in [POP Interval] → press [Next].
If you set the interval to '0', the POP server is not checked automatically. For instructions on manually checking the POP server, see "Checking and Cancelling Receive Jobs."
Specify <POP> → press [Next].
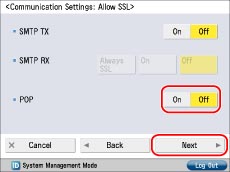
If you want to send encrypted data, press [On] for <POP>
|
IMPORTANT
|
|
Even if you select [On] for <POP>, the data will not be encrypted if the POP server does not support encryption.
|
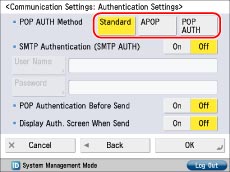
Select the authentication method supported by the POP server in <POP AUTH Method>.
Logging in to a POP server before sending (POP before SMTP):
Press [SMTP Server].

Enter the IP address or name for the SMTP server → press [OK].
Press [On] for <Use POP RX> → [Off] for <Use SMTP RX> → [Next].
Press [POP Server].
Enter the IP address or name for the POP server → press [OK].
Press [POP Address].
Enter the POP address → press [OK].
Press [POP Password].
Enter the POP password → press [OK].
Specify the time interval to automatically check the POP server in [POP Interval] → press [Next].
If you set the interval to '0', the POP server is not checked automatically. For instructions on manually checking the POP server, see "Checking and Cancelling Receive Jobs."
Specify <SMTP TX> and <POP> → press [Next].
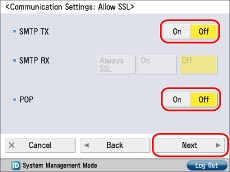
To encrypt data using SSL, select [On] for <SMTP TX> or <POP>.
|
IMPORTANT
|
|
Even if you select [On] for <SMTP TX>, the data will not be encrypted if the SMTP host does not support encryption.
Even if you select [On] for <POP>, the data will not be encrypted if the POP server does not support encryption.
|
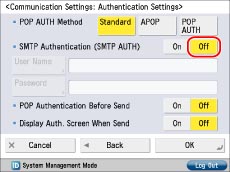
Press [Off] for <SMTP Authentication (SMTP AUTH)> → [On] for <POP Authentication before Sending>.
Logging in to an SMTP server before sending (SMTP Authentication):
Press [SMTP Server].

Enter the IP address or name for the SMTP server → press [OK].
Specify <SMTP TX> → press [Next].

To encrypt data to be sent using SSL, select [On] for <SMTP TX>.
|
IMPORTANT
|
|
Even if you select [On] for <SMTP TX>, the data will not be encrypted if the SMTP host does not support encryption.
|
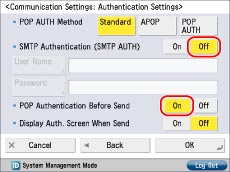
Press [On] for <SMTP Authentication (SMTP AUTH)> → [User Name].
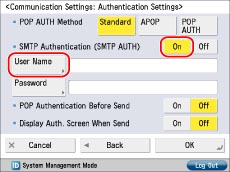
Enter the user name for logging in to the SMTP server → press [OK].
If you are using a Microsoft SMTP server, enter the user name in [User] using the following format: user name@domain name.
Press [Password].
Enter the password for logging in to the SMTP server → press [OK].
Press [Off] for <POP Authentication Before Send> → specify <Display Auth. Screen When Send>.
If you want to display the authentication screen when sending, set <Display Auth. Screen When Send> to 'On'.
Sending without authenticating:
Press [SMTP Server].
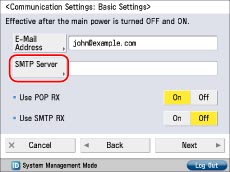
Enter the IP address or name for the SMTP server → press [OK].
Press [Next] → specify the POP Server → press [Next].
Specify <SMTP TX> → press [Next].
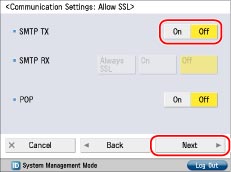
To encrypt data to be sent using SSL, select [On] for <SMTP TX>.
|
IMPORTANT
|
|
Even if you select [On] for <SMTP TX>, the data will not be encrypted if the SMTP host does not support encryption.
|
Press [Off] for <SMTP Authentication (SMTP AUTH)> → [Off] for <POP Authentication before Sending>.
7.
Press [OK].