Checking and Cancelling Jobs from the Job Status Screen
This section describes the operations that can be performed from the Job Status screen.
|
NOTE
|
|
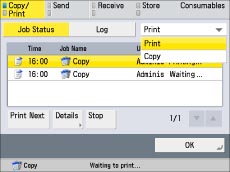
You can select a job type from the drop-down list to display only jobs of a specific type in the list.
|
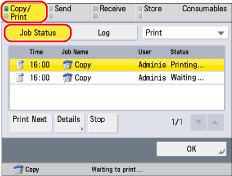
Checking and Cancelling Copy/Print Jobs
1.
Press  (Status Monitor/Cancel).
(Status Monitor/Cancel).2.
Press [Copy/Print] → [Job Status].
3.
Select the desired job →select the operation to perform.
You can select the following operations.
|
[Print Next]:
|
You can change the printing priority of the selected job, so that it is printed right after the current job is complete. [Print Next] is displayed when a print job is selected.
|
|
[Details]:
|
Displays detailed information for the selected job. Check the detailed information → press[OK] to return to the Copy/Print screen.
|
|
[Stop]:
|
Cancels the selected job. Press [Stop] → [Yes] to cancel the job.
|
If you select a print job → press [Details], you can perform the following operations.
Press [Pause] to temporarily stop the job.
Press [Paper Feed] to forcibly print the print data remaining in the memory.
Press [Skip Error] to temporarily disable errors and continue printing.
|
IMPORTANT
|
|
You cannot select multiple jobs and cancel them all at once. Select and cancel one job at a time.
|
|
NOTE
|
|
[Pause] changes to [Resume] when you pause a print job. Press [Resume] to resume printing.
For information on the errors that can be temporarily disabled by pressing [Skip Error] after you select a job, see "When a Message Appears."
The cancelled job is displayed as <NG> (No Good) on the Log screen.
|
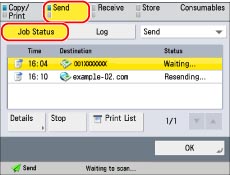
Checking and Cancelling Send Jobs
1.
Press (Status Monitor/Cancel).
(Status Monitor/Cancel).2.
Press [Send] → [Job Status].
3.
Select the desired job →select the operation to perform.
You can select the following operations.
|
[Details]:
|
Displays detailed information for the selected job. Check the detailed information → press [OK] to return to the Send screen.
|
|
[Stop]:
|
Cancels the selected job. Press [Stop] → [Yes] to cancel the job.
|
|
[Print List]:
|
Prints the job status list. [Print List] is displayed when a job is selected. Press [Print List] → [Yes] to print the list.
|
If you select a send job → press [Details], you can perform the following operations.
Press[Resend] to resend the job. If you select a job with multiple destinations, press [Broadcast List] → [Resend].
Press [Change Destination] to change the destination. If you select a job with multiple destinations, press [Broadcast List] → [Resend].
|
IMPORTANT
|
|
You cannot select multiple jobs and cancel them all at once. Select and cancel one job at a time.
|
|
NOTE
|
|
The canceled job is displayed as <NG> (No Good) on the Log screen.
The list can be printed only if A3, B4, A4, or A4R (plain, recycled, thin, or color paper) is loaded in one of the paper sources that is set to 'On' when you press [Other] to select a paper source in [Paper Drawer Auto Selection On/Off]. (See "Enabling Paper Drawer Auto Selection.")
However, if [Consider Paper Type] for Copy is set to 'On' in [Paper Drawer Auto Selection On/Off] in [Function Settings] (Settings/Registration), you cannot print from a paper source with color paper specified.
|
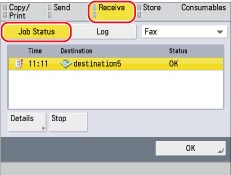
Checking and Cancelling Receive Jobs
1.
Press (Status Monitor/Cancel).
(Status Monitor/Cancel).2.
Press [Receive] → [Job Status].
3.
Select the desired job →select the operation to perform.
You can select the following operations.
|
[Details]:
|
Displays detailed information for the selected job. Check the detailed information → press [OK] to return to the Receive screen.
|
|
[Stop]:
|
Cancels the selected job. [Stop] is displayed when a job is selected. Press [Stop] → [Yes] to cancel the job.
|
|
[Check I-Fax RX]:
|
Displays the I-fax reception status. [Check I-Fax RX] is displayed when a job is selected.
|
|
NOTE
|
|
To use [Check I-Fax RX], set <Use POP RX> to 'On' in [Communication Settings] to enable the machine to receive POP. (See "Common Communication Settings for E-Mail/I-Fax.")
|
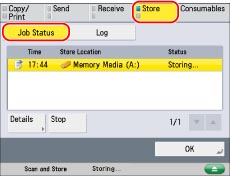
Checking and Cancelling Store Jobs
1.
Press (Status Monitor/Cancel).
(Status Monitor/Cancel).2.
Press [Store] → [Job Status].
3.
Select the desired job →select the operation to perform.
You can select the following operations.
|
[Details]:
|
Displays detailed information for the selected job. Check the detailed information → press [OK] to return to the Store screen.
|
|
[Stop]:
|
Cancels the selected job. Press [Stop] → [Yes] to cancel the job.
|
|
IMPORTANT
|
|
You cannot select multiple jobs and cancel them all at once. Select and cancel one job at a time.
|
|
NOTE
|
|
The cancelled job is displayed as <NG> (No Good) on the Log screen.
|
|
NOTE
|
|
If [Suspended Job Timeout] in [Function Settings] (Settings/Registration) is set to 'On', the job which is suspended because paper was not available for printing is received is displayed as a suspended job after the specified time has elapsed. To resume printing, load the paper, and select the job → press [Details] → [Resume].
|