The Group Address feature enables you to create a group. You can register different types of destinations (such as e-mail, I-fax, or file server destinations) as a single group.
You can register up to 256 destinations in a group address.
Group Addresses
If you are using the imageRUNNER ADVANCE C2020, depending on the region, the optional product is required to use this function. For information on the optional product, see "Optional Products Required for Each Function."
|
IMPORTANT
|
|
If you want to store a group address, the destinations must be stored beforehand, such as fax numbers, e-mail addresses, and file server addresses.
|
1.
Press  (Settings/Registration).
(Settings/Registration).2.
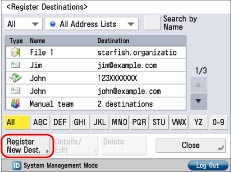
Press [Set Destination] → [Register Destinations] → [Register New Dest.].
3.
Press [Group].
4.
Press the drop-down list → select an address list from Address List 1 to 10.
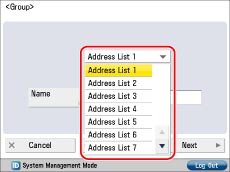
Address lists are a convenient way to classify destinations.
The group address that you enter will be stored in the selected address list.
5.
Press [Name].
6.
Enter a name for the destination → press [OK].
|
NOTE
|
|
For more information, see "Overview of This Function" for Sending/Receiving a Fax and "Overview of This Function" for Scan and Send.
|
7.
Press [Add from Address Book].
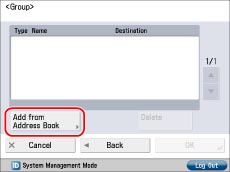
To store destinations in a group address, the destinations must be stored in the address list that contains the group address.
Select the destination to register from the address book → press [OK].
To delete a destination, select the destination that you want to delete → press [Delete].
If you set Manage Address Book Access Numbers to 'On' in [Set Destination] (Settings/Registration), and you want to select a destination that is stored with an access number, press [Access No.] → enter the access number. (See "Registering an E-Mail Address" and "Storing Fax Numbers.")
To cancel a selected destination, select the destination again.
You can restrict the types of destinations displayed in the results list by pressing the drop-down list and selecting the desired type of destination → press [Details]. Press [OK] to return to the previous screen.
Repeat step 8 to register other addresses as necessary.
|
NOTE
|
|
[Access Number] appears on the screen only if [Manage Address Book Access Numbers] is set to 'On' in [Set Destination] (Settings/Registration). (See "Managing the Address Book with Access Numbers.")
|
8.
Press [OK] → [Close].
If you are performing Access Number Management for the Address Book, perform the following operation.
Press [Next] → [Access No.] → [Access No.].
Enter the access number using  -
-  (numeric keys) → press [Confirm].
- (numeric keys) → press [Confirm].Enter the access number again for confirmation → press [OK] → [OK].
|
NOTE
|
|
If you want to store a group address, you can only select destinations that you registered in the same address list.
If the Color Universal Send Kit is activated, you can store e-mail addresses, I-fax addresses, file server addresses, and locations to store the file in a group address.
If the fax board is installed or the Remote Fax Kit is activated, you can also store fax numbers and locations to store the file in a group address.
You cannot send to a group address including a file server in which [Enter Password Each time] is set to 'On'. (See "File Server Addresses.")
|