A folder in the Advanced Space of another imageRUNNER ADVANCE series machine which is opened as an SMB or WebDAV server can be registered as a destination in the Address Book.
For more information on Advanced Spaces, see user manuals for other imageRUNNER ADVANCE series machines with Advanced Spaces.
Registering an Advanced Space Address
1.
Press [Scan and Send] → [Address Book].
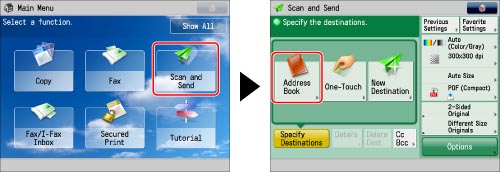
2.
Press [Other Ops.].
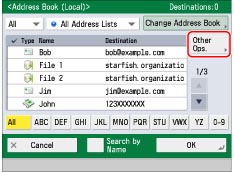
3.
Press [Register/Edit].

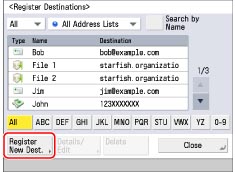
4.
Press [Register New Dest.].
5.
Press [File].
6.
Press the drop-down list → select one of the numbered Address Lists.
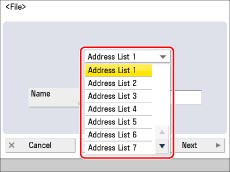
Address lists are a convenient way to classify destinations.
7.
Press [Name].
8.
Enter a name for the recipient of the file server address → press [OK].
9.
Press [Next].
10.
Press the drop-down list → select the desired protocol.
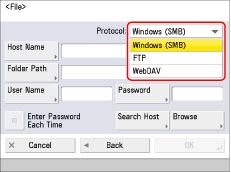
Select [Windows (SMB)] or [WebDAV].
11.
Specify each setting.
For details on the settings, see step 4 of "Storing in an Advanced Space."
If you try to send a document to an Advanced Space for which [Enter Password Each Time] is set to 'On', a screen prompting you to enter the password appears each time.
If you want to register an Advanced Space in a group address, set [Enter Password Each Time] to 'Off'. You cannot send to a group address including an Advanced Space for which [Enter Password Each Time] is set to 'On'.
12.
Press [OK].
If you are managing Address Book access numbers, perform the procedure in step 13 of "Registering an E-Mail Address."
13.
Press [Close] → [OK].
|
IMPORTANT
|
|
If you set [Language/Keyboard Switch On/Off] to 'On', the host name and folder path of the file server destination may not appear correctly, and you may not be able to browse them. (See "Enabling the Language/Keyboard Switch.")
|