Connecting to a Network
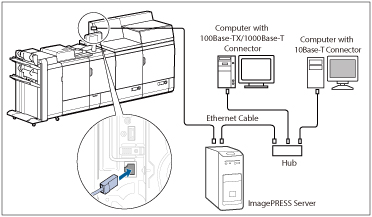
The machine can be connected to a network via the imagePRESS Server.
IMPORTANT |
This section describes the network connection with a LAN cable and network settings on the control panel. For details about the network settings, see the manual provided with the imagePRESS Server. A network cable is not included in this package. Please obtain a suitable cable for your computer or network. For details about the connection, contact your local authorized Canon dealer. |
Connecting the Machine to a Network
Connect the RJ-45 connector of the machine to the port of the imagePRESS Server. Cables are not supplied.
 WARNING WARNING |
When connecting the network cable, be sure to observe the following precautions to avoid electrical shock: Turn OFF the machine's main power switch before disconnecting the power cord from the power outlet. (See "Main Power and Energy Saver Key.") Turn OFF the computer and disconnect the power cord from the power outlet. |
NOTE |
After connecting to the network, perform the following operations. (For more information, see the relevant descriptions.) Set the date and time, and user management settings. (For information on setting the date and time, see "Current Date and Time." For information on user management settings, see "Restricting Access by Authentication." Set the network settings. Install the necessary drivers. (For details on installing the drivers, see the manual provided with the imagePRESS Server.) Install a utility if necessary. (See the manuals provided with the utility.) |
TCP/IP Settings
This section describes the procedure for specifying the settings common to TCP/IPv4 and TCP/IPv6 using the control panel.
Specify the settings required for your network environment. If you want to use both TCP/IPv4 communications and TCP/IPv6 communications, specify the settings required for both protocols.
1.
Press  (Settings/Registration).
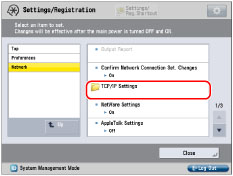
(Settings/Registration).2.
Press [Preferences] → [Network] → [TCP/IP Settings].
3.
Press [Use FTP PASV Mode] for [TCP/IP Settings] → specify the required settings → press [OK].
If you want to enable file transfers when connecting to the internet via a firewall, press [On].
IMPORTANT |
Whether you use the PASV mode for FTP depends on the network environment you are using and the settings of the file server you are sending to. Before specifying the PASV mode for FTP, consult the administrator for the network you are using. |
4.
Press [Use HTTP] for [TCP/IP Settings] → specify the required settings → press [OK].
Press [On] to use the Remote UI and Department ID Management PIN confirmation.
5.
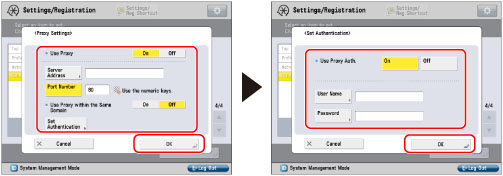
Press [Proxy Settings] for [TCP/IP Settings] → Press [On] for <Use Proxy> → specify the required settings → press [OK].