Basic Sending Methods
This section describes the basic procedures for sending documents via e-mail, I-fax, and fax, or to a file server or USB memory media device.
|
IMPORTANT
|
|
If the Language Switch setting is set to ‘On’, some characters are restricted and cannot be entered. To enter all characters, set the Language Switch setting to ‘Off’. (Configuring the Machine's Basic Settings)
|
Sending an E-Mail Message
This machine enables you to send scanned documents to an e-mail application. Scanned documents are converted to file formats such as TIFF and are transmitted as an e-mail attachment to the recipient’s e-mail application.
Follow the procedure below to send e-mails.
Follow the procedure below to send e-mails.
1
Press  (SEND) → place your originals.
 (SEND) → place your originals.
NOTE:
For instructions on how to place your originals, see Basic Operations.
If <Enter your User Name and password and specify the login destination.> appears, follow the instructions in Logging in to Authentication at Send.
If any of the messages below appears, follow the instructions in Basic Operations:
<Enter the Department ID and Password using the numeric keys.>
<You must insert a control card.>
<Enter the User ID and Password.>
2
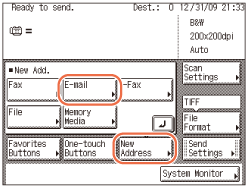
Press [New Address] → [E-mail].
NOTE:
If E-mail Send is set to ‘Do not allow’ or ‘Only allow sending to own address’, [E-mail] is not displayed. (Customizing Settings)
3
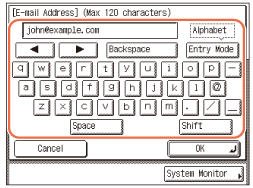
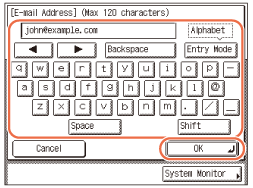
Enter the e-mail address (up to 120 characters) using the on-screen keyboard.
NOTE:
For instructions on how to enter characters, see Basic Operations.
4
Press [OK].
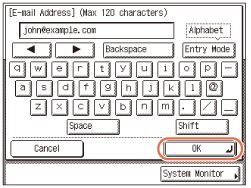
The specified destination appears on the top screen.
If you want to check or change the specified destination:
|
1
|
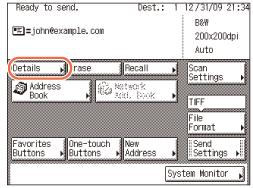
Press [Details].
 |
|
2
|
Check or change the destination’s information → press [OK].
 The display returns to the top screen.
|
If you want to delete the specified destination:
|
1
|
Press [Erase].
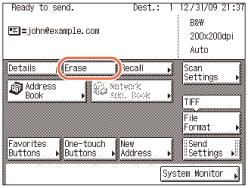 The specified destination is deleted from the destination list.
|
5
Press [Scan Settings] to specify the scan settings you require.
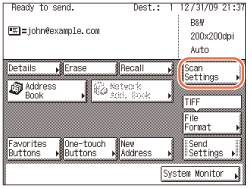
For more information, see Specifying the Scan Settings.
6
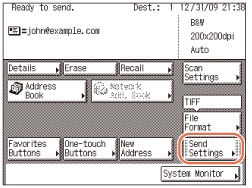
Press [Send Settings].
7
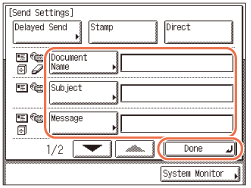
Specify the send settings you require → press [Done].
Press [ ] or [
 ] to scroll to the desired setting if it is not displayed.
 ] or [
 ] to scroll to the desired setting if it is not displayed.
The settings listed below can be specified to suit your needs. Documents can be sent to the specified destination regardless of whether any of these settings specified.
|
|
[Document Name]:
|
Sets the name of the document that you want to send. You can enter up to 24 characters for the document name.
|
|
[Subject]:
|
Sets the subject of the e-mail message. You can enter up to 40 characters for the subject.
If you do not enter a subject, the default subject set in <Default Subject> is used. (Setting the Send Function) |
|
|
[Message]:
|
Sets the message body text. You can enter up to 140 characters for the message. A hard return is counted as one character.
|
|
|
[Reply-to]:
|
Sets the reply-to address. When you press [Reply-to], e-mail addresses stored in the Address Book appear. Select one address from the Address Book as the reply-to address. For instructions on how to use the Address Book, see Using the Address Book.
E-mail addresses must be stored in the Address Book beforehand. (Registering the Address Book) |
|
|
[E-mail Priority]:
|
Sets the priority for your e-mail message. Press the E-mail Priority drop-down list → select the desired priority setting.
|
NOTE:
[Delayed Send] and [Stamp] also can be specified as necessary. For more information, see Stamping Originals Which Have Already Been Scanned and Stamping Originals Which Have Already Been Scanned.
When you are sending documents, each page is sent as a separate image attached to an e-mail message, and the extension of the document matches the file format that you select for sending. The file name prefix of the image attached to the e-mail message is generated based on the date and time (year, month, day, hour, minute, second) and four digits that signify the page number of the image.
Example: date and time_0001.tif
If you specify the Document Name setting in this step or set <Add user name to Send Document Name> in User ID Management to ‘On’, the file name prefix is assigned as follows:
If you specify the Document Name setting:
The document name specified in Document Name comes first as the file name prefix.
The document name specified in Document Name comes first as the file name prefix.
Example: document name_date and time_0001.tif
If you set <Add user name to Send Document Name> in User ID Management to ‘On’:
The user ID entered when you log in to the machine comes first as the file name prefix.
Example: user ID_date and time_0001.tif
If you specify the Document Name setting and set <Add user name to Send Document Name> in User ID Management to ‘On’:
The document name specified in Document Name and the user ID entered when you log in to the machine comes first as the file name prefix.
Example: document name_user ID_date and time_0001.tif
For instructions on how to set <Add user name to Send Document Name> in User ID Management to ‘On’, see Protecting the Machine from Unauthorized Access.
8
Press  (Start) to start scanning your originals.
 (Start) to start scanning your originals.
To cancel scanning, press [Cancel] or  (Stop).
 (Stop).
If the original is placed on the platen glass, follow the instructions that appear on the touch panel display → press  (Start) once for each original. When scanning is complete, press [Done].
 (Start) once for each original. When scanning is complete, press [Done].
The scanned data is sent to the specified destination when scanning is complete.
IMPORTANT:
The machine automatically detects the size of the original when scanning it. For the size of the original the machine can detect, see Basic Operations.
If the machine cannot detect the size of the original correctly, the Original Size screen appears when you press  (Start). Specify the size of the original manually → press [OK].
 (Start). Specify the size of the original manually → press [OK].
If the settings under <Authentication Method> in <SMTP Authentication Settings> are configured to display an authentication screen, the Enter Network Password screen appears when you press  (Start). (Customizing Settings) Specify the user name and password → press [OK].
 (Start). (Customizing Settings) Specify the user name and password → press [OK].
Sending an I-Fax
Internet fax (I-fax) enables you to send fax documents over the network. Scanned documents are converted to TIFF format and are transmitted as an e-mail attachment to the recipient’s I-fax compatible machine. Regardless of the distance and area, I-fax helps you to reduce transmission costs by making transactions via the Internet.
Follow the procedure below to send I-faxes.
Follow the procedure below to send I-faxes.
|
NOTE
|
|
If you are sending a document to an I-fax address, the following conditions are always selected:
Paper Size: LTR
This is because the sender does not know whether the recipient’s machine can receive sizes other than LTR. Originals larger than LTR are reduced to LTR size. File Format: TIFF
Color Mode: B&W
Resolution: 200 × 100 dpi or 200 × 200 dpi
|
1
Press  (SEND) → place your originals.
 (SEND) → place your originals.
NOTE:
For instructions on how to place your originals, see Basic Operations.
If <Enter your User Name and password and specify the login destination.> appears, follow the instructions in Logging in to Authentication at Send.
If any of the messages below appears, follow the instructions in Basic Operations:
<Enter the Department ID and Password using the numeric keys.>
<You must insert a control card.>
<Enter the User ID and Password.>
2
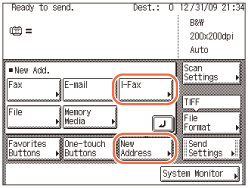
Press [New Address] → [I-Fax].
NOTE:
If E-mail Send is set to ‘Do not allow’ or ‘Only allow sending to own address’, [I-Fax] is not displayed. (Customizing Settings)
3
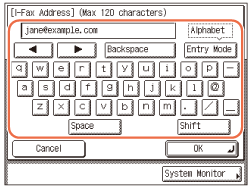
Enter the I-fax address (up to 120 characters) using the on-screen keyboard.
NOTE:
For instructions on how to enter characters, see Basic Operations.
4
Press [OK].
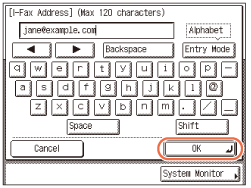
The specified destination appears on the top screen.
If you want to check or change the specified destination:
|
1
|
Press [Details] → check or change the destination’s information → press [OK].
For help, see step 4 in Sending an E-Mail Message.
|
If you want to delete the specified destination:
|
1
|
Press [Erase].
For help, see step 4 in Sending an E-Mail Message.
|
5
Press [Scan Settings] to specify the scan settings you require.
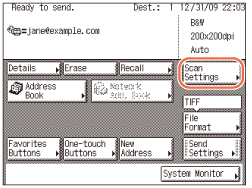
For more information, see Specifying the Scan Settings.
6
Press [Send Settings].
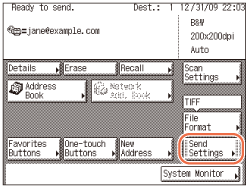
7
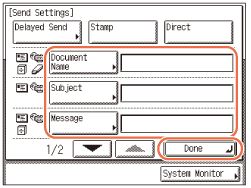
Specify the send settings you require → press [Done].
Press [ ] or [
 ] to scroll to the desired setting if it is not displayed.
 ] or [
 ] to scroll to the desired setting if it is not displayed.
The settings listed below can be specified to suit your needs. Documents can be sent to the specified destination regardless of whether any of these settings specified.
|
|
[Document Name]:
|
Sets the name of the document that you want to send. You can enter up to 24 characters for the document name.
|
|
[Subject]:
|
Sets the subject of the I-fax documents. You can enter up to 40 characters for the subject.
If you do not enter a subject, the default subject set in <Default Subject> is used. (Setting the Send Function) |
|
|
[Message]:
|
Sets the message body text. You can enter up to 140 characters for the message. A hard return is counted as one character.
|
|
|
[Reply-to]:
|
Sets the reply-to address. When you press [Reply-to], e-mail addresses stored in the Address Book appear. Select one address from the Address Book as the reply-to address. For instructions on how to use the Address Book, see Using the Address Book.
E-mail addresses must be stored in the Address Book beforehand. (Registering the Address Book) |
NOTE:
[Delayed Send] and [Stamp] also can be specified as necessary. For more information, see Specifying the Time to Start Sending (Delayed Send) and Stamping Originals Which Have Already Been Scanned.
When you are sending documents, each page is sent as a separate TIFF image attached to the I-fax. The file name prefix of the image attached to the I-fax is generated based on the date and time (year, month, day, hour, minute, second) and four digits that signify the page number of the image.
Example: date and time_0001.tif
If you specify the Document Name setting in this step or set <Add user name to Send Document Name> in User ID Management to ‘On’, the file name prefix is assigned as follows:
If you specify the Document Name setting:
The document name specified in Document Name comes first as the file name prefix.
Example: document name_date and time_0001.tif
If you set <Add user name to Send Document Name> in User ID Management to 'On':
The user ID entered when you log in to the machine comes first as the file name prefix.
Example: user ID_date and time_0001.tif
If you specify the Document Name setting and set <Add user name to Send Document Name> in User ID Management to ‘On’:
The document name specified in Document Name and the user ID entered when you log in to the machine comes first as the file name prefix.
Example: document name_user ID_date and time_0001.tif
For instructions on how to set <Add user name to Send Document Name> in User ID Management to ‘On’, see Protecting the Machine from Unauthorized Access.
8
Press  (Start) to start scanning your originals.
 (Start) to start scanning your originals.
To cancel scanning, press [Cancel] or  (Stop).
 (Stop).
If the original is placed on the platen glass, follow the instructions that appear on the touch panel display → press  (Start) once for each original. When scanning is complete, press [Done].
 (Start) once for each original. When scanning is complete, press [Done].
The scanned data is sent to the specified destination when scanning is complete.
IMPORTANT:
The machine automatically detects the size of the original when scanning it. For the size of the original the machine can detect, see Basic Operations.
If the machine cannot detect the size of the original correctly, the Original Size screen appears when you press  (Start). Specify the size of the original manually → press [OK].
 (Start). Specify the size of the original manually → press [OK].
If the settings under <Authentication Method> in <SMTP Authentication Settings> are configured to display an authentication screen, the Enter Network Password screen appears when you press  (Start). (Customizing Settings) Specify the user name and password → press [OK].
 (Start). (Customizing Settings) Specify the user name and password → press [OK].
Sending a Document to a File Server
This machine enables you to send scanned documents to a file server. Scanned documents are converted to file formats such as TIFF and are transmitted to the specified file server.
Follow the procedure below to send documents to a file server.
|
IMPORTANT
|
|
The number of users or clients that can access a server running Windows 2000/XP/Vista/7/Server 2003/Server 2008 is limited. After this number of users or clients is reached, it is not possible to send to a server running Windows 2000/XP/Vista/7/Server 2003/Server 2008.
|
1
Press  (SEND) → place your originals.
 (SEND) → place your originals.
NOTE:
For instructions on how to place your originals, see Basic Operations.
If <Enter your User Name and password and specify the login destination.> appears, follow the instructions in Logging in to Authentication at Send.
If any of the messages below appears, follow the instructions in Basic Operations:
<Enter the Department ID and Password using the numeric keys.>
<You must insert a control card.>
<Enter the User ID and Password.>
2
Press [New Address] → [File].
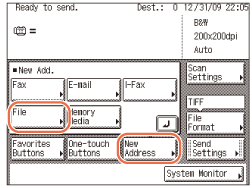
NOTE:
If File Send is set to ‘Do not allow’ or ‘Only allow sending to own address or specified folder’, [File] is not displayed. (Customizing Settings)
3
Press the Protocol drop-down list → select the desired server protocol.
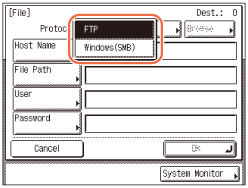
The following server protocols are available.
The table below shows the system requirements for the server that is compatible with IPv4.
|
Protocol
|
System Requirements
|
Application
|
|
FTP
|
Sun Solaris 2.6 or later, Mac OS X, or Red Hat Linux 7.2
|
-
|
|
Windows 2000 Server
|
Internet Information Services 5.0
|
|
|
Windows XP Professional
|
Internet Information Services 5.1
|
|
|
Windows Server 2003
|
Internet Information Services 6.0
|
|
|
Windows Vista/Server 2008
|
Internet Information Services 7.0
|
|
|
Windows 7/Server 2008 R2
|
Internet Information Services 7.5
|
|
|
Windows (SMB)
|
Windows 2000/XP/Vista/7/Server 2003/Server 2008
|
-
|
|
Mac OS X/UNIX/Linux
|
Samba 2.2.8a or later
|
The table below shows the system requirements for the server that is compatible with IPv6.
|
Protocol
|
System Requirements
|
Application
|
|
FTP
|
Solaris Version 9 or later, Red Hat Enterprise Linux AS/ES/WS 4.0 or later, or Mac OS X 10.3 or later
|
-
|
4
Specify a file server as the destination.
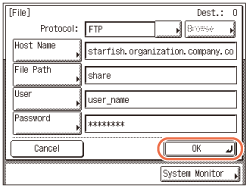
When specifying a file server, you need to set the host name, file path, user name, and password. You can use the on-screen keyboard to set these items, or use the Browse key on the File screen to specify a file server if [Windows (SMB)] is selected as the server protocol in step 3. With the Browse key you can search for and specify a file server connected to a specific network.
NOTE:
If the settings under <When Sending File to New Address> are configured to carry over the login information from Authentication at Send, the user name and password used to log in to Authentication at Send are automatically inserted in the [User] text box and the [Password] text box. (Customizing Settings) Leave them as they are or change them as necessary in this step.
If you use the on-screen keyboard:
|
1
|
Press [Host Name].
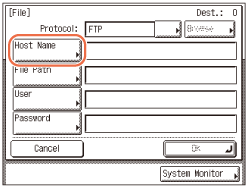 A host name is a name assigned to a host computer that provides services on the Internet. A specific host name is assigned to each host computer to specify it on the Internet. In this entry box, enter the name of the file server on the network as the destination of the send job.
|
|
2
|
Enter the host name (up to 47 characters or 120 characters when [Windows (SMB)] is selected as the server protocol) using the on-screen keyboard → press [OK].
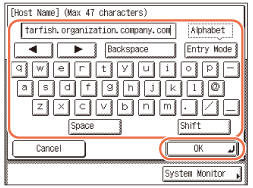 |
|
3
|
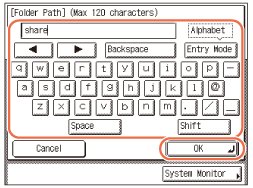
Press [File Path].
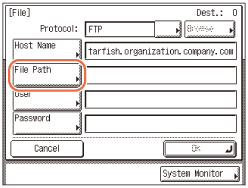 A file path is a series of characters that signify the location of the folder. In this entry box, specify a folder in the file server as the destination of the send job.
|
|
4
|
Enter the file path (up to 120 characters) using the on-screen keyboard → press [OK].
 |
|
5
|
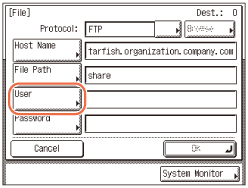
Press [User].
 |
|
6
|
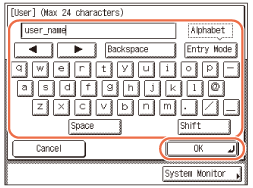
Enter the user name (up to 24 characters) using the on-screen keyboard → press [OK].
 |
|
7
|
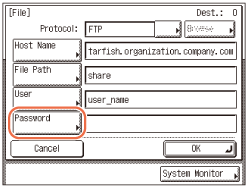
Press [Password].
 |
|
8
|
Enter a password (up to 24 characters or 14 characters when [Windows (SMB)] is selected as the server protocol) using the on-screen keyboard → press [OK].
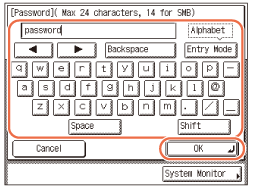 After pressing [OK], the characters that you enter for the password are displayed as asterisks (********) on the [File] screen.
|
|
IMPORTANT
|
|
If Language Switch in Common Settings is set to ‘On’, the characters entered in [Host Name] and [File Path] may not be displayed correctly, so you may not be able to refer to them.
|
|
NOTE
|
|
For instructions on how to enter characters, see Basic Operations.
If you are sending to an imageWARE Document Manager* folder, set the FTP server address specified in imageWARE Gateway as the destination. Using imageWARE Document Manager and the Send function of the machine enables you to manage digitized paper documents and computer data on the network. For more information on the imageWARE Document Manager, see the appropriate imageWARE Gateway documentation.
* a document management system provided by Canon
|
If you use the Browse key:
|
1
|
Press [Browse].
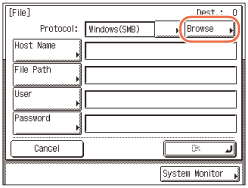 IMPORTANT:
After turning the main power ON, you must wait for the time set in Startup Time Settings to elapse before pressing [Browse]. Network transmission is not possible until this startup time has elapsed. (Other System Settings)
|
|
2
|
Select the desired workgroup → press [Down].
Press [
 ] or [ ] or [ ] to scroll to the desired workgroup if it is not displayed. ] to scroll to the desired workgroup if it is not displayed.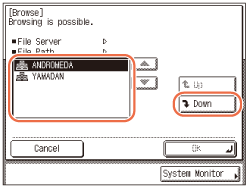 |
|
3
|
Select the desired file server → press [Down] or [OK].
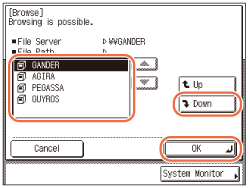 If you want to send scanned documents in a specific folder in the selected file server, press [Down] → select the desired folder → press [OK].
If not, press [OK].
|
NOTE:
If the Enter Network Password screen is displayed, enter your user name and network password → press [OK].
For instructions on how to enter characters, see Basic Operations.
5
Confirm your settings → press [OK].
The specified file server destination appears on the top screen.
If you want to check or change the specified destination:
|
1
|
Press [Details] → check or change the destination’s information → press [OK].
For help, see step 4 in Sending an E-Mail Message.
|
If you want to delete the specified destination:
|
1
|
Press [Erase].
For help, see step 4 in Sending an E-Mail Message.
|
6
Press [Scan Settings] to specify the scan settings you require.
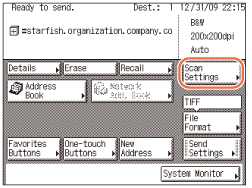
For more information, see Specifying the Scan Settings.
7
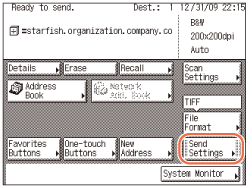
Press [Send Settings].
8
Specify the send settings you require → press [Done].
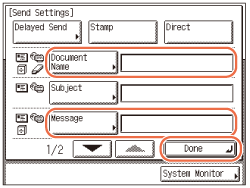
The settings listed below can be specified to suit your needs. Documents can be sent to the specified destination regardless of whether any of these settings specified.
|
|
[Document Name]:
|
Sets the name of the document that you want to send. You can enter up to 24 characters for the document name.
If you use characters such as ",", "/", "[", or "]" in the document name, you may not be able to send the file to file servers that run on operating systems that do not recognize such characters. |
|
[Message]:
|
Sets the message body text. You can enter up to 140 characters for the message. A hard return is counted as one character.
When you are sending documents to a file server, the characters entered in [Message] is sent as a text file. However, if you do not enter characters in [Message], only the image file is sent to the server without a text file. |
NOTE:
[Delayed Send] and [Stamp] also can be specified as necessary. For more information, see Specifying the Time to Start Sending (Delayed Send) and Stamping Originals Which Have Already Been Scanned.
When you are sending documents, each page is sent as a separate image and stored in a file server. The extension of the document matches the file format that you select for sending. The file name prefix of the image attached to the document you are sending is generated based on the date and time (year, month, day, hour, minute, second) and four digits that signify the page number of the image.
Example: date and time_0001.tif
If you specify the Document Name setting in this step or set <Add user name to Send Document Name> in User ID Management to 'On', the file name prefix is assigned as follows:
If you specify the Document Name setting:
The document name specified in Document Name comes first as the file name prefix.
Example: document name_date and time_0001.tif
If you set <Add user name to Send Document Name> in User ID Management to ‘On’:
The user ID entered when you log in to the machine comes first as the file name prefix.
Example: user ID_date and time_0001.tif
If you specify the Document Name setting and set <Add user name to Send Document Name> in User ID Management to 'On':
The document name specified in Document Name and the user ID entered when you log in to the machine comes first as the file name prefix.
Example: document name_user ID_date and time_0001.tif
For instructions on how to set <Add user name to Send Document Name> in User ID Management to ‘On’, see Protecting the Machine from Unauthorized Access.
9
Press  (Start) to start scanning your originals.
 (Start) to start scanning your originals.
To cancel scanning, press [Cancel] or  (Stop).
 (Stop).
If the original is placed on the platen glass, follow the instructions that appear on the touch panel display → press  (Start) once for each original. When scanning is complete, press [Done].
 (Start) once for each original. When scanning is complete, press [Done].
The scanned data is sent to the specified destination when scanning is complete.
IMPORTANT:
The machine automatically detects the size of the original when scanning it. For the size of the original the machine can detect, see Basic Operations.
If the machine cannot detect the size of the original correctly, the Original Size screen appears when you press  (Start). Specify the size of the original manually → press [OK].
 (Start). Specify the size of the original manually → press [OK].
Sending a Document to a USB Memory Media Device
This machine enables you to store scanned documents in a USB memory media device. Scanned documents are converted to file formats such as TIFF and are transmitted directly to the USB memory media device connected to the machine.
Follow the procedure below to send documents to a USB memory media device.
Follow the procedure below to send documents to a USB memory media device.
|
IMPORTANT
|
|
The supported file systems of a USB memory media device are FAT16 and FAT32.
The supported maximum sizes of a USB memory media device are as follows:
FAT32: 8GB
FAT16: 2GB
USB memory media devices with security function or card readers are not supported.
USB memory media devices used with an extension cable are not supported.
Use of USB memory media devices through a USB hub (except for the optional USB Application 3-Port Interface Kit-A1) is not supported.
USB memory media devices that do not comply with USB specifications are not supported.
In some cases, images may not be saved correctly due to the type of USB memory media device used.
|
|
NOTE
|
|
For a USB memory media device formatted with the FAT16 file system, a maximum of 255 files can be saved in the root directory (the top level of the directory tree in the USB memory media device). It is recommended that you use a computer to organize the root directory of your USB memory media device beforehand by moving existing files to a newly created folder or by deleting unnecessary files. Formatting the USB memory media device to FAT32 is also recommended if none of the files in the USB memory media device are necessary.
If the destination folder of the scanned images contains too many files, the time it takes to save will increase. It is recommended that you use a computer to organize your destination folder beforehand by moving existing files to a newly created folder or by deleting unnecessary files.
|
1
Press  (SEND) → place your originals.
 (SEND) → place your originals.
IMPORTANT:
You can only send one page at a time when you place your original on the platen glass. If you want to send a document of two or more pages, place your originals into the feeder.
NOTE:
For instructions on how to place your originals, see Basic Operations.
If <Enter your User Name and password and specify the login destination.> appears, follow the instructions in Logging in to Authentication at Send.
If any of the messages below appears, follow the instructions in Basic Operations:
<Enter the Department ID and Password using the numeric keys.>
<You must insert a control card.>
<Enter the User ID and Password.>
2
Insert the USB memory media device into the USB port on the left or right side of the machine.
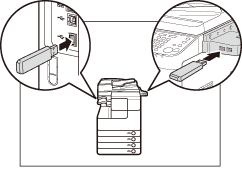
IMPORTANT:
The USB ports on the right side of the machine are optional (USB Application 3-Port Interface Kit-A1).
The left side USB port is not available when the above option is attached.
3
Press [Done].
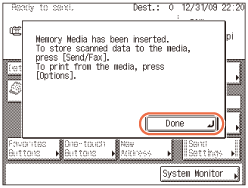
NOTE:
The displayed message may vary depending on the settings in Memory Media Settings. (Setting the Send Function)
4
Press [New Address] → [Memory Media].
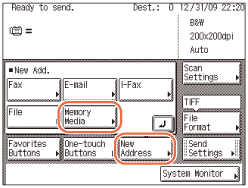
NOTE:
If Use Scan to Memory Media in Memory Media Settings is set to 'Off', [Memory Media] is not displayed. (Setting the Send Function)
5
Select the desired memory media device → press [Down] or [OK].
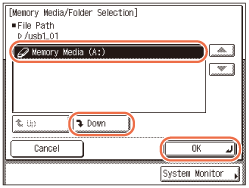
If you want to store scanned documents in a specific folder in the selected media, press [Down] → select the desired folder → press [OK].
If not, press [OK].
6
Press [Scan Settings] to specify the scan settings you require.
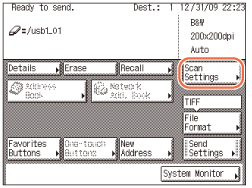
For more information, see Specifying the Scan Settings.
7
Press [Send Settings].
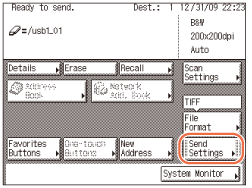
8
Specify the send settings you require → press [Done].
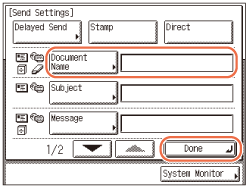
The setting listed below can be specified to suit your needs. Documents can be sent to the specified destination regardless of whether this setting specified.
|
|
[Document Name]:
|
Sets the name of the document that you want to send. You can enter up to 24 characters for the document name.
|
NOTE:
[Stamp] also can be specified as necessary. For more information, see Stamping Originals Which Have Already Been Scanned.
When you are sending documents, each page is sent as a separate image and stored in a USB memory media device. The extension of the document matches the file format that you select for sending. The file name prefix of the image attached to the document you are sending is generated based on the date and time (year, month, day, hour, minute, second) and four digits that signify the page number of the image.
Example: date and time_0001.tif
If you specify the Document Name setting in this step or set <Add user name to Send Document Name> in User ID Management to 'On', the file name prefix is assigned as follows:
If you specify the Document Name setting:
The document name specified in Document Name comes first as the file name prefix.
Example: document name_date and time_0001.tif
If you set <Add user name to Send Document Name> in User ID Management to 'On':
The user ID entered when you log in to the machine comes first as the file name prefix.
If you specify the Document Name setting and set <Add user name to Send Document Name> in User ID Management to 'On':
The document name specified in Document Name and the user ID entered when you log in to the machine comes first as the file name prefix.
Example: document name_user ID_date and time_0001.tif
For instructions on how to set <Add user name to Send Document Name> in User ID Management to ‘On’, see Protecting the Machine from Unauthorized Access.
9
Press  (Start) to start scanning your originals.
 (Start) to start scanning your originals.
To cancel scanning, press [Cancel] or  (Stop).
 (Stop).
The scanned data is sent to the specified destination when scanning is complete.
IMPORTANT:
The machine automatically detects the size of the original when scanning it. For the size of the original the machine can detect, see Basic Operations.
If the machine cannot detect the size of the original correctly, the Original Size screen appears when you press  (Start). Specify the size of the original manually → press [OK].
 (Start). Specify the size of the original manually → press [OK].
Sending a Fax
You can scan originals and send them as faxes. The machine provides the three modes for sending faxes: Memory Sending, Direct Sending, and Manual Sending.
Memory Sending
All sent originals are scanned and read into memory before they are sent. This means that you do not need to stay near the machine once the originals have been scanned. You can start scanning documents for sending even while the machine is busy sending another document.
Direct Sending
The machine sends each page of the document to the destination as it is scanned.
Although the Direct Sending mode is slower than the Memory Sending mode, you can use the Direct Sending mode when you need to send an urgent document ahead of other documents stored in memory.
Although the Direct Sending mode is slower than the Memory Sending mode, you can use the Direct Sending mode when you need to send an urgent document ahead of other documents stored in memory.
Manual Sending
This mode enables you to manually send fax documents after checking that the destination is ready to receive fax transmissions. Use this mode if the recipient does not have a fax machine that can receive automatically.
Memory Sending
The following describes the flow of sending faxes using the Memory Sending mode.
|
IMPORTANT
|
|
The Memory Sending mode is automatically set when:
The Delayed Send mode is used
Multiple destinations are specified
The Direct Sending mode is not used
|
|
NOTE
|
|
The memory can hold a total of approximately 1,000 pages for sent and received documents.
If the memory becomes full, delete unwanted received documents using the System Monitor screen. (Checking / Changing the Status of Documents in Memory)
|
1
Press  (SEND) → place your originals.
 (SEND) → place your originals.
NOTE:
For instructions on how to place your originals, see Basic Operations.
If <Enter your User Name and password and specify the login destination.> appears, follow the instructions in Logging in to Authentication at Send.
If any of the messages below appears, follow the instructions in Basic Operations:
<Enter the Department ID and Password using the numeric keys.>
<You must insert a control card.>
<Enter the User ID and Password.>
2
Press [New Address] → [Fax].
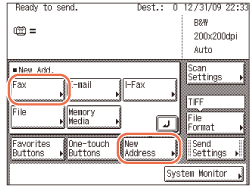
NOTE:
If Fax Send is set to 'Do not allow', [Fax] is not displayed. (Customizing Settings)
3
Enter the fax number (up to 40 characters) using  -
-  (numeric keys).
 -
-  (numeric keys).
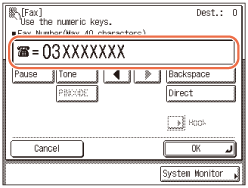
In this step, the keys listed below are also available as needed.
|
|
[Pause]:
|
Press to insert a pause of several seconds in the fax number you are dialing. If you insert a pause within the fax number, the letter <p> is displayed between the numbers. If you insert a pause at the end of the fax number, the letter <P> appears. When dialing an overseas number, insert a pause after the international access code and at the end of the fax number. (Dialing an Overseas Number)
|
|
[Tone]:
|
Press when you want to directly call an extension line that is connected to a PBX (Private Branch eXchange), which accepts only tone dialing. If you press [Tone], the letter <T> appears.
|
|
|
[PIN Code]:
|
Press to enter the PIN (Personal Identification Number) code. You can press this key only if [Option] is selected for PIN Code Position. If [Prefix], [Suffix], or [Off] is selected for PIN Code Position, this key is grayed out. (Dialing with a PIN Code)
|
|
|
[
 ] [ ] [ ]: ]: |
Press to move the position of the cursor.
|
|
|
[Backspace]:
|
Press to delete the number immediately to the left of the cursor.
|
IMPORTANT:
You cannot insert a pause at the beginning of a number.
NOTE:
For instructions on how to enter characters, see Basic Operations.
The pause time differs in length, depending on whether it is entered in the middle or at the end of a fax number.
The pause time entered in the middle of a fax number (lower-case p) is set to two seconds long by default. This can be changed to any length between 1 and 15 seconds. (Adjusting the Pause Time)
The pause time entered at the end of a fax number (upper-case P) is set to 10 seconds long. (This length cannot be changed.)
Two or more pauses can be entered consecutively.
You can press  (Clear) to clear your entry.
 (Clear) to clear your entry.
4
Press [OK].
The specified destination appears on the top screen.
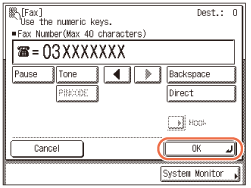
If you want to check or change the specified destination:
|
1
|
Press [Details] → check or change the destination’s information → press [OK].
For help, see step 4 in Sending an E-Mail Message.
|
If you want to delete the specified destination:
|
1
|
Press [Erase].
For help, see step 4 in Sending an E-Mail Message.
|
NOTE:
If Confirm Entered Fax Numbers in Restrict the Send Function is set to ‘On’, you should enter the fax number again for confirmation. Enter the fax number you entered in step 3 → press [OK]. (Setting the Send Function)
5
Press [Scan Settings] to specify the scan settings you require.
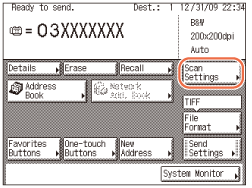
For more information, see Specifying the Scan Settings.
6
Press  (Start) to start scanning your originals.
 (Start) to start scanning your originals.
To cancel scanning, press [Cancel] or  (Stop).
 (Stop).
If the original is placed on the platen glass, follow the instructions that appear on the touch panel display → press  (Start) once for each original. When scanning is complete, press [Done].
 (Start) once for each original. When scanning is complete, press [Done].
The scanned data is sent to the specified destination when scanning is complete.
IMPORTANT:
The machine automatically detects the size of the original when scanning it. For the size of the original the machine can detect, see Basic Operations.
If the machine cannot detect the size of the original correctly, the Original Size screen appears when you press  (Start). Specify the size of the original manually → press [OK].
 (Start). Specify the size of the original manually → press [OK].
Direct Sending
The following describes the flow of sending faxes using the Direct Sending mode.
|
IMPORTANT
|
|
You can specify only one destination at a time for the Direct Sending mode.
If an error occurs or you cancel transmission in the Direct Sending mode, you can check how many pages have been sent to the destination by printing the communication reports or using the System Monitor screen. (See Printing Communication Reports or Checking / Printing Communication Log.)
|
1
Press  (SEND) → place your originals.
 (SEND) → place your originals.
IMPORTANT:
You can only send one page at a time when you place your original on the platen glass. If you want to send a document of two or more pages, place your originals into the feeder.
NOTE:
For instructions on how to place your originals, see Basic Operations.
If <Enter your User Name and password and specify the login destination.> appears, follow the instructions in Logging in to Authentication at Send.
If any of the messages below appears, follow the instructions in Basic Operations:
<Enter the Department ID and Password using the numeric keys.>
<You must insert a control card.>
<Enter the User ID and Password.>
2
Press [New Address] → [Fax].
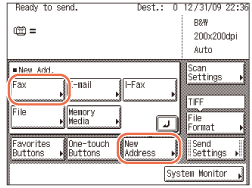
NOTE:
If Fax Send is set to 'Do not allow', [Fax] is not displayed. (Customizing Settings)
3
Enter the fax number (up to 40 characters) using  -
-  (numeric keys).
 -
-  (numeric keys).
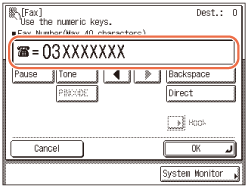
In this step, the keys listed below are also available as needed.
|
|
[Pause]:
|
Press to insert a pause of several seconds in the fax number you are dialing. If you insert a pause within the fax number, the letter <p> is displayed between the numbers. If you insert a pause at the end of the fax number, the letter <P> appears. When dialing an overseas number, insert a pause after the international access code and at the end of the fax number. (Dialing an Overseas Number)
|
|
[Tone]:
|
Press when you want to directly call an extension line that is connected to a PBX (Private Branch eXchange), which accepts only tone dialing. If you press [Tone], the letter <T> appears.
|
|
|
[PIN Code]:
|
Press to enter the PIN (Personal Identification Number) code. You can press this key only if [Option] is selected for PIN Code Position. If [Prefix], [Suffix], or [Off] is selected for PIN Code Position, this key is grayed out. (Dialing with a PIN Code)
|
|
|
[
 ] [ ] [ ]: ]: |
Press to move the position of the cursor.
|
|
|
[Backspace]:
|
Press to delete the number immediately to the left of the cursor.
|
IMPORTANT:
You cannot insert a pause at the beginning of a number.
NOTE:
For instructions on how to enter characters, see Basic Operations.
The pause time differs in length, depending on whether it is entered in the middle or at the end of a fax number.
The pause time entered in the middle of a fax number (lower-case p) is set to two seconds long by default. This can be changed to any length between 1 and 15 seconds. (Adjusting the Pause Time)
The pause time entered at the end of a fax number (upper-case P) is set to 10 seconds long. (This length cannot be changed.)
Two or more pauses can be entered consecutively.
You can press  (Clear) to clear your entry.
 (Clear) to clear your entry.
4
Press [Direct] → [OK].
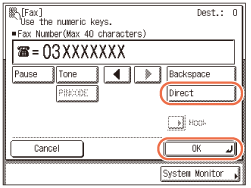
The Direct Sending mode is set and the specified destination appears on the top screen.
You can also set to the Direct Sending mode on the Send Settings screen. On the top screen, press [Send Settings] → [Direct] → [Done].
To cancel the Direct Sending mode, press [Direct] again.
If you want to check or change the specified destination:
|
1
|
Press [Details] → check or change the destination’s information → press [OK].
For help, see step 4 in Sending an E-Mail Message.
|
If you want to delete the specified destination:
|
1
|
Press [Erase].
For help, see step 4 in Sending an E-Mail Message.
|
NOTE:
If Confirm Entered Fax Numbers in Restrict the Send Function is set to ‘On’, you should enter the fax number again for confirmation. Enter the fax number you entered in step 3 → press [OK]. (Setting the Send Function)
5
Press [Scan Settings] to specify the scan settings you require.
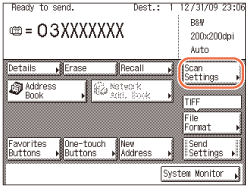
For more information, see Specifying the Scan Settings.
6
Press  (Start) to start scanning your originals.
 (Start) to start scanning your originals.
To cancel scanning, press [Cancel] or  (Stop).
 (Stop).
The scanned data is sent to the specified destination when scanning is complete.
After the fax is sent, the Direct Sending mode is canceled automatically.
IMPORTANT:
The machine automatically detects the size of the original when scanning it. For the size of the original the machine can detect, see Basic Operations.
If the machine cannot detect the size of the original correctly, the Original Size screen appears when you press  (Start). Specify the size of the original manually → press [OK].
 (Start). Specify the size of the original manually → press [OK].
Manual Sending
The following describes the flow of sending faxes using the Manual Sending mode.
|
IMPORTANT
|
|
If you cancel the Manual Sending mode during transmission, the pages that have already been scanned are sent. You can check how many pages have been sent to the destination by printing the communication reports or using the System Monitor screen. (Printing Communication Reports, Checking / Printing Communication Log)
|
1
Press  (SEND) → place your originals.
 (SEND) → place your originals.
IMPORTANT:
You can only send one page at a time when you place your original on the platen glass. If you want to send a document of two or more pages, place your originals into the feeder.
NOTE:
For instructions on how to place your originals, see Basic Operations.
If <Enter your User Name and password and specify the login destination.> appears, follow the instructions in Logging in to Authentication at Send.
If any of the messages below appears, follow the instructions in Basic Operations:
<Enter the Department ID and Password using the numeric keys.>
<You must insert a control card.>
<Enter the User ID and Password.>
2
Press [New Address] → [Fax].
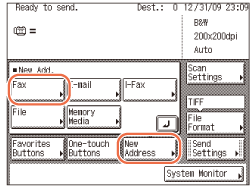
NOTE:
If Fax Send is set to 'Do not allow', [Fax] is not displayed. (Customizing Settings)
3
Press [Hook].
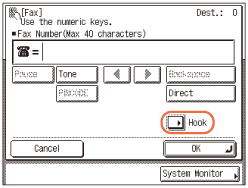
You should hear the dial tone (a continuous high-pitched sound).
4
Press [Scan Settings] to specify the scan settings you require.
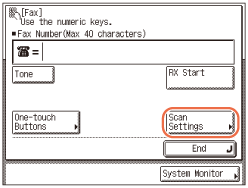
For more information, see Specifying the Scan Settings.
5
Enter the fax number (up to 40 characters) using  -
-  (numeric keys).
 -
-  (numeric keys).
If the number is registered in the one-touch buttons, you can also press [One-touch Buttons] to specify the number. (Using the One-Touch Buttons)
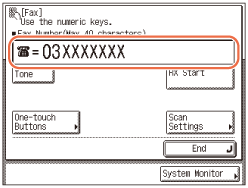
In this step, the keys listed below are also available as needed.
|
|
[Tone]:
|
Press when you want to directly call an extension line that is connected to a PBX (Private Branch eXchange), which accepts only tone dialing. If you press [Tone], the letter <T> appears.
|
|
[End]:
|
Press to cancel the Manual Sending mode.
|
NOTE:
For instructions on how to enter characters, see Basic Operations.
You cannot use group dialing for the Manual Sending mode.
6
When you hear a high-pitched tone, press  (Start) to start scanning your originals.
 (Start) to start scanning your originals.
To cancel scanning, press [Cancel] or  (Stop).
 (Stop).
The scanned data is sent to the specified destination when scanning is complete.
IMPORTANT:
The machine automatically detects the size of the original when scanning it. For the size of the original the machine can detect, see Basic Operations.
If the machine cannot detect the size of the original correctly, the Original Size screen appears when you press  (Start). Specify the size of the original manually → press [OK].
 (Start). Specify the size of the original manually → press [OK].