Parts and Their Functions
This section provides you with the names and functions of all of the parts on the outside and inside of the main unit and control panel. The illustrations in this section show some optional equipment attached to the machine. For more information on the optional equipment, see Optional Equipment.
External View
|
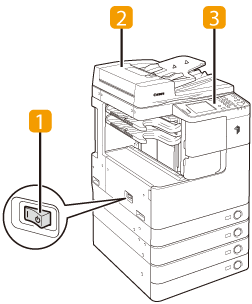
The imageRUNNER 2545i with the optional Inner Finisher-B1, Inner Finisher Additional Tray-B1, and CST. Feeding Unit-AE1 attached.
|
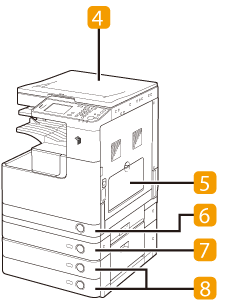
The imageRUNNER 2520 with the optional Inner 2 Way Tray-G1, Cassette Module-W1, and CST. Feeding Unit-AE1 attached.
|
 |
 |
 Main Power Switch
Press to the "I" side to turn ON the machine. (See Chapter 2, "Before You Start Using the Machine," in the User's Guide.)
 Feeder
(Optional for the imageRUNNER 2525/2520)
Originals placed in the feeder are automatically fed sheet by sheet to the scanning area. The feeder also automatically turns over two-sided originals to make one- or two-sided copies.
 Control Panel
The control panel includes the keys, touch panel display, and indicators required for operating the machine. (Control Panel)
 Platen Cover
(Optional for the imageRUNNER 2525)
The platen cover secures the originals placed on the platen glass.
 Stack Bypass
Use the stack bypass to feed paper manually, and for loading nonstandard paper stock, such as envelopes. (Loading Paper in the Stack Bypass)
 Paper Drawer 1
Paper Drawer 1 holds up to 550 sheets (250 sheets for the imageRUNNER 2520) of paper (80 g/m2).
 Paper Drawer 2 (Optional for the imageRUNNER 2520)
Paper Drawer 2 holds up to 550 sheets of paper (80 g/m2).
 Paper Drawers 3 and 4 (Optional)
The CST. Feeding Unit-AE1 provides two additional sources of paper for printing jobs. Each paper drawer holds up to 550 sheets of paper (80 g/m2).
Internal View
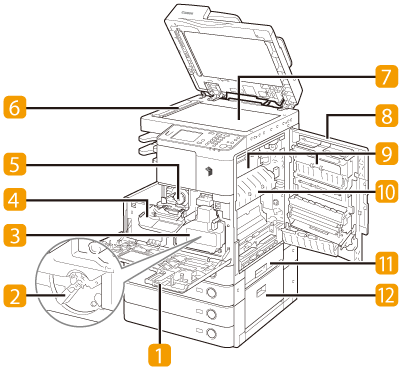
The imageRUNNER 2545i with the optional Inner Finisher-B1, Inner Finisher Additional Tray-B1, and CST. Feeding Unit-AE1 attached.

 Front Cover
Open this cover to replace the waste toner container.
 Drum
Drum
 Waste Toner Container
When the waste toner container becomes full, replace it with a new one. (Replacing the Waste Toner Container)
 Toner Replacement Cover
Open this cover when replacing the toner cartridge. (Replacing the Toner)
 Toner Cartridge
When toner runs out, pull out the toner cartridge and replace it with a new one.
(See Chapter 5, "Consumables," in the User's Guide.)
(See Chapter 5, "Consumables," in the User's Guide.)
 Scanning Area
Originals placed in the feeder are scanned here.
 Platen Glass
Place originals here when scanning books, heavyweight originals, transparencies, etc.
 Right Cover
Open this cover when clearing a paper jam inside the main unit.
 2 Way Unit-B1 (Optional for the imageRUNNER 2525/2520)
The 2 Way Unit-B1 delivers the prints to the additional output tray.
 Fixing Unit
If paper is jammed in the fixing unit, remove the jammed paper carefully. (Fixing Unit)
 Paper Drawer’s Right Cover
Open this cover when clearing a paper jam in Paper Drawers 1 and 2.
 Right Cover of the optional CST. Feeding Unit-AE1
Open this cover when clearing a paper jam in Paper Drawers 3 and 4.
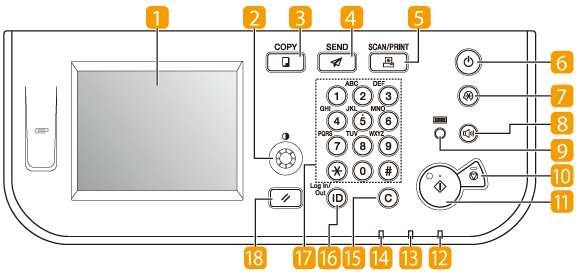
Control Panel

 Touch panel display
The menu screen for each function is displayed here. (Using the Touch Panel Display)
 Display Contrast dial
Turn clockwise or counterclockwise to adjust the contrast of the touch panel display.
 COPY key
Press to use the Copy function. (Copying)
 SEND key
Press to use the Send/Fax function. (Sending and Faxing)
 SCAN/PRINT key
Press to use functions such as Remote Scan, Media Print, Secure Printing, etc. (See the help on the Color Network ScanGear and Using the Machine as a Printer.)
 Control panel power switch
(Sub power supply)
Press to turn the control panel ON or OFF.
When the control panel is turned OFF, the machine is in the Sleep mode. (See Chapter 2, "Before You Start Using the Machine," in the User's Guide.)
When the control panel is turned OFF, the machine is in the Sleep mode. (See Chapter 2, "Before You Start Using the Machine," in the User's Guide.)
 Additional Functions key
Press to access the Additional Functions menu. (Accessing the Additional Functions Menu)
 Volume Control key
Press to set the machine’s audible tone settings. (Volume Control)
 Counter Check key
Press to view the machine’s print/scan page counts.
 Stop key
Press to stop a job in progress, such as copying, printing, scanning, etc.
 Start key
Press to start an operation.
 Main Power indicator
Lights up green when the main power is turned ON.
 Error indicator
Flashes or lights up red if an error occurs in the machine.
 Processing/Data indicator
Flashes or lights up green when the machine is performing operations.
 Clear key
Press to clear entered values or characters.
 Log In/Out key
Press to log in to/out of the machine, such as when it is managed with Department ID/User ID Management.
 Numeric keys
Press to enter numbers.
 Reset key
Press to cancel all settings and return to the top screen.