Installing after Downloading from the Canon Website
Install the printer driver after downloading the latest version from the Canon website.
1
Log on to the computer with an administrator account.
2
Download the printer driver from the Canon website (http://www.canon.com/).
For more information about how to download the printer driver, see the driver download page for your printer.
3
Unzip the downloaded file.
4
If you are making a wireless LAN connection, connect the printer to the computer. Connecting via Wireless LAN
Before starting installation of the printer driver, use the "MF/LBP Network Setup Tool" included in the downloaded file to configure network settings.
5
If you are making a USB connection, turn OFF the printer.
The printer may not be recognized if you install the printer driver with the printer turned ON. Always turn OFF the power before installing.
6
Open the folder where the printer driver is stored.
32-bit operating system
[UFRII] [uk_eng]
  [32BIT] folders of the downloaded file
[UFRII]
 [uk_eng]
  [32BIT] folders of the downloaded file
64-bit operating system
[UFRII] [uk_eng]
  [x64] folders of the downloaded file
[UFRII]
 [uk_eng]
  [x64] folders of the downloaded file
If you do not know whether to specify the 32-bit version or the 64-bit version for Windows Vista/7/8/Server 2008/Server 2012, see Checking the Bit Architecture.
7
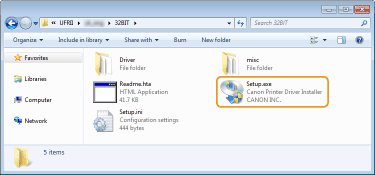
Double-click "Setup.exe."
8
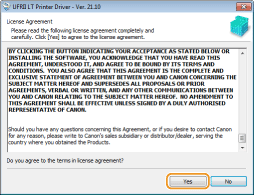
Read the License Agreement and click [Yes] to agree.
9
Install the printer driver.
 Wireless LAN Connection
|
1
|
Select [Standard], select the [Reactivate Printers in the Sleep Mode and Search] check box, and click [Next].
If you are using the printer in an IPv6 environment, click [Detailed Settings]
 select [Standard TCP/IP Port] select [Standard TCP/IP Port]  click [OK]. click [OK].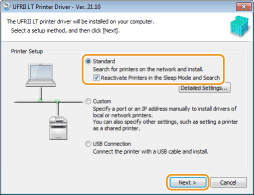  About [Detailed Settings]
You can select the port type.  [MFNP Port] (only for IPv4 environment)
This is a port that enables automatic detection of the printer's IP address. Even if the IP address of the printer is changed, the connection between the printer and computer will be maintained, provided that they belong to the same subnet. Therefore, you do not need to add a new port every time the IP address is changed. If you are using the printer in an IPv4 environment, choose this setting. [Standard TCP/IP Port]
This is a standard Windows port. Whenever the IP address of the printer is changed, a new port must be added. |
|
|
2
|
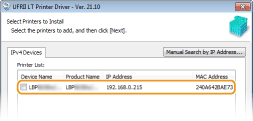
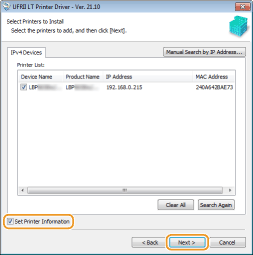
Select check box for the printer that you want to install from the [Printer List].
If you want to use the printer in an IPv6 environment, click the [IPv6 Devices] tab.
  If the [Select Process] screen is displayed
If a printer driver is already installed, the [Select Process] screen is displayed before the [Select Printers to Install] screen. For your printer, the selection made here makes no difference for the setup process. Simply click [Next]. 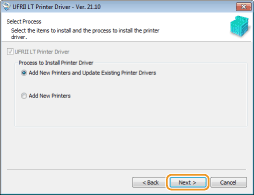 If the [IPv6 Devices] tab is not displayed
Return to the previous screen, and click [Detailed Settings]  select [Standard TCP/IP Port]. select [Standard TCP/IP Port]. If the printer that you want does not appear in [Printer List]
Problems with the Wireless LAN Connection |
|
|
3
|
Select the [Set Printer Information] check box, and click [Next].
 |
|
|
4
|
Set the printer information as necessary, and click [Next].
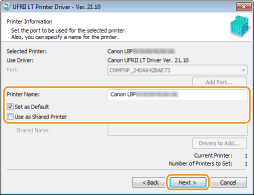 [Printer Name]
Change the printer name as necessary. [Set as Default]
Select the check box if you want to use your printer as your default printer. [Use as Shared Printer]
Select the check box if you want to share the printer (using the computer where you are performing the installation as a print server). Setting Up a Print Server during Printer Driver Installation |
|
|
5
|
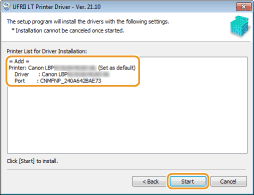
Check the printer information in [Printer List for Driver Installation], and click [Start].
|
 USB Connection
|
1
|
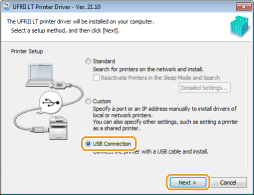
Select [USB Connection], and click [Next].
 |
|
|
2
|
Click [Yes].
 |
|
|
3
|
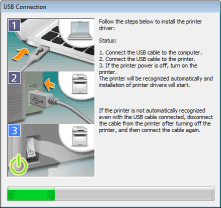
When the following screen appears, connect the computer and the printer with a USB cable (Connecting via USB), and turn ON the printer.
|
10
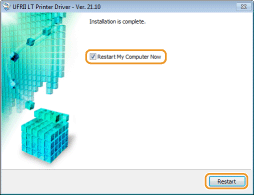
Select the [Restart My Computer Now] check box, and click [Restart].
Checking the Results of the Installation
|
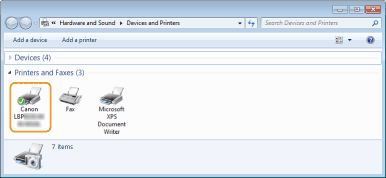
If the printer driver has been installed correctly, an icon for the installed printer will be displayed in the printer folder (Displaying the Printer Folder).
 |
 |
If the icon is not displayedUninstall the printer driver (Uninstalling Printer Drivers) and repeat the installation from the beginning.
|
 Installation of the printer driver starts.