Adjusting Print Position
If a document is printed off-center or out of the printable range, adjust the print position. You can adjust the print position for each paper source.

Step 1: Printing the Current Print Position
You can perform "Printing Position Adjustment Print" to check the direction and distance to adjust.
 |
|
When you want to check the print position for 2-sided printing, set <2-Sided Printing> to <On> in the setting menu of the operation panel in advance. 2-Sided Printing
|
1
Press  (
( ).
).
 (
( ).
).2
Use  /
/ to select <Paper Source>, and press
  .
.
 /
/ to select <Paper Source>, and press
  .
.
3
Select the paper source for which you want to check the print position, and press  .
.
 .
.
4
Press  (
( ).
).
 (
( ).
).The screen returns to the main screen.
5
Press  (
( ).
).
 (
( ).
).6
Select <Printing Pos. Print>, and press  .
.
 .
.
7
Select <Yes>, and press  .
.
 .
.
A printing position adjustment printout is output.
Step 2: Checking the Direction and Distance to Adjust
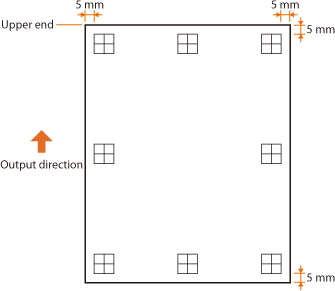
When Printing Position Adjustment Print is performed, the print position check marks  are printed. Determine the direction and distance to adjust based on those marks. When the print position is normal, all the marks are printed at a position 5 mm from the nearest edge of the paper.
How to Check Printing Position Adjustment Printouts
The edge of paper that comes out first when the paper is output is the top of a Printing Position Adjustment Print. When you check the print position, make sure which edge of the paper is the top.
 |
|
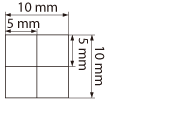
The size of the mark
 |
When the Print Position Is Off-Center
When the print position check marks are printed off the correct position, you need to adjust the print position. When you adjust the print position, specify the direction using "+" and "-" and the distance using "mm". Use "-" to shift the print position upward and "+" to shift it downward (vertical position correction). Use "-" to shift the print position leftward and "+" to shift it rightward (horizontal position correction).
|
Vertical direction (<Offset Y>)
 |
Horizontal direction (<Offset X>)
 |
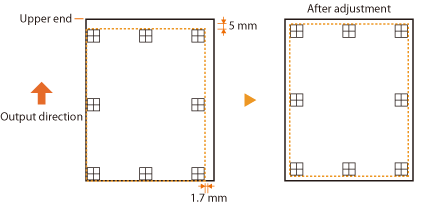
In the example shown below, to shift the print position 5 mm upward and 1.7 mm rightward, "-5.0 mm" is set in <Offset Y> and "+1.70 mm" is set in <Offset X>.

Step 3: Adjusting the Print Position for Each Paper Source
After you confirm the direction and distance to adjust, specify an adjusted print position. You can adjust the print position in the range of -5.0 to +5.0 mm in 0.1 mm increments in either direction: vertical and horizontal.
1
Set the machine to offline.
When  (
( ) is lit, press
  (
( ).
).
 (
( ) is lit, press
  (
( ).
).2
Press  (
( ).
).
 (
( ).
).3
Use  /
/ to select <User Maintenance>, and press
  .
.
 /
/ to select <User Maintenance>, and press
  .
.
4
Select <Adj. Print Position>, and press  .
.
 .
.
5
Select the combination of the direction to adjust and the paper source, and press  .
.
 .
.You can use <Offset Y (2-Sided)> and <Offset X (2-Sided)> to adjust the print position on the first page (front side) in 2-sided printing mode regardless of the paper source.


The print position on the second page (back side) in 2-sided printing mode follows the settings for the available paper source. For example, the vertical print position for 2-sided printing from the multi-purpose tray is adjusted as shown below.
|
First page (front side)
|
<Offset Y (2-Sided)> setting value
|
|
Second page (back side)
|
<Offset Y (MP Tray)> setting value
|
6
Set a value, and press  .
.
 .
.Based on the printout made by Printing Position Adjustment Print, use  /
/ to enter a value.
 /
/ to enter a value.
To adjust another position or paper source, repeat steps 5 and 6.
7
Press  (
( ).
).
 (
( ).
).The screen returns to the main screen.
8
Press  (
( ) again.
 (
( ) again.
The machine becomes online.
9
Perform the Printing Position Adjustment Print, and check the adjusted print position on the printout. Step 1: Printing the Current Print Position
|
Adjusting all print positions
|
|
You can use <Offset Y> and <Offset X> in the setting menu of the operation panel to adjust the print positions for all types of printing regardless of the paper source. You can adjust the print position in the range of -50.0 to +50.0 mm in 0.5 mm increments in either direction: vertical and horizontal. Offset Y/Offset X
|