
Printing a Document Stored in the Machine (Stored Job Print)
The data printed from a computer can be saved on the SD card installed on the machine. Since the saved data can be directly printed from the machine, you can eliminate the need to operate the computer every time you print. It is convenient to save a document that will be printed many times such as a fax cover sheet. Installing an SD Card

 |
|
Up to 1,000 documents can be stored in the machine.
The data saved on the SD card is not deleted even when the power is turned OFF, but the machine is set to automatically delete the data three days later. When you want to change the data storage period or prevent the data from being automatically deleted, change the applicable settings from the Remote UI (Changing the Storage Period for Documents). The saved data can also be deleted manually (Manually Deleting Documents).
|
Storing a Document in the Machine
1
Open a document in an application and display the print dialog box.
How to display the print dialog box differs for each application. For more information, see the instruction manual for the application you are using.
2
Select this machine, and click [Preferences] or [Properties].
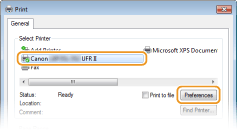
The screen that is displayed differs depending on the application you are using.
3
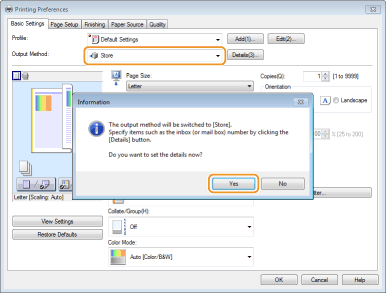
Select [Store] in [Output Method], and click [Yes].
4
Specify the settings for storing documents, and click [OK].
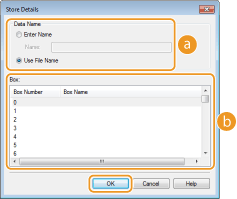
 [Data Name]
Assign a name to print data to store in the SD card.
|
[Enter Name]
|
Manually set a name. Enter up to 24 characters for the name of the print data. Specify a friendly name that can be easily identified on the display of the machine.
|
|
[Use File Name]
|
A name is automatically set based on the file name of print data to store and the information of an application that you are using.
|
 [Box]
[Box]A place used to store print data in the SD card is called a box. Select the number of the box to store the document. You can assign a name to the box to facilitate identification of the box. Setting a Name or PIN to a Box
5
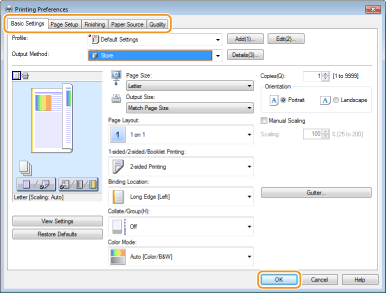
Specify the print settings, and click [OK].
Click the [Basic Settings], [Page Setup], [Finishing], [Paper Source], or [Quality] tab to specify the print settings on each screen as necessary. Various Print Settings
The settings changed here are stored with the document. When the document is printed next time, it is printed with the stored settings.
6
Click [Print] or [OK].
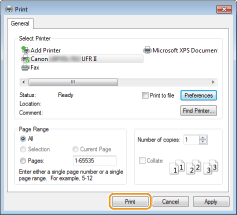
The document is sent to the machine and stored in the specified box.
Printing a Document Stored in the Machine
1
Press  (
( ).
).
 (
( ).
).When the machine is offline, it does not operate even if you press  (
( ). Set the machine to Online. [Online] key
 (
( ). Set the machine to Online. [Online] key
2
Use  /
/ to select <Stored Job Print>, and press
  .
.
 /
/ to select <Stored Job Print>, and press
  .
.
3
Select the box number of the document to print, and press  .
.
 .
.

If the box is protected by a PIN
When the PIN input screen is displayed, enter the PIN and press  . If you are unsure of the PIN, contact the administrator of the machine.
 . If you are unsure of the PIN, contact the administrator of the machine.
4
Select the document to print, and press  .
.
 .
.
Printing starts.
To cancel printing, use the operation panel. Canceling Prints
 |
|
Documents saved on the SD card can also be printed from the [Box] page of the Remote UI ([Box] Page). Open the box in which documents are saved, select the check box for a document to print, and click [Print].
|