Managing Stored Files
 |
|
You can use the Remote UI to print, send, or delete files that are stored in the Mail Box, or faxes and I-faxes that are temporarily stored in the Fax/I-Fax Inbox.
|
Managing Files Stored in a Mail Box
You can print or send documents that are stored in a Mail Box. You can also edit stored documents by deleting specific pages.
1
Start the Remote UI. Starting the Remote UI
2
Click [Access Received/Stored Files] on the portal page. Remote UI Screen
3
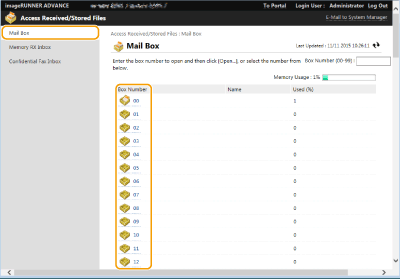
On the [Mail Box] page, click the number of the desired Mail Box.
If the page for entering a PIN is displayed, enter the PIN and click [OK].
You can also specify a Mail Box by entering its number in [Box Number (00-99)] and clicking [Open...].

4
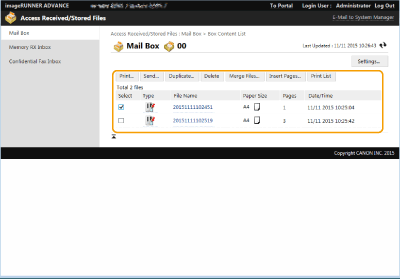
Specify the file to manage, and perform the desired operation.
You can click the [Type] icon or file name to display the file details.
You can click [Print List] to print a list of the files in the Mail Box.

 Printing a file
|
1
|
Select the check box for a file that you want to print, and click [Print...].
You can select multiple files.
|
|
2
|
Click [Start Printing].
You can click [Move to Top], [Move Up], [Move Down], or [Move to Bottom] to change the order in which files are printed.
You can click [Change Print Settings...] to change the print settings.
If you select the check box for [Delete File After Printing], files are automatically deleted after they are printed.
|
 Sending a file
|
1
|
Select the check box for a file that you want to send, and click [Send...].
You can select multiple files.
|
|
2
|
Click [Select Destination...], select the destination, and click [OK].
You can click [Move to Top], [Move Up], [Move Down], or [Move to Bottom] to change the order in which files are sent.
You can click [Settings...] in [Set Details] to change the send settings. You can also change detailed settings of the file in [File Settings]. Scanning
If you select the check box for [Delete File After Sending], files are automatically deleted after they are sent.
|
|
3
|
Click [OK].
|
 Merging multiple files into one
|
1
|
Select the check box for all of the files that you want to merge.
|
|
2
|
Click [Merge Files...] and enter a file name in [File Name].
You can click [Move to Top], [Move Up], [Move Down], or [Move to Bottom] to change the order in which files are merged.
|
|
3
|
Click [Start].
|
 Inserting a file into another file
|
1
|
Select the check box for the file that you want to insert the second file into, and click [Insert Pages...].
|
|
2
|
Select the file to insert, and click [Next].
|
|
3
|
Enter the new file name in [File Name After Insertion], and specify the insertion location (page) in [Select Insertion Location].
The file is inserted before the page specified in [Select Insertion Location].
|
|
4
|
Click [Insert].
|
 Duplicating a file in another Mail Box
|
1
|
Select the check box for a file that you want to duplicate, and click [Duplicate...].
|
|
2
|
Select the number of the destination Mail Box in [Target Box], and click [Start].
|
 Changing a file name
|
1
|
Click a [Type] icon or file name.
|
|
2
|
Click [Change File Name...], enter the new name in [File Name], and click [OK].
|
 Deleting pages from a file
|
1
|
Click a [Type] icon or file name.
|
|
2
|
Select the check box for the pages that you want to delete, and click [Delete Page]
 [OK]. [OK].You can also click [Delete Pages Consecutively...] and specify a range of pages to delete.
|
 Deleting a file
|
1
|
Select the check box for the file that you want to delete.
|
|
2
|
Click [Delete]
 [OK]. [OK]. |
 |
To change the settings of a Mail BoxYou can click [Settings...] on the screen displayed in step 4 to change the name and PIN for the selected Mail Box. Specifying the Mail Box Settings
|
Managing Documents Temporarily Stored in Memory RX Inbox
You can print or forward faxes and I-faxes that are temporarily stored in the Memory RX Inbox using Memory Lock.
1
Start the Remote UI. Starting the Remote UI
2
Click [Access Received/Stored Files] on the portal page. Remote UI Screen
3
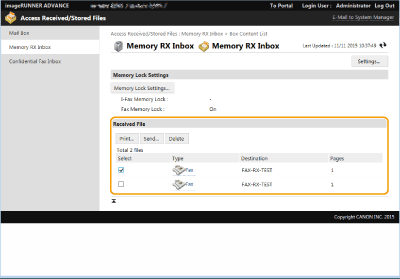
Select [Memory RX Inbox] and click [Memory RX Inbox].
If the page for entering a PIN is displayed, enter the PIN and click [OK].
4
Select the document and perform the desired operation.
Click the [Type] icon to display detailed information about the document.

 Printing a document
|
1
|
Select the check box for a document that you want to print, and click [Print...].
You can select multiple documents.
|
|
2
|
Click [Start Printing].
Documents are automatically deleted after they are printed.
|
 Forwarding a document
|
1
|
Select the check box for a document that you want to forward, and click [Send...].
You can select multiple documents.
|
|
2
|
Click [Select Destination], select the destination, and click [OK].
You can click [Move to Top], [Move Up], [Move Down], or [Move to Bottom] to change the order in which the files are forwarded.
You can click [Settings...] in [Set Details] to change the send settings. You can also change detailed settings of the file in [File Settings]. Scanning
If you select the check box for [Delete File After Sending], documents are automatically deleted after they are forwarded.
|
|
3
|
Click [OK].
|
 Deleting a file
|
1
|
Select the check box for the file that you want to delete.
|
|
2
|
Click [Delete]
 [OK]. [OK]. |
 |
To check I-faxes that were divided when receivedClick [Divided Data RX Inbox] on the screen displayed in step 3 to display a list of I-faxes that were divided when received. Receiving I-Faxes
To set a PIN for Memory RX InboxYou can change the PIN for the Memory RX Inbox by clicking [Settings...] on the screen displayed in step 4 and adding a check mark to [Set PIN].
To configure Memory Lock settingsYou can set whether to receive faxes and I-faxes in the Memory RX Inbox by clicking [Memory Lock Settings...] on the screen displayed in step 4.
|
Managing Documents Temporarily Stored in Confidential Fax Inbox
You can print or delete faxes and I-faxes that are temporarily stored in the Confidential Fax Inbox.
1
Start the Remote UI. Starting the Remote UI
2
Click [Access Received/Stored Files] on the portal page. Remote UI Screen
3
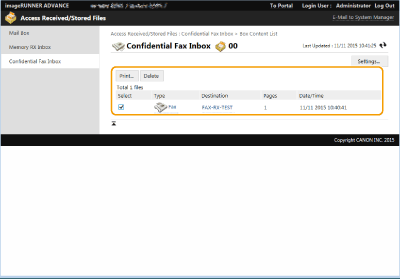
Select [Confidential Fax Inbox] and click the number of the desired Confidential Fax Inbox.
If the page for entering a PIN is displayed, enter the PIN and click [OK].
You can also specify a Confidential Fax Inbox by entering its number in [Box Number (00-49)] and clicking [Open...].
4
Select the document and perform the desired operation.
Click the [Type] icon to display detailed information about the document.

 Printing a document
|
1
|
Select the check box for a document that you want to print, and click [Print...].
You can select multiple documents.
|
|
2
|
Click [Start Printing].
If you select the check box for [Delete File After Printing], documents are automatically deleted after they are printed.
|
 Deleting a file
|
1
|
Select the check box for the file that you want to delete.
|
|
2
|
Click [Delete]
 [OK]. [OK]. |
 |
To change the settings of a Confidential Fax InboxYou can change the name and PIN for the selected Confidential Fax Inbox by clicking [Settings...] on the screen displayed in step 4.
|